Watercolor Quote Art

I just recently finished what might be one of my new favorite pieces of wall art.  It's for my niece, Bren's, room that my mom and I have been working on.  She and her family moved into a new house over Christmas and we were given the opportunity to get to decorate Bren's girly-girl room.  We have been working hard to pull it all together and plan on installing it all this Wednesday.  I can't wait to see how it all looks together!

The inspiration for this quote art came from Beth's (Bren's mom) Pinterest board that she had created for Bren's room.  The original pin can be found here and while I loved the quote itself, the colors of that piece of art just weren't going to work with the room we were planning.  So I had to get creative.  

I had already finished a little watercolor project for above Bren's bed, and thought it would be good to somehow tie those colors in with this piece of art.  One weekend during the Christmas holiday, I asked my Dad to make me a wooden canvas measuring around 2 feet by 3 feet.  When he finished it, we were ready to get started on KW's pantry, but I told him to give me just a second while I put on some quick paint that could be drying while we worked.  TWO HOURS LATER and I was finally finishing up with the base water color layer.  Chalk this up to one of those things that looks and seems a lot easier than it actually is.

watercolor
watercolor

I didn't take step-by-step pictures because I didn't really know what I was doing even as I was doing it.  Basically I blobbed paint on and then added a whole bunch of water and tried to strategically blend the colors together. 

I only watercolored the top of the canvas.  I had a general idea in my head of how I wanted this to go, but had no clue if it would work or not.  In my head, the sides would be painted later.

painted top

To add the quote, I cut out vinyl letters using my Silhouette SD.  I downloaded new software to use with the SSD so it took me forever to get these done.  I'm such a slow learner with techy stuff.  I used several different fonts and sizes to cut out all the words and roughly laid them out on the wooden canvas.  After three hours of working that night, I called it quits after getting the first row of words stuck down.

adding words
first row of words

I got back at it a few days later to finish it up.  I always hate sticking vinyl letters down because it's so hard to get them straight.  Stresses me out!  

I had told myself that if the canvas looked good with just the white letters on it, that I would leave it like that (and paint the sides somehow) instead of risking ruining it with the idea in my head.  The white letters didn't show up on the watercolor at all though, so I moved forward with my idea.

water color with letters
water color with vinyl letters

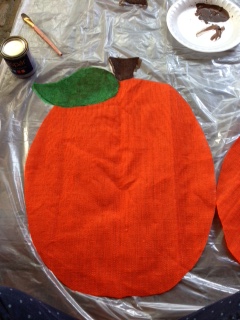
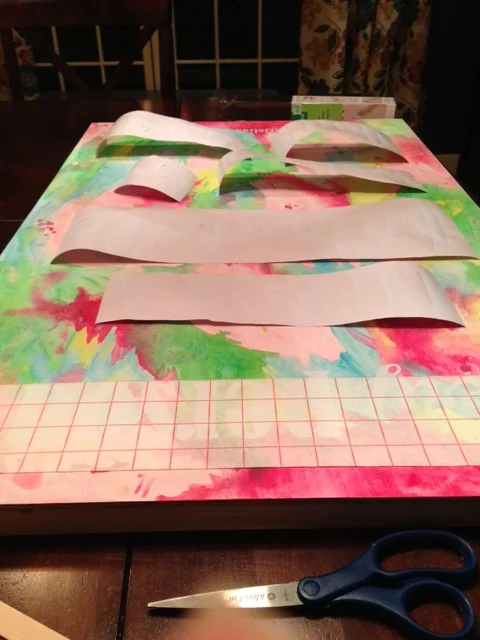
I laid the canvas out in the yard and got ready to spray paint.  I knew if this had any chance at all at being successful, I would have to do thin, thin, thin coats so that the paint wouldn't bleed under the letters.  I originally was going to use white spray paint but after seeing how much it blended in with the watercolors, I switched to silver paint for more contrast.  

This is the canvas after one coat of silver (on the left) and then after about four coats (on the right).

silver paint
silver paint

Then came the most nerve-wracking part of the process...time to peel off the letters!  Would this crazy idea work or was I about to have a messy silver bleed-through mess on my hands??  I really didn't want to have to start all over with another art project.

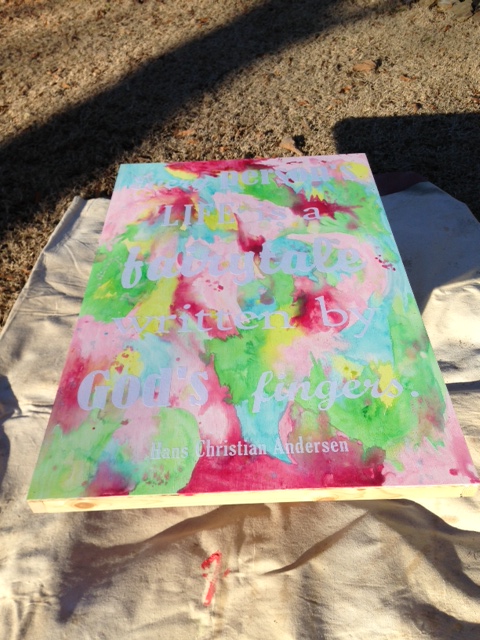
I chose the smallest thing to peel off first - the apostrophe - and miraculously, it peeled off perfectly with nice crisp lines!  Aww yeah!

peeling off letters
peeling letters

Within no time all of the letters were peeled off and Mom and I could stand back and get a good look at it.  I love the way it turned out!  These crappy iPhone pics in terrible lighting don't really do it justice, but in person the shiny silver paint is a good contrast to the watercolored letters.  I don't plan on adding a coat of polyurethane because I like the shiny silver up against the dull letters.

quote art
watercolor quote art

I love all the colors in the letters too.  And the quote is a pretty great one, don't you think?

If all goes well on Wednesday, I should have much better pics to show you soon of how it looks in Bren's room.  Fingers crossed it looks good against her pale pink walls!

Burlap Door Hanger Tutorial

It's finally time for the tutorial you've all (read: Allyson) been waiting for!  The truth is I've had these pumpkin door hangers done for a week or so now, I just haven't had time to crank out the tutorial.  (We're T minus 2 days from Katie Wynn's first birthday party, so I've been one busy mama!!)

We didn't read a tutorial when we made the burlap crosses a while back.  We just got some burlap, cut out our design, and got to painting.  And while that method did technically work, we ran into a bunch of bumps along the road and knew there was room for improvement.  When we got ready for round two, I did google around and try to find a good tutorial, but all of the ones I found followed the same method we'd just done.

So, with some trial and error, we came up with our own way of doing this.  I'm sure others have done it this way too, I just couldn't find this exact tutorial anywhere.  Here we go!

  Supplies:
Colored burlap (the natural color will work too, but it's easier to start with colored)
Elmer's glue
Paint (craft paint works, but leftover latex paint from other projects is better)
Paint brushes
Bendable wire
Hot glue gun and glue sticks
Plastic shopping bags

For this round, we purchase orange burlap to make some reversible pumpkins.  We also ordered red burlap for the next set.  Not sure what we'll make yet - candy canes? Valentine hearts? Who knows.

We had a yard and a half of burlap and, because we wanted to make three reversible pumpkins, needed to cut six pumpkins out of it.  I laid out the full yard and a half, folded it in half and cut it, and then cut the two halves into thirds so I would have six equally sized pieces.

1.JPG
2.JPG
3.JPG

Next, you need to prep your burlap.  Tip we learned: it's best to do this part with the burlap in a square/rectangle.  If you go ahead and cut out your shape, it will majorly ravel and distort the shape. 

In a bowl, mix your Elmer's (or generic) glue with water.  For our six rectangles, we used two full bottles of glue and a third of a bowl of water.  The more glue in your mixture, the stiffer your burlap will be.  (Next time I will probably use three for this much burlap.)   I just mixed the two together with my hand.

4.JPG
6.JPG

Now you want to soak each piece of burlap into the glue/water mixture and then wring it out.  We clipped ours to hangers and then hung them up to dry overnight.  You can see I kind of folded the rectangles to wring them out.  Oh, and note that the glue/water mixture turned orange so you'll need a separate bowl for each color of burlap you're doing.  It's also very drippy so put down some newspaper to protect your garage floors!  (Hanging outside on a pretty day would probably be better, but we had rain.)

8.JPG
9.JPG
10.JPG

The next day our rectangles of burlap were dry and stiff.  Not so stiff that they didn't bend at all, but much stiffer than before.  While they were drawing, my mom drew a pumpkin template out of newspaper for us to trace.   We traced the pumpkin on three pieces of burlap and then cut them out two at a time so that the fronts and backs of each pumpkin would match.

11.JPG
12.JPG

Next is the fun part: getting to paint and decorate your door hanger!  But here's a VERY important step: when you lay out your two sides, make sure you flip one over so that you have one front and one back.  This was a major uh-oh for us on the crosses as they did not match up correctly when it came time to put them together.  Also, the paint will go through - not as bad as if you hadn't soaked them in the glue, but still enough to ruin floors - so put a drop cloth or something underneath them.

13.JPG

I'm gonna walk you through how I painted our pumpkins in case you want to make a pumpkin door hanger too. :)

First up, I painted the stems brown.  Easy peasy.   Then I added the green leaf.  I had to free-hand in the shape of the leaf.  This is where I really noticed a difference in the kind of paint I was using.  I used craft paint for the stems and, because burlap is so dry and thirsty and craft paint can be kinda thick, it took a lot of dipping my brush into the paint to get enough to cover it.  For the leaf, I switched to some leftover latex paint and it was much thinner and smoother.  It went on my more easily.

14.JPG
15.JPG

For the front of my pumpkins, I wanted to just add polka dots so that they would be generic fall pumpkins.  Here's my favorite trick for getting perfectly round polka dots...just find a cup that you like the size of, dip it into some paint (I used the lid of the paint can), and then press it down onto your pumpkin (or whatever).  Like the bend and snap, it works every time.

16.JPG
17.JPG
18.JPG

Then you can just use a paint brush to fill in your circles. 

19.JPG
20.JPG

On the other three pumpkins (the backs), I painted on a jack-o-lantern face for a Halloween vibe.

23.JPG

Now, this next step is what I think really takes your burlap door hanger to the next step.  It's on all the professional ones that I've purchased but none of the tutorials that I read, but it's what really "wakes up" your design.  Ready for it?  Puff paint.  Yes, go dig out your box of leftover crafting supplies from the 90s and find your puff paint.  This is important. 

24.JPG

Use the puff paint to outline everything and give it more definition.  I outlined the stem, leaf, and all the polka dots and also outlined the outside of the pumpkin and added lines for the pumpkin curves (or lumps? or whatever you want to call them).  On the jack-o-lantern side, I did the same but also outlined the face and used green puff paint to add some vines because I thought it needed a little something else. 

25.JPG
26.JPG
27.JPG

Now would be time to add any other finishing touches you want.  Sprinkle on some glitter.  Stitch on some buttons.  Whatever. 

Once your paint has dried, you're in the home stretch.  The rest is really easy and pretty self-explanatory.  Line up the two sides of you pumpkin (or whatever) and run a bead of hot glue all the way around the edge (do small sections at a time) to glue them together.  Be sure to leave a small opening so you can stuff it!  

29.JPG
37.JPG
32.JPG

Use something like plastic grocery sacks for your stuffing.  (Newspaper might get soggy and wet if it's hanging outside.)  Stuff it as full as you'd like.  I think I used 13 sacks on each of out pumpkins.   When you've gotten it full, glue together your small opening.

35.JPG
36.JPG

Even though you cut out your front and back pieces together, there's a chance that by this point, they don't perfectly match up.  See how you can see orange around the green leaf below?  Take your scissors and do any necessary trimming to clean up your edges.

33.JPG
34.JPG

To make a hanger, I use bendable wire that can be found at Home Depot or Lowe's.  It comes in a package that has a cutter on it - nice and convenient.  :)  Pull off a piece about a foot long.  You should be able to poke the ends right through the burlap.  To finish it off, I wrap the ends around a pencil to make a cute little curly-q. 

38.JPG
39.JPG
43.JPG

Boom, you're done!  Get out your command hook and hang those babies, er pumpkins, on the door! 

45.JPG
47.JPG
44.JPG
46.JPG

You did it!  Yaaaay!  (Obligatory Katie Wynn + clapping pic.)

48.JPG

For reals though...if you make one, I wanna see it. 

Burlap Door Hanger

My mom and I got crafty this past weekend and tried our hand at making those burlap door decorations you see everywhere.  I love the "burlees" because they're cute, come in a huge variety of different designs, and they don't scratch up your doors.  Win, win, win!

This reversible pumpkin is the first one I ever bought and it might still be my favorite. 

pumpkin 1.jpg
pumpkin 2.jpg

The other two that I have are a Christmas stocking and the "It's A Girl" one from when Katie Wynn was born.  It hangs on her bedroom door now.

stocking.jpg
it's a girl.jpg

My mom's front doors are double doors so she always has to buy two door hangers.  She's got two cute Christmas ones in the shape of ornaments but I don't have a picture of them.  This past spring we both bought burlap door hangers that look like flower pots with three flowers in them.  These are not the official Burlee brand that you can buy in boutiques, but instead made by someone local.  They were ok, but neither of us LOVED them and by now we were ready for a change. 

I took pictures along the way of our process so that I could do a tutorial for you, but we know we did a few things wrong so I'm not ready to share the process yet.  We have plans to have another craft weekend and make more so I'll do a tutorial after we've worked out some of the kinks. 

Even with our mess-ups, though, I think our reversible crosses came out pretty cute!  We both have a side that is turquoise with big yellow polka dots.  I didn't take a good detail shot but the yellow polka dots are lined with small brick red polka dots.  Super cute up close.  (And looks really nice with those really dead ferns, no?)

The other side of my cross is yellow with brown polka dots and a blue and white striped trim.  And yes, it looks like a chocolate chip cookie.  That was not really intentional.

IMG_5171.JPG
IMG_5172.JPG

I think Mom's look great!  It's hard for her to find door decorations that are affordable enough to buy two and don't look silly having two side by side.  I think these work as a set of two and since we had all the materials already, you can't beat free! 

IMG_5160.JPG
IMG_5161.JPG

I need to take a close-up of her brick red side because it's really cute too.  

Now that we know we can do this and think we know how to do it better, the wheels are really turning in my head of all the different designs we could do.  I can't wait to get back at it!

Latch Board

Last week I made a new toy for Katie Wynn.  In all honesty, she's probably too young for it, but this toy is going to live at my parents' house and I have a feeling all of KW's cousins will enjoy playing with it too.  It's the perfect thing for us to keep out in my Dad's woodshop so that when the adults are building or painting or refinishing, the kids have something to do. 

The toy is a latch board, like this one that John and Sherry did on Young House Love

I used a piece of scrap wood that we already had, so the only thing I had to buy for this project was a whole bunch of latches.  I probably could've scrounged around the woodshop to find old ones but when I originally planned this it was gonna be a birthday gift for someone so I bought new ones.  (And obviously I ended up buying something else for the birthday gift.)  I chose to go with latches in different finishes to mix it up a little and I got them in bigger sizes than what John and Sherry used. 

After cutting the scrap board down to size, my mom put two coats of paint (on both sides) on it for me.  Then, the hardest part of this whole DIY was figuring out the arrangement of all the latches.

1.JPG
2.JPG

I had randomly grabbed this package of hook and eye closures to use in as filler if we needed them.  I'm glad I did because we ended up using all three of them in blank spaces.

3.JPG

After getting the arrangement figured out, then it was just a matter of screwing them all in place.  Easy peasy!

Latches closed...

Latches closed...

Latches open!

Latches open!

To finish it off, I adhered some small bumpers on the back so that the wood wouldn't scratch up any floors.  I know I said this toy was for out in the shop but I couldn't resist taking it inside to see what my little girl thought of it. 

7.JPG
8.JPG
9.JPG
11.JPG

So far it's a hit!  And I think she'll only grow to love it more when she figures out how to work the harder latches.  Right now, she's perfectly content with flipping the hinges back and forth.  :)  Yay for quick and easy projects!

Handwritten Dish Towels

Before we dive into the tutorial of how I made the most awesome Handwritten Recipe Dish Towels ever for Mother's Day, let me preface this post by saying I get zero, ZERO, credit for this brilliant idea.  The original idea came from the Spoonflower Blog.  And it was Allison that brought it my attention when she asked for a little sewing help last Christmas so she could make these for her mother.  I gladly helped and also filed the idea away for me to use later on. Spoonflower, if you're not familiar with it, is a website that allows you to create your own fabric from anything you upload.  It's pretty much the coolest thing ever.  I'm trying to figure out what all I could make from my own personalized fabric. 

Anyway.  This brilliant idea was to scan old recipes, print them onto fabric, and then sew them into usable dish towels.  And, to make it more memorable, I chose recipes that were written in my grandmother's handwriting (another suggestion from the spoonflower blog).  Getting my hands on these old recipe cards was definitely the hardest part.  I had to sneak into my mom's kitchen while she wasn't there.  I had no idea how I would get some from Doc's mom but, as luck would have it, he actually ended up traveling there the week before Mother's Day and I was able to put him (and his dad!) to work sneaking around her kitchen.  Operation: Steal Old Recipe Cards was a success!

The next step was to get them all scanned in and resized to the right measurements.  Special thanks to Allison for her help on this step so I didn't have to try to sneak back into my mom's house to use her rickety old scanner.  After they were turned into digital files, they just had to be uploaded on the Spoonflower site so they could be printed on fabric.  Detailed instructions for this step can be found here.  If you're smart, you'll plan ahead so you'll have plenty of time to order your fabric and wait for it to come in with plenty of time before you need to give your gift.  Don't be like me and wait until the week of to get it done.  Trust me, you'll pay an exorbitant amount to have it rushed. 

Moving along.  Here's how the fabric looked when it arrived.  Each yard - I had five total - had four different recipes printed on it.

Here's a close up of one of the quadrants.  My grandmother always wrote recipes on this same pad of paper - from the bank she retired from - and I love it.  I love that not only are they in her handwriting, but her hometown and where she worked are printed on there too.

Doc's mom's recipes were almost all on traditional recipe cards.  We didn't do any touch-ups to them after scanning them in, so every smudge and drop of ingredients that are on the actual paper recipes are printed on the fabric recipes too.

First step to turning these into dish towels was obviously to cut the four recipes apart.

I had already purchased five yards of white terry cloth to use as a backing so they'd be extra absorbent.  After cutting the four squares from the first yard, I placed them face down on the terry cloth and cut it out too.

Then I just did a simple stitch all the way around (except for leaving an opening to turn it out) to sew the two together. 

Here's how they looked after that first round of sewing and turning them rightside out.  Quite a wrinkled mess!

Thankfully, they easily ironed back flat.

The last step was to top-stitch all the way around to give the edge a more finished look.

And voila!  Done!

Here is one of the towels I gave my mom folded over so you can see the difference in the two sides.

Up close, you can see the top-stitched edge.

Here's one that I gave Pat that was on a recipe card.  Just looks like a giant card now!

Some of hers were two-sided recipe cards, so instead of adding terry cloth to the back, I just sewed the two sides of the card together. 

I like this one of hers too.  It was written by Anna a few years ago.  I love her little kid handwriting!  My mom has lots of recipe cards that I wrote out for her when I was little...wish I'd thought to scan one of them for her!

I love this one too even though I cut off some of the words in my sewing.  Looks like it's gotten lots of use in the kitchen! 

Each of the women - my mother and mother-in-law - received a stack of dish towels for their kitchen. 

I think they were both really surprised and excited about the gift!  I know I loved them.  I might've kept two with my grandmother's handwriting for myself.  :)  I've seen them out in my mom's kitchen the last couple times I've been over there so I know she's already put her's to use.  The best part is, I think the fabric will get even softer and more absorbent the more they're washed.  Gotta love a gift that gets better with age!