It's finally time for the tutorial you've all (read: Allyson) been waiting for! The truth is I've had these pumpkin door hangers done for a week or so now, I just haven't had time to crank out the tutorial. (We're T minus 2 days from Katie Wynn's first birthday party, so I've been one busy mama!!)
We didn't read a tutorial when we made the burlap crosses a while back. We just got some burlap, cut out our design, and got to painting. And while that method did technically work, we ran into a bunch of bumps along the road and knew there was room for improvement. When we got ready for round two, I did google around and try to find a good tutorial, but all of the ones I found followed the same method we'd just done.
So, with some trial and error, we came up with our own way of doing this. I'm sure others have done it this way too, I just couldn't find this exact tutorial anywhere. Here we go!
Supplies:
Colored burlap (the natural color will work too, but it's easier to start with colored)
Elmer's glue
Paint (craft paint works, but leftover latex paint from other projects is better)
Paint brushes
Bendable wire
Hot glue gun and glue sticks
Plastic shopping bags
For this round, we purchase orange burlap to make some reversible pumpkins. We also ordered red burlap for the next set. Not sure what we'll make yet - candy canes? Valentine hearts? Who knows.
We had a yard and a half of burlap and, because we wanted to make three reversible pumpkins, needed to cut six pumpkins out of it. I laid out the full yard and a half, folded it in half and cut it, and then cut the two halves into thirds so I would have six equally sized pieces.


Next, you need to prep your burlap. Tip we learned: it's best to do this part with the burlap in a square/rectangle. If you go ahead and cut out your shape, it will majorly ravel and distort the shape.
In a bowl, mix your Elmer's (or generic) glue with water. For our six rectangles, we used two full bottles of glue and a third of a bowl of water. The more glue in your mixture, the stiffer your burlap will be. (Next time I will probably use three for this much burlap.) I just mixed the two together with my hand.


Now you want to soak each piece of burlap into the glue/water mixture and then wring it out. We clipped ours to hangers and then hung them up to dry overnight. You can see I kind of folded the rectangles to wring them out. Oh, and note that the glue/water mixture turned orange so you'll need a separate bowl for each color of burlap you're doing. It's also very drippy so put down some newspaper to protect your garage floors! (Hanging outside on a pretty day would probably be better, but we had rain.)


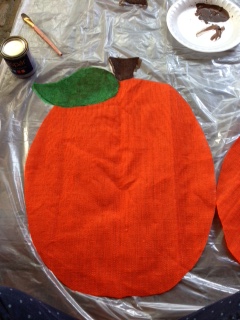
The next day our rectangles of burlap were dry and stiff. Not so stiff that they didn't bend at all, but much stiffer than before. While they were drawing, my mom drew a pumpkin template out of newspaper for us to trace. We traced the pumpkin on three pieces of burlap and then cut them out two at a time so that the fronts and backs of each pumpkin would match.


Next is the fun part: getting to paint and decorate your door hanger! But here's a VERY important step: when you lay out your two sides, make sure you flip one over so that you have one front and one back. This was a major uh-oh for us on the crosses as they did not match up correctly when it came time to put them together. Also, the paint will go through - not as bad as if you hadn't soaked them in the glue, but still enough to ruin floors - so put a drop cloth or something underneath them.

I'm gonna walk you through how I painted our pumpkins in case you want to make a pumpkin door hanger too. :)
First up, I painted the stems brown. Easy peasy. Then I added the green leaf. I had to free-hand in the shape of the leaf. This is where I really noticed a difference in the kind of paint I was using. I used craft paint for the stems and, because burlap is so dry and thirsty and craft paint can be kinda thick, it took a lot of dipping my brush into the paint to get enough to cover it. For the leaf, I switched to some leftover latex paint and it was much thinner and smoother. It went on my more easily.

For the front of my pumpkins, I wanted to just add polka dots so that they would be generic fall pumpkins. Here's my favorite trick for getting perfectly round polka dots...just find a cup that you like the size of, dip it into some paint (I used the lid of the paint can), and then press it down onto your pumpkin (or whatever). Like the bend and snap, it works every time.


Then you can just use a paint brush to fill in your circles.


On the other three pumpkins (the backs), I painted on a jack-o-lantern face for a Halloween vibe.

Now, this next step is what I think really takes your burlap door hanger to the next step. It's on all the professional ones that I've purchased but none of the tutorials that I read, but it's what really "wakes up" your design. Ready for it? Puff paint. Yes, go dig out your box of leftover crafting supplies from the 90s and find your puff paint. This is important.

Use the puff paint to outline everything and give it more definition. I outlined the stem, leaf, and all the polka dots and also outlined the outside of the pumpkin and added lines for the pumpkin curves (or lumps? or whatever you want to call them). On the jack-o-lantern side, I did the same but also outlined the face and used green puff paint to add some vines because I thought it needed a little something else.


Now would be time to add any other finishing touches you want. Sprinkle on some glitter. Stitch on some buttons. Whatever.
Once your paint has dried, you're in the home stretch. The rest is really easy and pretty self-explanatory. Line up the two sides of you pumpkin (or whatever) and run a bead of hot glue all the way around the edge (do small sections at a time) to glue them together. Be sure to leave a small opening so you can stuff it!


Use something like plastic grocery sacks for your stuffing. (Newspaper might get soggy and wet if it's hanging outside.) Stuff it as full as you'd like. I think I used 13 sacks on each of out pumpkins. When you've gotten it full, glue together your small opening.


Even though you cut out your front and back pieces together, there's a chance that by this point, they don't perfectly match up. See how you can see orange around the green leaf below? Take your scissors and do any necessary trimming to clean up your edges.


To make a hanger, I use bendable wire that can be found at Home Depot or Lowe's. It comes in a package that has a cutter on it - nice and convenient. :) Pull off a piece about a foot long. You should be able to poke the ends right through the burlap. To finish it off, I wrap the ends around a pencil to make a cute little curly-q.


Boom, you're done! Get out your command hook and hang those babies, er pumpkins, on the door!


You did it! Yaaaay! (Obligatory Katie Wynn + clapping pic.)

For reals though...if you make one, I wanna see it.