DIY: Four Frames

Confession: I started this DIY project when I was still pregnant.  My baby is eight months old now so yeah, it's taken me a while to get it finished.  Oopsie. If you've been reading for a while, you may remember that when we were preparing to move into our current house, I said the only two rooms I was focusing on were the nursery and our master bedroom.  Well, the nursery was a success.  As for the master, I bought new bedding and that's about it.  The bedding colors were really hard to match and I was running out of steam.

One afternoon I decided I'd just make some frames out of scrap wood and paint them to match the bedding.  Most everything in our room is a neutral gray except for the pops of color in our pillow shams, and I wanted to bring those colors out somewhere else.

I found some scrap wood and cut it down to 16 boards of equal length (four boards for each frame, four frames total).  I angled the edges using our miter saw and then used a kreg jig to attach them on the back side of the frames.

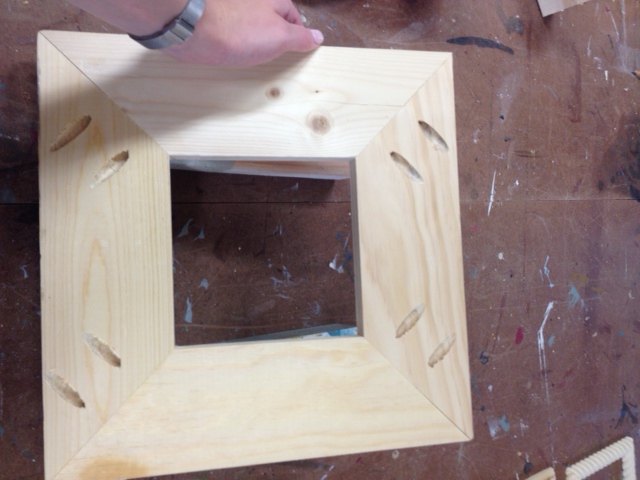
The saw blade on our miter saw is not the best for this step, so wood putty is always my best friend.  Fill those cracks and no one will know any different.

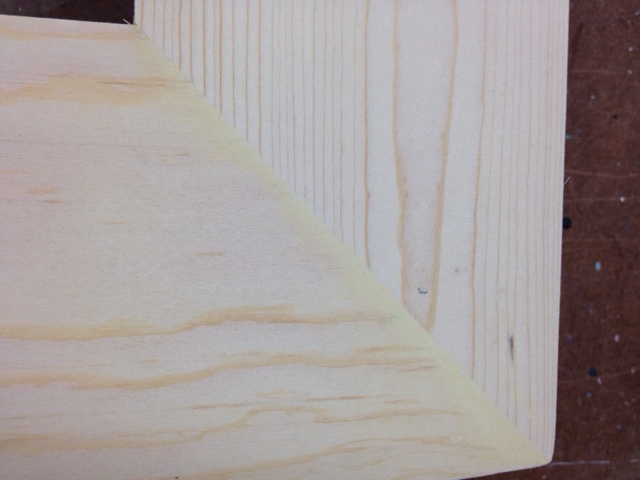
Here's the view of the front after all four pieces had been attached and the seams wood-puttied.

Next, I dug out some scrap molding and cut it down to size.  I only had three different styles so two are just alike.  I mitered the edges the same way as above, but for these I just used wood glue to hold them together.  They are slightly smaller than the opening of the frame above.

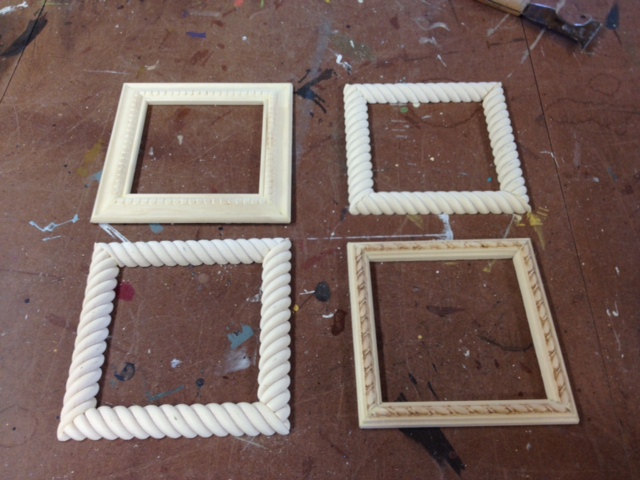
My next step was to put a base layer of paint on each of the 8 frames (4 large frame bases, 4 frames of molding).  I had already had some paint color-matched to our pillow shams and brushed a coat on each piece.  I must've been too lazy to take a picture of this step.

That's when I hit the pause button.  For a really long time.  Like, long enough to have a baby and her grow for about 6 months...

Finally, I revisited this project so I could finish it.  My plan all along had been to stencil some designs on each frame so they wouldn't be so plain.

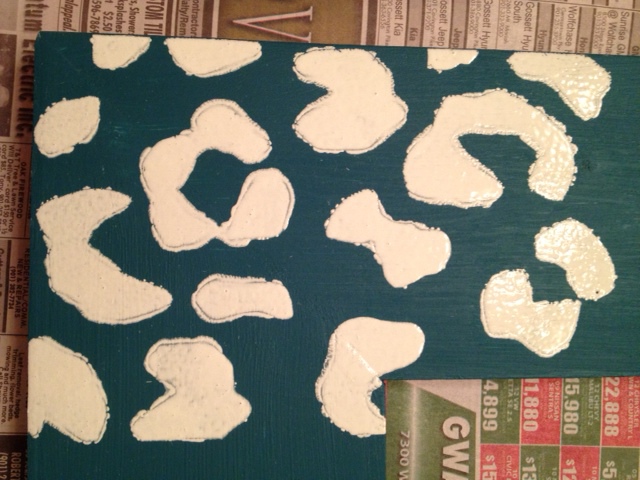
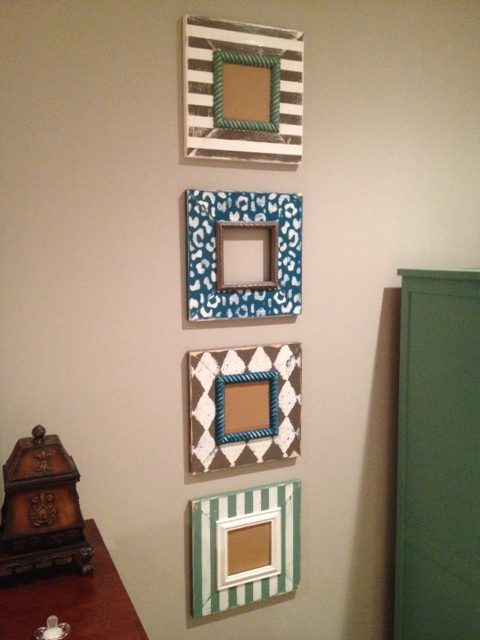
I started with the dark teal frame and used white paint to stencil on a leopard (cheetah?) print.  Don't judge.  I was limited in my stencil choices.

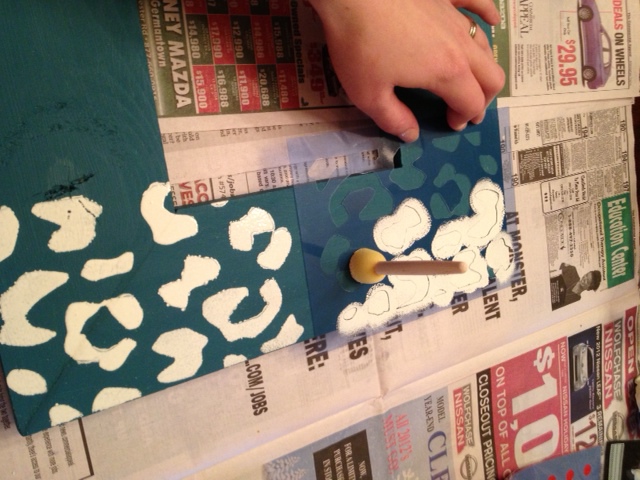
As you can see, I'm not a very good (read: patient) stenciler and had a lot of bleed through.  Not a big deal since I was also planning on doing some sanding in the next step.

Since I didn't really have any other good stencils, I taped off some stripes with painter's tape on the lighter blue frame.  I painted the stripes with white paint.

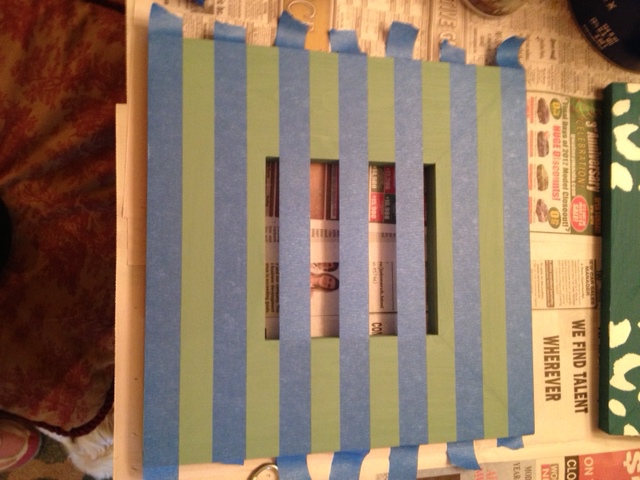
I also taped stripes on the white frame and painted on some tan stripes.

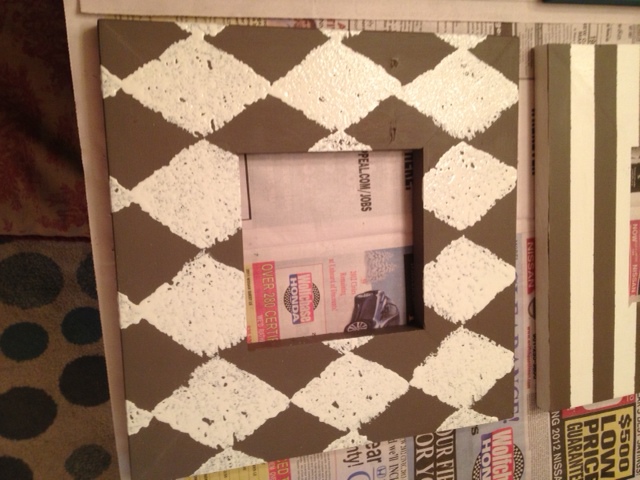
For the fourth and final frame, I used a sponge stencil and added white diamonds to the tan frame.  This one drives me nuts because I didn't get my spacing centered.  Gah!

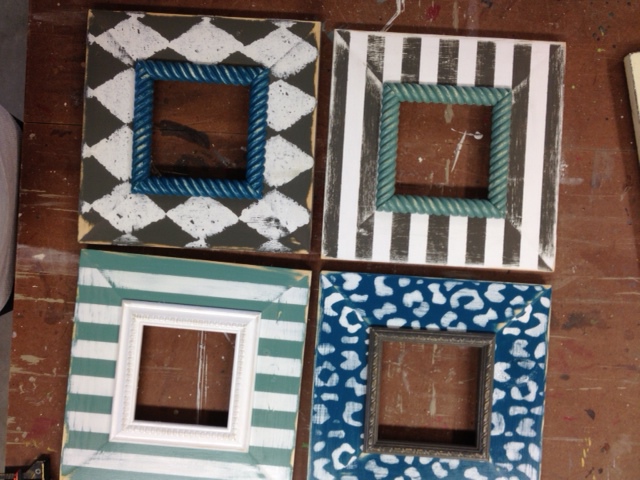
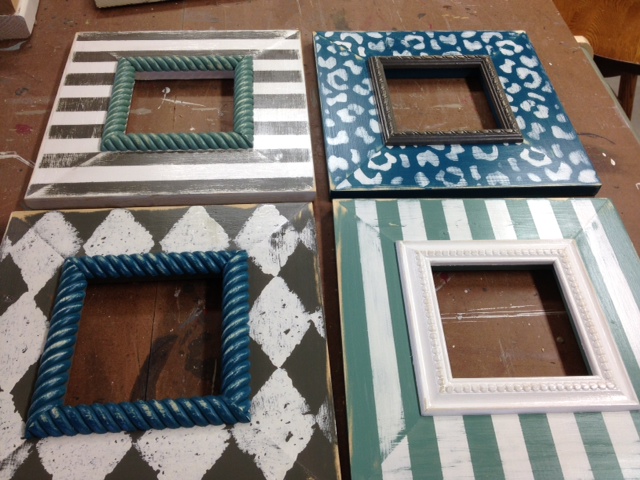
The molding frames just stayed a solid color.  After the stenciled designs were dry, I gave all four frames a good sanding to distress them a little bit, and then glued the molding frames onto the base frames.  The molding frames being just a little bit smaller than the opening in the big frame created a little lip to hold in a picture.

I switched up the colors when I added the molding so that they'd all coordinate.

After sanding and adding a quick coat of polyurethane.

To finish them off, I added a claw picture hanger to the back of each one.

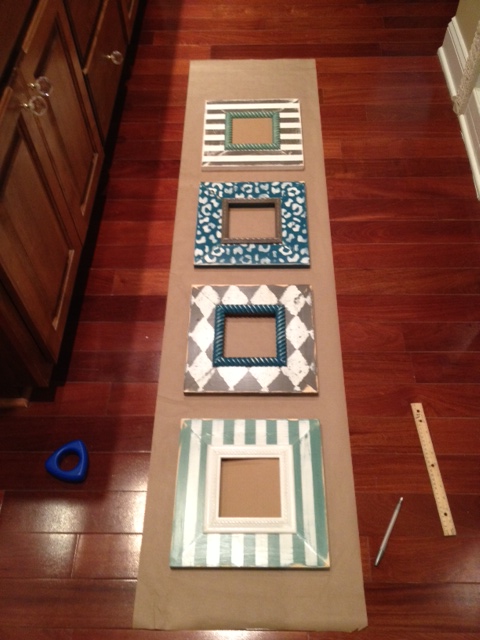
There was another pause that lasted about a month until I finally got around to hanging them up in our room.  To get my spacing right, I rolled out a long piece of brown craft paper and lined them up on it.  I used a ruler to make sure they were centered and evenly spaced.  Once they were in the right spot, I traced around them and added a dot where the nail should go.

Just as I was finishing marking the last one, my little helper came in to show me how she would do it if it were her project.  I didn't have the heart to tell her that was a pretty dumb way to figure out picture frame spacing.

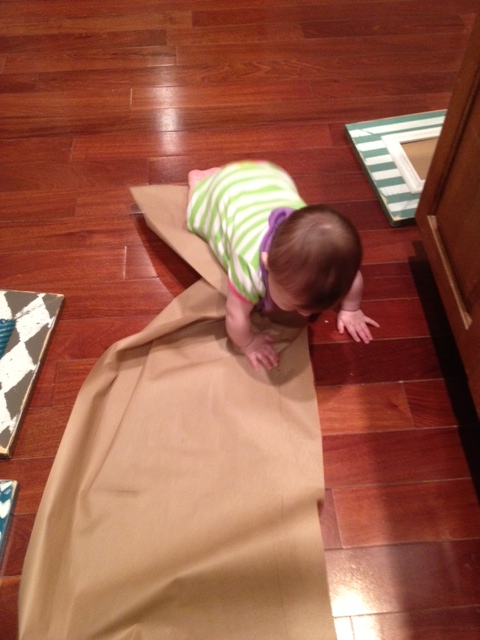
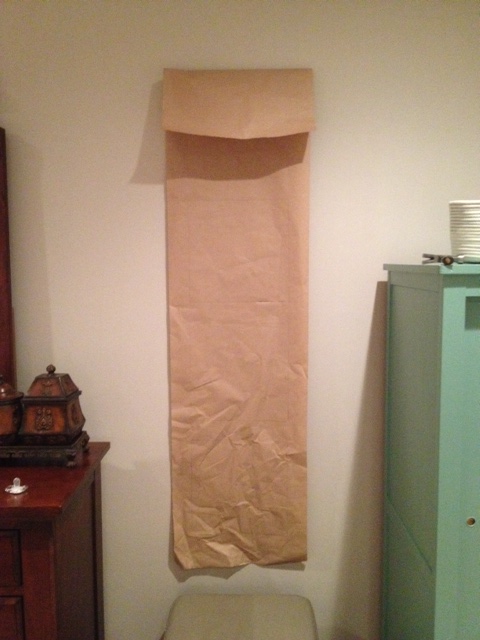
I hung my brown paper on the wall and let gravity help me get it hanging straight.  That wrinkled part at the bottom was my helper's contribution.

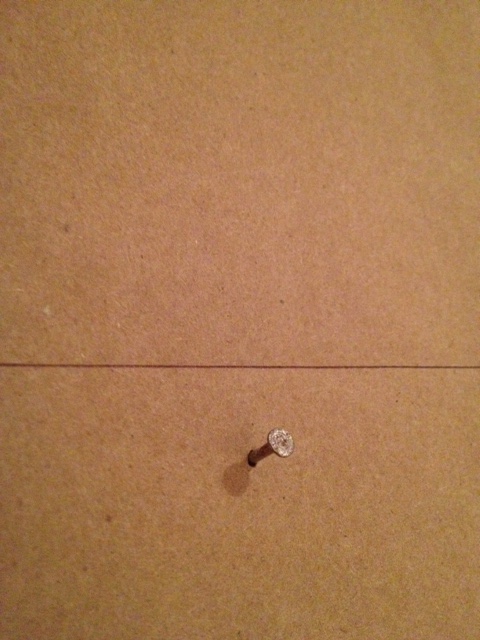
Since I had marked my nail holes on the paper, all I had to do was tap four nails in directly through the paper.

Then I just ripped off the paper and hung the frames up!  I don't love, love them but I'm ok with them.  I do love that we finally have something up on the wall and that it adds some color.

At some point, one of my helpers (my money's on the furry one) ran off with one of my cardboard backing squares.  That's why the second one down is empty.

I suppose the very last step is to put pictures in the frames.  Nope, still haven't done that, even though they've been hanging up for about three weeks now.  I just can't decide which ones to use!

And I still owe you a tour of our room, especially since it's where we spend the majority of our time.  It's far from finished, but I guess I could do an in-progress post.  Maybe I'll work on that this week...

Wrap-Tastic

  Ever since we moved into our new house, I've been searching for the perfect spot to store all of my wrapping paper and ribbons.  At the old house, I stored them in two long, skinny tupperware containers under our bed.  I guess the carpet in our master bedroom is more plush in this house (causing the bed to sit lower) because they won't fit under there now!  For months, the two storage containers have been on the very top shelf in our closet, and every time I have to wrap a present I have to drag out a stool and climb up to retrieve all of my supplies.  Such a pain!

So when my friend Emily said she was getting rid of this wardrobe that they were no longer using, I quickly volunteered to take it off her hands.  Can't beat a free piece of furniture!  Especially since I already had a plan for it.

They had purchased it at a second-hand store years ago and it was still in really good condition.  We replaced the bottom shelf but other than that, it was pretty structurally sound.  It came with two doors but I had already removed them before I snapped my before picture.  Oops.

My original plan was to give it a quick sanding before slapping on a couple coats of paint and then distressing it so the brown stain would show through.  The problem with that was that it was stained a deep red-brown and the stain bled through my paint.  Darn you, cherry stain!

So I had to back up and break out the primer.  I hate priming things, but sometimes you just gotta do it. 

In the picture below, you can see how bad the stain was seeping through.  This was after just one coat of primer.  We ended up having to do three coats and still weren't sure if we'd blocked it enough.

I already had my paint color on hand.  It's some that I had color matched to our curtains back when we moved in, so it doesn't have a real name.  Kinda blue-greenish, maybe?  Thankfully, after two coats of it, there was no more sign of red stain!  Hooray!

Painting was the quick and easy part.  The next part was trickier - figuring out how it could become the perfect wrapping paper storage wardrobe.

I decided to add peg board to the top half of the inside.  This was only hard because we couldn't screw through the back and sides since they'd show on the outside.  With my Dad's help, we managed to get the peg board attached securely without damaging the exterior.

I hit up Lowe's to purchase the rest of the supplies to outfit the inside.  I bought two black garbage cans, one wire basket that could hang on the peg board, and twenty long pegs.

Then came my favorite part: filling it up with all of my supplies!  The 20 long pegs now hold all of my different ribbons and the wire basket holds tape, scissors (if I could find them), and gift tags.  One garbage can is just for Christmas wrapping paper while the other one holds all other wrapping paper as well as tissue paper.  Gift bags are organized by occasion and size on the right side and gift boxes are stacked in front.  I hope I can actually keep it this clean and organized!

The very last step was just putting the doors back on.  Rather than being hinged, these doors sit in a track and slide from side to side.

I can still easily access everything I need...

...from either side.  I've already wrapped two gifts with my freshly organized supplies and it was great!

Total cost of this wrap-tastic storage wardrobe was only about $40, and that was just for the pegs and garbage cans at Lowe's since we already had paint, primer, and the furniture was free!  Can't beat that.  Now I just need to find some fun stuff to go on top of it so it doesn't look so plain sitting in the corner of our room.  Guess I'll have to go shopping...

I'm not the only one that's thrilled with this new setup.  The now-empty storage tubs that used to hold all my wrapping supplies quickly became Katie Wynn's new favorite toy!

She spent the better part of Sunday afternoon cruising around the carpet in her tupperware "boat."  Love that sweet girl and her silly face!

If you're like me and in desperate need of a place to store all of those wrapping tidbits, might I suggest looking for a wardrobe?  It was super easy to convert!  I think I may be way more excited about this than a normal person should be.

3 Kids, 2 Rooms

Many of you know my friend Emily, and that she just recently welcomed a precious set of twins to her family.  They joined their two and half year old sister, Alice, and all three of them are just the cutest things ever!

Well, back in December before those twins made their debut, my mom and I spent a little bit of time helping Emily get rooms ready for her growing family.  At the time, Alice was still sleeping in her crib, but that crib was needed in the nursery so it was time to make the switch to a big girl bed.  Emily thought it would be a good time to give Alice's room a mini makeover and you know I jumped at the opportunity to help!  Em had already scheduled for the two rooms to be painted, and then she asked if me and/or my mom would be willing to sew some curtains to hang in them.  I'm pretty sure she was just going to leave it at that (she was busy chasing after a toddler while being very pregnant with twins, afterall) but Mom and I decided to do just a little bit more.  Not a whole lot, just a few extra touches here and there.

Emily and her husband, Andrew, were leaving to go out of town for a few days, so I told her to leave me a key so we could come in and do some work.  We brought Dad with us the first night we went over so he could hang the curtain rods.  We rounded the corner to Alice's room and were met with something like this:

Woah, boy.  We had some work to do.

I gave Dad a chair to stand on and told him to get to work on the curtain rods while Mom and I got busy organizing.  See that blue table and lamp with the yellow shade in the picture above?  Those were supposed to be Alice's bedside table and lamp.  Except that Emily had chosen a pale pink and orange color scheme, so I just couldn't in my right mind leave those the way they were.  I threw the table in the back of the car and thought at the very least that a coat of white spray paint would help.

I'll spare you the play-by-play details, but here's the gist of what we did in Alice's room: added the curtains (Emily had already purchased the fabric), made a matching bed skirt, corralled all her toys onto a book shelf, painted the bedside table and added a new lamp.  Alice also inherited a new dresser (painted by her grandmother) since the changing table was also moving to the nursery.  Her headboard was painted to match the dresser.

Now, normally I am 100% opposed to furniture blocking a window, but in Alice's room it just made the most sense.  Actually, there was a much cuter arrangement, but it left no floor space for playing.  And every toddler needs some floor space to play on, right?  So the dresser was pushed in front of the window.  Luckily, Emily said the blinds were always kept closed anyway.

Since Alice had just transitioned from the crib, the bed rails were a necessity.  I'm sure the bed will look better once she doesn't need them anymore!  And you can see the table that got spray painted white and a new lamp I added.

Like I said, Mom made a bed skirt to match the curtains.  We just couldn't let Alice have a bed frame with no skirt to hide it!

Here is where all the toys landed - on a shelf in the corner.  It'd probably look better painted white or pink like the dresser.  Maybe if I'm feeling it up for it I'll steal it from Emily one day and give it a makeover.

That was it for Alice's room.  We really didn't do much and I hate that we couldn't do more.  I know Emily has since added some cute art to the walls along with adding a cute bean bag that Santa brought Alice.  I'm always on the lookout for the perfect rug (at the perfect price!) to add; I think it could make a huge difference in the feel of the room!

Across the hall is the new nursery.  Boy/Girl twins obviously make decorating the room a little trickier, but Emily picked the perfect neutral color scheme: grey and yellow.  Like Alice, they have an oddly shaped room so furniture placement is tough.  The best layout, we decided, was to have both cribs coming out from the wall with the changing table in between them.  Hopefully this is a practical set up too!

Emily already had the cute alphabet that's hanging on the wall above the cribs.  In fact, it was hanging up at the baby shower she hosted for me.  I love the way it looks above the cribs!

Emily never decided on bedding (I probably drove her crazy bugging her about it!) so Mom and I finally just took action and bought fabric for the crib skirts.  (It's grey with white dandelions.)  Thank goodness Mom knows her way around the sewing machine!  Since the sheets were just white, we jazzed them up a little by adding the twins' monograms to them.


We were at Target one day and saw a pack of receiving blankets that were grey and yellow, and being suckers for all things that match, you know we had to buy them.

If you're wondering where the yellow in this grey-and-yellow room is, trust me...it's there.  I LOVE the chevron curtains that Emily chose.  I think they look great against the grey walls!

There was also a wooden bookshelf in this room that I stole and painted yellow.  Of course, then I couldn't find anything to actually sit on it when I brought it back over, but I'm sure Emily has since found plenty of things to put on it.  The frame above the bookshelf is one we made out of a piece of coordinating scrap fabric.  I know for sure that a picture of the twins has already been added to it.

The last thing we added to the nursery were these two white shelves.  I knew Emily had received these cute little shoes as a shower gift, and since I love Katie's shelf full of shoes so much, I thought the twins needed the same thing for their nursery.

Again, we didn't do much, but I think it at least helped take some of the stress off Emily when it came to getting everything ready for the babies.  I know several of you had asked about these pictures waaay back when we did it, so I apologize for taking so long to get them posted!!

Candy Butterfly

Friends, I've got a quick and easy craft project for you and hopefully I've given you enough time to do it before Easter on Sunday.  I was able to whip up about 15 of these cute candy butterflies last night in about thirty minutes.  

The idea came from Pinterest, of course, but when I clicked on the picture to take me to the original source, I found the instructions weren't in English.  So I had to figure it out on my own.  Wasn't hard though.

First, I gathered my supplies.  If you're a crafter at all, there's a good chance you could have most, if not all, of these on hand already.  Cute scrapbook paper (I used less than a fourth of a piece), clear bags (found mine at JoAnn's; they're Wilton brand), googly eyes, pipe cleaners, glue stick, clothespins.  Not pictured is the candy.  I used M&Ms but any small colorful candy would work.

The first thing I did was flip my scrapbook paper over and trace around the edge of a clothespin.  You can see I just lined it up in the corner and traced the remaining two edges.

I figured it'd be easiest to go ahead and cut a long strip to the right width, so I grabbed a ruler and took my line down further.  After cutting out the first strip (from the clothespin I had traced), I used it as a pattern to cut all the others.  I was not a perfectionist about straight cuts at all and you can't tell.

I found the easiest way to stick the paper to the clothespin was to rub the glue stick onto the clothespin and then stick the paper on top, as opposed to trying to rub the glue stick onto the tiny piece of paper (it just crumbled up when I did that).

The next step was adding the googly eyes.  I wasn't sure if the glue stick was going to be strong enough to hold them on, but turns out it was.  I just swiped the end of the clothespin with the glue stick and stuck them down.  Make sure it's the end that open and closes.

Here are my googly eyed clothespins dressed and ready for wings!

Next, I took my bag and filled it with candy.  It was trial and error before I figured out about the right amount to add.  Oh, I did try ziploc bags and they do work, but they make much floppier wings and they take a lot more candy to fill up.  These Wilton bags were perfect.

This is the part I wasn't sure about from just looking at the picture on Pinterest.  Not sure how they did it, but all I did was lay my bag of candy down flat and fold the top edge over.  The bag was pretty much folded in half.

Then I parted my sea of M&Ms down the center.

After that, it was just a matter of clipping that middle section of the bag with the clothespin.  It's a tight snug fit which keeps the bag good and closed.

The finishing touch is definitely the antennae.  I cut my pipe cleaners in half first so they wouldn't be too long.  Then I folded it in half and curved the edges around a little bit.

Finally, I clipped the antennae into the mouth of the clothespin.  Done!

I think they turned out really cute!  (Cuter than some I've seen on Pinterest even!)  I made blue, yellow, and pink antennae.

One last look at the finished product (sorry for the iPhone pics).

I made these for my niece and nephews, but then decided to make more so I could give them to my coworkers.  They were a hit!  Hey, adults like candy in cute packages too.

If you're looking for a little something to hand out to your kids' classmates or Sunday school class or whatever, these are perfect.  (If they can have candy, that is.)  And they take no time at all!  (If you live near me and need some bags, give me a call.  I bought a package of 100 and have plenty left over.)  Obviously I chose to do these for Easter but I think the great thing about this craft is that, with different colored candy, scrapbook paper, and pipe cleaners, it can be done any time of year!

Baby Mobile

It's been a while since we had a craft project around here, hasn't it?  My sincere apologies!  I assure you, though, that we are still crafting away.  I just haven't had time to document much lately.  And it takes much longer to complete a project.  I can't imagine why! With all that said, today's craft project comes from back before Miss Katie Wynn graced us with her presence.  In the very near future, I will be packing it away and I just realized that I hadn't even shared it with you all yet!  And that's a shame because it's really cute.

Remember the antique bassinet that I purchased back in the summer and spruced up?  Well, as cute as it is on its own, it still needed a little something to make it even cuter.  I may have even mentioned in that post that I had plans to add a mobile.  Plans I had.  Time and energy I did not.  I had made my dear sweet mother very aware of my plans.  We had even talked through the process and purchased supplies.  But, between moving houses and being very pregnant, I could not make myself get this one last project done.

So my mom did it for me.  Isn't she the best?

The plan was birds.  Yep, just birds.  I wanted it simple and sweet.  And white and pink.  While I was at work, Mom cut the cutest little bird shape out of pink and white felt.  Each bird shape then got a wing in the opposite color added to it and decorated with some cute tiny buttons.  She made two sides per bird, added a little stuffing between them, and then hand-stitched them together.  The circle that they're hanging from is an embroidery hoop that she covered in white yarn.

Excuse the crazy shadows that the lattice wicker from the bassinet casts.  For the last six months, the bassinet has sit in a little corner in our room.  Our master has a sitting room that's divided by a small wall and the wall made the perfect little nook for our peanut to sleep in.


Full disclosure: I did a lot of picking up to take that picture.

Let's focus on those little birdies, shall we?

Cute little things, aren't they?  There are six total - three white and three pink.

I couldn't help but lay down so I could see how the mobile looked from Katie's point of view.

I mean, I wouldn't mind watching those birds fly over my head.  Would you?  The best part is that it weighed virtually nothing, so I had absolutely zero fear of it hurting her if it ever fell.  Not that it could have fallen, but still.

Anyway, now that Katie Wynn's sleeping in the crib in her room, we don't have much need for the bassinet in our bedroom anymore.  I already have a piece of furniture that I'm going to refinish to take it's spot in the bedroom.  And when it goes, the birdie mobile will too.  Sad day.  I'd love to hang it in her room, I'm just not sure where it could go.  Hmmm...I may have to do some brainstorming.