Our Handmade Hideaway

For the last couple of years, we've been talking about wanting to build some kind of playset for the kids in our backyard.  We briefly looked at purchasing one but thought that we could DIY one that might suit our needs better.  About a year ago, I started following Ashley and Jamin from The Handmade Home and was excited to discover what they call their Handmade Hideaway.  [Photo below belongs to them.]

handmade hideaway 1.jpg

Isn't that the cutest little playhouse you've ever seen?  And the best part is that while they were building it for their three kids, they photographed the process and wrote detailed blog posts about how they did it so others could do it too.  In fact, check out #handmadehideaway on Instagram to see LOTS of different versions of their hideaway.  Some variations are really, really cool and others are...not.  

I thought about drawing up some kind of playhouse plans of my own, but the more Matt and I looked at theirs, the more we thought it would be a really good one to replicate.  We love that it's big and that it's nice and open in the front.  One thing we didn't want in our kids' playhouse was an enclosed house that would become a sweatbox in the summer, or home to wasps and hornets.  I also love that their playhouse was used by all three of their kids, all of which are older than ours, making me think it could be something the kids enjoyed for many years.

I declared the summer of 2017 to be when the playhouse would finally be built, but while we procrastinated getting started ("It's just so hot!" we told ourselves), Ashley and Jamin moved into a new home and built a newer version of their playhouse: the Handmade Hideaway 2.0.  [Photo below belongs to them.]

handmade_hideaway2.2.jpg

We oohed and ahhed over it.  Isn't it just something?!  At this point, I had decided that Katie Wynn's birthday party would be themed around her nonexistent playhouse so we really needed to get started!  We started to ditch the plans for the first Hideaway in favor of the new upgraded version, but ended up returning to the original for several reasons:

  • We still really loved the open front over the enclosed house for reasons mentioned above.
  • The bottom level is screened-in which initially really appealed to us, but it's only accessible through a trap-door in the top level and we worried about how we would keep it clean.  No doubt dust, dirt, and leaves would end up in it when the yard was mowed or from the trap door up above, and that kinda seemed like a nightmare to deal with.
  • Ashley and Jamin hadn't published the plans for the new version yet, and we didn't have any time to wait.

Matt and I read through their blog posts of instructions both together and individually until we had our minds wrapped around what all we were about to be doing.  We penciled out our first supply list, went shopping, and on Saturday morning of Labor Day weekend, we officially started on our own playhouse.

Just as their plans instructed, we started by building the base upside down.  We opted to do this in our garage so we would have shade and a level ground to build on.  Great idea until it was time to move it because this sucker, even without the top slats, is really heavy.

IMG_9083.JPG
IMG_3489.JPG
IMG_3492.JPG

It took me, Matt, my dad, my brother Nick, and the use of a lawn mower and trailer to very carefully drive the base to the backyard.  I wish I had a picture of our setup but it was an all-hands-on-deck situation.  We relocated it to the backyard on Saturday evening and then on Sunday morning I decided I didn't really like where we had positioned it so I asked them back over to move it again.  Noone was happy about that...

I don't plan to detail each of the steps in the process as Ashley and Jamin have already done that on their blog, but I will touch on things we did differently in case anyone visiting is getting ready to build their own.  

First major difference is the size of the base.  Theirs is 10 feet deep by 8 feet wide and 4 feet high.  Ours is bigger.  It is the same width - 8 feet across - but it is 14 feet deep so our front porch could be bigger and it is 5 feet high so the kids could play under it too for at least a few years.

With the base finally in the right position, my Dad screwed in the planks across the top (the floor of the house) while Matt and I built the stairs.

IMG_9090.JPG

Katie Wynn, Mom, and my grandmother were our audience that afternoon.

IMG_9092.JPG

Once the slats were on, it was my turn to climb up and stain the deck.  This is another deviation from Ashley and Jamin's plans.  They built their whole hideaway and then painted.  We opted to stain/paint in sections as we went.  I HIGHLY recommend doing it our way!

IMG_9094.JPG
IMG_3495.JPG

Because our deck is bigger than theirs, we also added a few extra support braces on the bottom.

IMG_9098.JPG

We had to go buy a few more boards to use as braces between the back legs for extra stability and another gallon of stain to go over some splotchy areas and the underside of the deck boards.

IMG_9111.JPG

I love this picture below because in the background under the tree you can see the playhouse the kids already had that we were getting rid of.  I'd say they were getting a pretty big upgrade!

IMG_3500.JPG

Since it was Labor Day weekend, we had a bonus workday on Monday!  Our goal for the day was to knock out the framing of the walls.  Just like with the base, we started on concrete so we'd have a flat surface to work on.  Because our base is 4 feet deeper than theirs, we added two feet to each of our side walls.  This way our extra 4 feet in depth would be split between the interior and the porch. 

Two side walls

Two side walls

Back wall

Back wall

Adding "shelves" to the back wall.

Adding "shelves" to the back wall.

As the kids went down for a nap, I went to pick out paint colors.  The winners were Building Block for the exterior and Enchanted Mermaid for the interior.

IMG_9103.JPG

Matt ditched me for a golf tournament that afternoon, but I forged on with the next step - painting!  I loaded the paint sprayer with the enchanted mermaid paint and sprayed the frames of the walls.  (I use this paint sprayer and I LOVE it!)

Back wall

Back wall

Side walls (windows have been added)

Side walls (windows have been added)

We used fence slats for the siding of the house and I laid them all out in the yard to spray a coat of the turquoise paint on one side of them too.  I leaned them up against our fence once they were dry and from a distance, it looked like I had painted our fence bright blue.  I'm sure our neighbors thought we had lost it.  

IMG_9110.JPG

So at the close of our first work weekend, we had a completed deck, the three walls built with a coat of paint, and one coat of paint on the interior sides of the wall slats.  Not too bad.

The goal for the next weekend would be putting up the walls and adding the siding, so I had to finish painting the fence slats during the week.  I was unhappy with how the coat of paint from the paint sprayer looked, so I rolled on another coat of enchanted mermaid on all the fence slats. You can see the difference it made in the picture below - the top portion has the second coat rolled on.  

IMG_9138.JPG

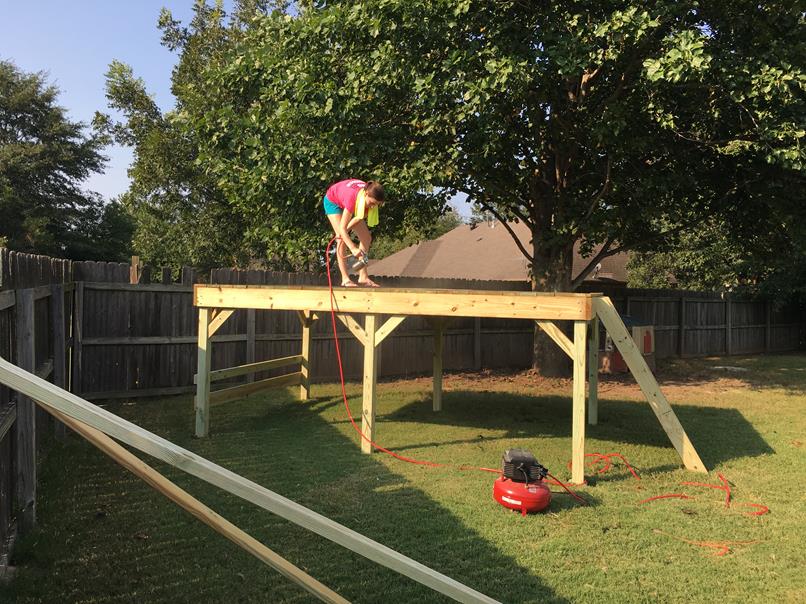
The next evening, I flipped the slats over and rolled on a coat of the grey exterior color.  

IMG_9173.JPG

My favorite girl cheered me on from the top of the deck.  :)

IMG_9177.JPG

We started bright and early on Saturday of Weekend #2 and Matt's parents came to help us - both with the playhouse work and with the kids.  By 8:45 that morning, the three wall frames had been screwed into place!

IMG_9224.JPG

Thomas was head water (gatorade) boy while we worked.  Isn't he the cutest?

IMG_9228.JPG

I don't have progress pictures of the next phase because to me, it was the hardest part - building the frame of the roof.  We calculated our pitch, moved back to the driveway, and built it upside down with the ridge laying on the ground.  This worked fine until it came to flip the frame over and all of the rafters pulled off.  Super frustrating.  We ended up building it in place with everyone available having to hold pieces in place.  

We had plans that evening so we had to wrap up early.  I took the picture below - our stopping point for Saturday - at 1:45. 

IMG_9230.JPG

The main objective for Sunday afternoon after church was to get all of the wall slats up.  Matt's dad, Bill, worked nonstop on them while Matt and I started the porch railing.  He had a couple helpers at times.  :)

IMG_9261.JPG
IMG_9270.JPG

We ended Weekend #2 with all of the wall slats up and the posts and horizontal rails of the railing in place.  It was starting to look like a playhouse!  But the left-to-do list was still pretty long...

IMG_9281.JPG

I love this view - I think it's the only picture I have from inside the playhouse facing back to our house.  It helps orient you with where in our backyard this is situated.  

IMG_9280.JPG

My job during the week would be to paint the parts of the railing we got up.  

IMG_9282.JPG

We had to order the slide for our playhouse and here is something I learned: raising the deck to 5 feet high instead of 4 feet high put us in a higher price bracket for slides.  So many of the more affordable slides that I found were only suitable for decks up to 4 feet high.  Also, all the curved slides I could find made right turns; there weren't any left turn slides like I had envisioned us having.  Who knew?  Our slide cost around $200.  And this is how it arrived. 

IMG_9369.JPG

The box did not look very promising and, sure enough, it was missing pieces.  Amazon's customer service was great and they shipped us another one, but it didn't arrive until after the birthday party.  We rigged the first one to work long enough for the party and then switched them out afterwards.  

The goal for Weekend #3?  Finish the roof and railing!  I ordered the tin roofing sheets and trim pieces from a local construction store and they delivered them to our house.  Once again we were at it bright and early on Saturday morning!

IMG_9380.JPG
IMG_9381.JPG

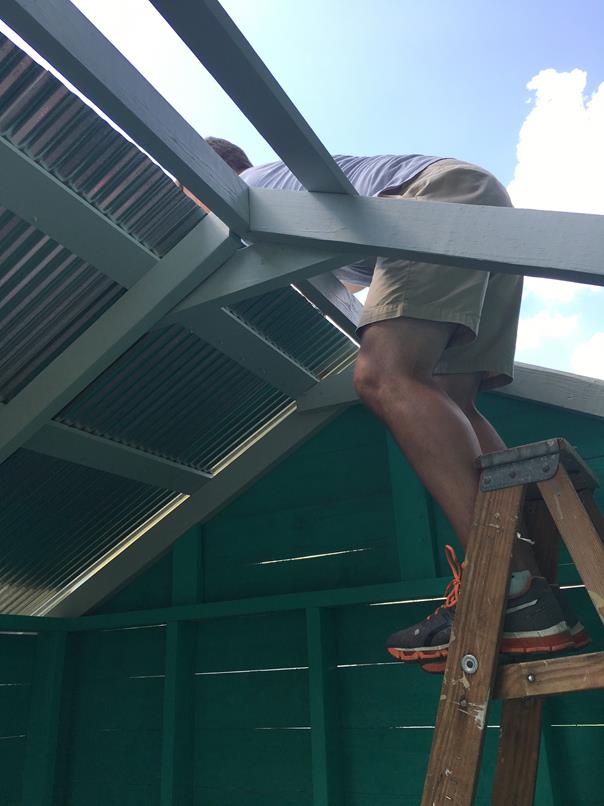
Have you heard the expression "cat on a hot tin roof?"  I'm pretty sure that's how Matt felt this day.  

IMG_9383.JPG

By the end of Saturday, he had finished the roof and we had gotten the first diagonal piece in each of the sections of railing.  

IMG_9388.JPG

I hosted a baby shower the next day after church so I didn't get to help work on it, but Matt was able to assemble and attach the slide (even with missing pieces).  

IMG_3517.JPG

I did put together shutters for the windows and get them stained to match the deck though.  

IMG_9392.JPG

That's where we ended Weekend #3 - the last weekend before Katie Wynn's birthday.  Her party was scheduled for the following Saturday and there was still quite a bit of work to do!  We needed to finish the railing, add the roof trim pieces, attach the shutters, sew curtains, and then - the part I was most excited about - decorate and accessorize!  Not gonna lie, I was pretty nervous at this point that we wouldn't make it.  

Two days later and we had finished the roof and the x's on the railing.  We could totally have the party at this point and the playhouse look finished.  

IMG_9411.JPG

My mom and I made a big Ikea run to buy some accessories for the playhouse.  The tricky thing was that the playhouse was being built for Katie Wynn's birthday, but we wanted to make sure the kids knew it was really for both of them.  So a lot of the accessories and toys went in right away and only a couple were reserved for Katie Wynn's birthday.

By Thursday of party week, we were able to call the playhouse done.

IMG_9478.JPG

My mom helped me with the curtains - they're made out of drop cloths so I'm hoping they'll hold up well being outside.  We cut the top of the two drapes at an angle to match the roof line, added grommets, and hung the curtains on small cup hooks that we screwed directly into the inside of the playhouse.  

I picked up a couple of hanging flower baskets from Home Depot and filled them with pansies.  I think they added the cutest touch!  We also completed the railing by adding caps and finials to the posts - just another small detail adding to the charm.  

IMG_9477.JPG

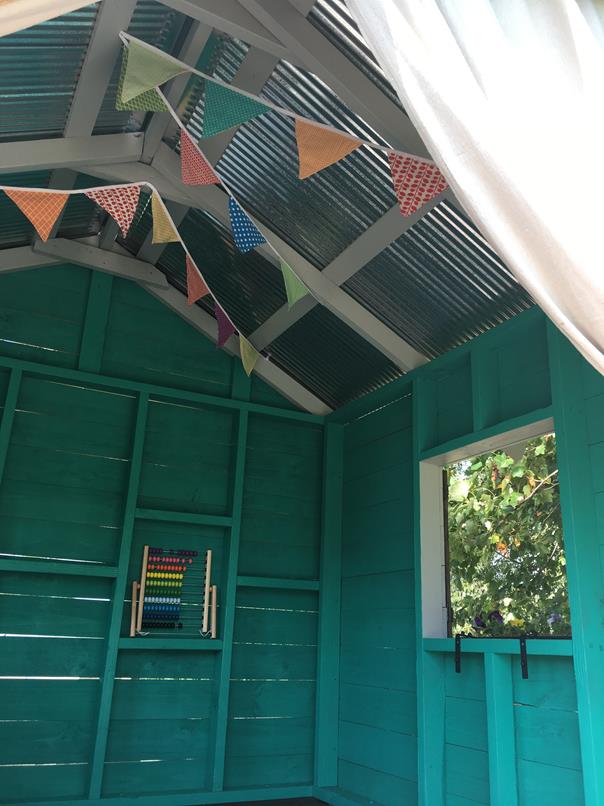
I took a big pile of scrap fabric and sewed together a bunting.  Swagging it on the ceiling made the inside so fun and festive!

IMG_9474.JPG
IMG_9473.JPG

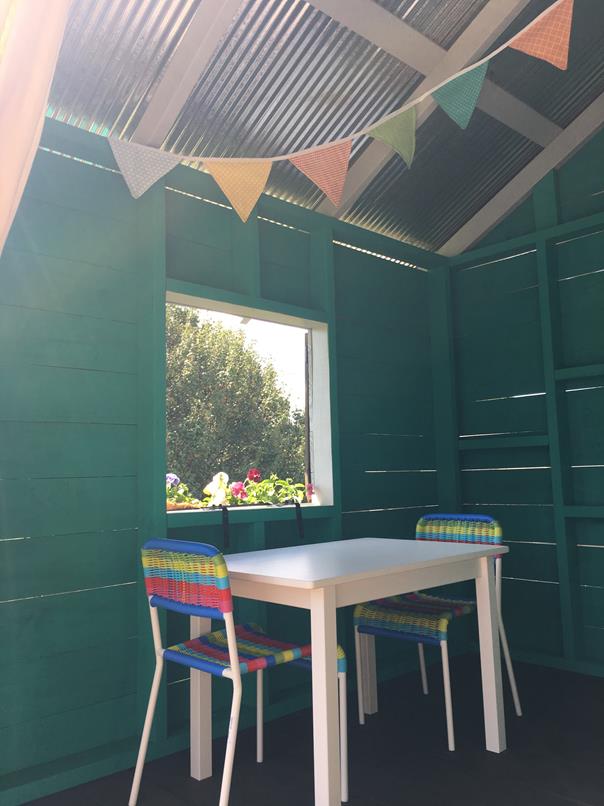
I chose a plain white wooden table from Ikea and paired it with these bright colorful chairs.  I just love them and the pop of color they add!

IMG_9476.JPG
IMG_9475.JPG

The kids were so excited to come home from school and see the added curtains, bunting, and table and chairs.  I had also added a couple of toys for them to play with.  

IMG_9484.JPG
IMG_9489.JPG

Friday evening we had both of our parents over for Katie Wynn's birthday dinner.  Together, they added a rug, kitchen, and pots, pans, and utensils to the playhouse.  The kids covered their eyes to go see the surprise. 

IMG_9512.JPG

They loved it all and got right to work making some leaf stew.  

IMG_9516.JPG

And of course they love the slide! 

IMG_9519.JPG
IMG_9517.JPG
IMG_9526.JPG

We are so glad we got the playhouse finished before Katie Wynn's party!  We weren't really sure what to do the next weekend without a list of work to get done.  :)  

The kids are still enjoying playing in the playhouse in the afternoons after school.  Right now we have it decorated with pumpkins for fall.  

IMG_1018.JPG

I say the playhouse is "done," but really, this was just Phase 1.  I have already dreamed up plans of how to tie in the tree off to the right.  And I definitely want to bring the swingset over closer to it.  And trim the play area out and mulch the ground underneath it.  Guess we still have plenty left to do for Summer 2018!

Built-Ins for the Playroom

We have a playroom in our house that has its own set of stairs and resides over the garage.  I think it's the only room in the house that has not ever been on the blog (that I can remember).  For good reason, too, because it was a bit of a disaster when we moved in and has stayed that way for about 4.5 years.  

I cannot find a good "before" picture of the room, but here it is when we toured the house before putting an offer on it. 

IMG_1714.JPG
IMG_1715.JPG

Once the room was empty of furniture, we could tell how horrible the carpet was.  Something had happened to discolored it bad - was it green? Was it brown?  You couldn't tell.  And the accent chalkboard wall?  It had neon paint splattered on it.  We used the room as a place to drop junk when we moved in.  And over the last four years, more junk and extra furniture has just rotated in and out of it.

Now that the kids are big enough to go upstairs on their own, it seemed like a good time to give the playroom a makeover.  First on the agenda: adding in some storage for all of the toys.  And a designated spot for the tv too.

Just like I did with for the built-ins in Thomas's room, I sketched out my design on the wall in chalk.  

IMG_4005.JPG

Last May (yes, that's how behind I am on this update!), I met with Cesar, the same carpenter that did the built-ins in our mudroom and in Thomas's room, and got everything squared away for him to build them while we were away at the beach.  I love letting him work while we're away because we leave with nothing on the wall and come back to it finished, and we never have to deal with the mess and sawdust. 

When we left for the beach, the room looked like the picture above, and we came home to it looking like this!

IMG_5496.JPG

I know that's far from looking finished.  With Cesar, he does the carpentry and then we do the painting and finishing.  Then he comes back to hang the doors.  We had one small misunderstanding.  With plans to replace the carpet as soon as these are painted, we wanted him to peel back the carpet to build the unit directly on the sub-floor.  That didn't end up happening but it's ok.  It just means the built-ins sit on an inch of old carpet that will just be under it forever! 

Here was my progress after a full morning of painting.  Cubbies are always the WORST thing to paint. 

IMG_5505.JPG

Finished the primer by the end of the afternoon.

IMG_5506.JPG

I had to do 2-3 coats of paint after the primer to get a good even finish.  The picture above was taken on May 31st, and the finished paint job picture below was taken June 14, about two weeks later.  I worked off and on in the evenings after work.  

IMG_6153.JPG

The nice thing about having the carpet removed and the room empty was that we could spread the doors out on the floor to paint.  

IMG_6154.JPG

We let Cesar know that we were finished painting and he came to hang the doors for us.

IMG_6291.JPG

That middle section is left open for the cable box and any future gaming toys the kids get.  The cords are able to pass through holes drilled in the back.  By the time these pictures were taken, we had also painted the walls grey.  

IMG_6292.JPG

One of my favorite parts of the built-ins, other than the awesome storage they'll provide! - is these fun little boy and girl knobs I found.  I wanted something a little quirky and kid-friendly to use and these were perfect.

IMG_6585.JPG

Since finishing painting, I've had lots of fun decorating those shelves with colorful toys and books!  But you'll have to wait to see that when I reveal the rest of the room.

Now, if you really pay close attention to detail, you might've noticed that in the picture of the doors laying out on the floor, there were three extras.  That's because while Cesar was at our house working on these, we also had him do a tiny upgrade in our master closet.  

This picture below is from the weekend we moved in, so before we did a first round of upgrades.  But it's the only picture I have of the tall set of open shelves there in the middle.  

photo 2.JPG

We were tired of those shelves always looking like a mess, so we had Cesar convert the bottom half of them to drawers.  We have LOVED having this upgrade in our closet. (Excuse the messy piles of clothes waiting to go into the drawers.)

IMG_6290.JPG

So that's the built-ins in the playroom!  I can't wait to show you what we did to cover up that chalkboard wall.  Hopefully I'll have pictures of it soon.  

Finally...A Front Walk!!

For years, our poor ol' mailbox has stood out in our front yard with no walk leading to it.  :(

Our beautiful brick front steps have led to nothing but a sea of grass.

When we purchased our home, it was 16 years old and we could not figure out how the previous owners had gone so long without a front walk.  Or WHY a front walk wasn't put in when the house was built.  It was very high on our to-do list when we moved in.  But then we had a baby and then another one and the front walk slid down on the priority list.  Still, I cringed every time the UPS guy or our postal lady had to carry a package through our wet grass, or I hosted a shower and guests tromped through the yard to get to the front door.

I knew I wanted a front walk, but I also knew when we got one, I didn't want it to just be a strip of bright white concrete.  I wanted a brick path that would match our front porch and steps.  Obviously, that kind of path costs more.  So we waited and saved our money and as we got bids from contractors to screen in our porch and pour a new patio in the back, we added this to the list.  Might as well have it done while all the big equipment was at our house anyway, right?

You can slightly tell from the picture above that the brick on the face of our house and the brick on our steps (and the top of our porch) are not the same.  Antique bricks were used for the porch and steps and we opted to have those matched for the walkway.  Luckily, our contractor was able to find them pretty quickly and could get to work!

We had no idea they were starting the front walk the day we arrived home to the view above, so it really was a fun surprise to drive up to.  We quickly consulted Thomas's big book of trucks to identify the machinery parked in our yard.  I think we had a mini excavator and a skid steer.  

Here are my superheroes surveying the scene.  

And the blank stares I got when I asked them what they thought.

The walkway crew was already hard at work when I left for work the next morning.

And by the time I got home, we had a concrete path!  

I'm not sure if you can tell from the photo above or not but it was raining that evening when we got home.  I'm glad they got it poured and it set up before the rain came!

After dinner, the rain was gone so we walked around to the front to check it out.  The kids were really excited to be the first ones to run up the walk!

Shortly after that picture was taken, Thomas fell down while running on the walk, officially making him the first person to scrape his knees on the walkway too.

The pathway stayed like that for a few days until one morning I noticed some supplies had been dropped off (like, before 6am).  

That afternoon we got to watch the brick masons hard at work.  I'm sure they didn't love us staring over their shoulders, but we were all pretty glued to it.  It was fascinating to watch!

When they left that day, they had the brick laid on the top half of the walk and the bottom three steps were left to be done.

I loved getting to watch them fill the cracks with mortar (I think?) because it looked like they were icing a cake.

It took a span of three days for all the bricks to be laid, set up overnight, and then get cleaned up.  Before they left, the filled in around the sides with dirt so that our grass will grow right up to the edge of the steps.  We are SO pleased with how it turned out!

Look at the beautiful herringbone pattern.  Sometimes, like last night, I just go outside to stand on it and admire it.

The new walkway is even Lolli-approved.  But she and I both agree that it will look EVEN better once the grass fills in through that dirt.

I have already had two Mint Tulip customers drop stuff off on my front porch and comment on how nice our walkway is.  I'm so glad no one has to traipse through the yard anymore!  Next time you come visit us, park out front and take a walk down our new front path.  :)

Screened-In Porch and a New Patio

Exciting news...the construction we've had going on at our house this summer has officially wrapped up!  And we can already tell that we will be living out on our new porch this fall.

Longtime readers may remember this post I wrote just over 2 years ago about the temporary paver patio we installed so the grill would have a place to live.  In that post I said that this small paver square would eventually be replaced with a real patio and our existing covered porch would get screened-in.  

Two years later of saving our pennies, we finally knocked those projects out!  Or, rather, we hired a contractor and his crew to knock them out for us.  We pitched the projects to a couple of different contractors in early May, and I was naive enough to think this could maybe be completed in time for Thomas's birthday party the first weekend in June.  Ha!

We chose a contractor and went on vacation.  When we got home, HE went on vacation.  And then it rained a lot.  So basically, it was a long time before things got started.  We did our part, though.  We cleared off our patio and picked up the pavers so that the crew would have a blank slate to work with.

The patio ended up sitting empty like that for the back half of June and the first week or so of July.  You can imagine how excited we were the day we came home from work to see that they had FINALLY gotten started!!  Framing was first.

I seem to have lost some of my pictures because the one above is actually of Framing Take Two.  Yep, at first I was excited to see the framing up and then my excitement quickly faded when I realized I hated the spacing of the columns.  And while I normally try hard not to complain, I knew this was something I didn't want to just live with forever so I called the contractor and asked him to move the columns.  We were already way behind schedule, so no big deal to take a step backwards at this point! 

Little did we know, there would be an even bigger step backwards in the next couple of days!

Framing continued that week.  The columns were boxed out and the supports for the screens were added.

On days that the workers came, they arrived EARLY!  As in, before I'm normally dressed.  I learned real fast that I had to get dressed quickly in the mornings cause I never knew when men would be right outside the windows!  The kids LOVED watching them work.  I had to pull them away from the windows to go to daycare.

One morning when we left, the painters were there to paint all the framing.  I couldn't wait to get home to see how it looked painted!  But when we got home, we found that it had all been taken apart and the columns weren't boxed out anymore...

I won't go into much detail here but apparently our contractor came to check on things while the painters were painting, saw that the columns had been boxed in such a way that the seams were visible, and made them take it apart to box it out the other way.  The seams are now on the insides where the screen goes instead of on the front and back that you can see.  I wasn't going to complain about this (I had noticed it though and mentioned to Matt that I thought they were going to need a lot of wood filler to fill the seams) but I'm really glad he made them change it himself.  

Here it is re-done and half painted since they re-used some of the boards that had already been painted.  This added another two days to the process.

Side note: I'm realizing while writing this I'm missing a lot of my progress pictures.  Oops.

Sometime during the columns' deconstruction fiasco, the new beadboard ceiling got its final coat of paint (Sherwin Williams Atmospheric) and the trim was installed (and painted - custom color match) on the inside of the porch.

View from the yard of the half-painted framing.

They finished the framing up on a Friday, which meant more waiting before the painting continued.  But, the sun went down that night on a mini excavator parked in our yard - a nice promise that more progress would be made the following week!

Painting continued on schedule the next Monday and we were pleased with how it looked!

With the painting done, the next steps were adding the screens and installing the door, can lights, fans, and outdoor light.  I don't have progress pics but you can see the screens and outdoor light in this picture with Katie Wynn.  We chose pet screens that are supposedly unable to tear, so we hope they last a long time.  There was only one mishap with this step - the door was hung the wrong way - but it was fixed within the same day so no hold-up.  (Our screen door was custom made by Screendoors.com.)

One morning when I left for work, the men there were demo-ing off the bottom brick step to make room for concrete.

When I returned home that afternoon, the brick step was gone and that mini excavator had filled in dirt and shaped out the soon-to-be-poured concrete patio.  And had also really torn up our yard!

Matt got home in time to capture the excavator in action.  

I don't remember why but it sat like this for a couple of days which was kinda annoying since it was really dirty.  

For the patio, we really went back and forth on how we wanted it done.  Originally, I wanted it to be brick to match the porch.  But the bricks wouldn't create a smooth surface and I thought a smooth surface would be better for toys or sliding chairs out from a table and things like that.  We knew we didn't want just bright white concrete but stained concrete had it's cons too - it would be really slick when wet (not good if we ever add in a pool and kids are running around) and if it ever got scratched or nicked, the concrete under the stain would not match in color.  We ended up going with dyed brushed concrete.  A liquid dye was added to the big drum of concrete so it was dyed all the way through and then the concrete was brushed so that the surface would be smooth but not slick.

It started out much browner than the color I thought we had picked!

The color has lightened up significantly over time and we really kinda like the "splotchiness" (for lack of a better word) of the color.

Once the concrete was nice and cured, they filled in around it with dirt and tried to straighten our yard back up some.  And with that, this project was D-O-N-E, done!

We snagged a new outdoor table and chairs on clearance during the process, but the rest of the patio is still pretty empty.  I have lots of plans for it though!  The ground is still pretty muddy around the patio thanks to the week of rain we just had, but it has definitely helped in getting the grass to start filling back in.  Hopefully next summer our lawn will look much better!  

We have some landscaping to address too.  We plan to add new beds to each side of the patio, hopefully sooner rather than later.

Here are a few more snapshots of the finished project that I snapped last night.

We LOVE our new fans, especially the oscillating feature!

Matt's favorite part is the TV he mounted on the wall.  Pretty sure he will be spending all of football season out here!

It's probably no surprise to anyone that I'm now shopping for new furniture.  I'm just not digging the turquoise out there anymore.  Fingers crossed that I can find some good end-of-season sales!!

But wait!  That's not all!!  While we were having our porch screened in and the new patio poured, we also installed a new front walk!!  Post coming about it next.  :)

Curb Appeal

Matt and I celebrated 6 years of marriage on May 9th!  It's been the best 6 years ever.  To celebrate, we spent the afternoon working on our house's curb appeal!  (Actually, we went out for a really nice dinner that night, but this happened on our anniversary too.)

I have been wanting to paint our front door since the day we moved in.  Why?  Because it was purple!  It actually had a very fresh coat of paint from the previous owners, so it was in good shape.  But the homeowner had tried to pick a light grey and you know how funny grey can be with all it's undertones, and the end result was a purple door.  A very FLAT purple door - matte paint is something else I'm not a big fan of.

Being that this summer is the first one in this house where I won't have a tiny baby or be pregnant, we declared it the summer we tackle some outside projects.  First on the list - the front door!  While I love the idea of having a fun, bright-colored door, that just wasn't going to go with the style of our house.  After spending lots of time standing in the front yard staring at the house, I decided charcoal grey could be the winner.  I picked up three different samples and slapped them up on the door.  Our door was multi-colored for about a week.  The top color was way too blue; it was easy to eliminate.  Matt liked the bottom one but I thought the middle one picked up the brown tones in our brick better so it ultimately won out.  (You can see a spot from where we changed the hardware that at one point the door was red!)

image.jpg

Since our hardware was fairly new, I had Matt remove it to keep it clean.  Painting the door was a quick, easy process.  Thankfully, the weather was not too hot that day so it wasn't terrible having the door open for an hour or so.  We set a fan up just inside the door to help keep bugs from flying in.  Here is the door with one coat of wet paint on it.

image.jpg

And here it is later that evening with two coats of paint and the hardware back on.  I know the glare from the picture make it look shiny (and dented?) but it really isn't in person.  It's just not super flat anymore (or purple!).  

image.jpg

What was Matt doing while I painted the door?  He was tackling our front columns!  (Our work was almost all done while both kids were napping...hooray for a productive nap time!)

image.jpg

We have six wooden columns across the front of our porch and I noticed over the winter how completely sun bleached they were.  I'm sure when the house was built 19 years ago they had a much darker stain on them!

image.jpg

Just like with the door, we tested out a stain color in an inconspicuous spot.  We went with a semi-transparent stain - something that would add color but still let some of the wood grain show through.

image.jpg

Matt got the short end of the stick because he had a lot more surface area to cover than I did!  He ended up doing two coats of stain to make the color good and rich.  You can see in the photo below the difference in color - the columns on the left have stain and the ones on the right do not.

image.jpg

Ready for the full before and after?  Hopefully you can tell a difference, ha!  Here is the house before we started painting - except that the door has the test swatches on it.

image.jpg

And here it is after our afternoon's worth of work.  A deeper color on the door and rich stain on the columns.  I think it looks better, do you?  It helps that our flower beds had also been mulched that week!

image.jpg

Now, what should we do next out here?  I plan on moving the three adirondack chairs that sit on the right side to a different part of the house this summer (and painting them, which is a job I'm dreading) so I will eventually need new furniture for out here.  What kind would you put on our porch?  I want something that looks nice but isn't incredibly expensive.  We rarely sit on the porch so it doesn't have to be super comfortable.  And I've learned that the squirrels will just pull the stuffing out of my cushions so it doesn't really need to have those.  Thoughts??  I'm at a loss.  What do you think about a porch swing?