Cross Stitch People

Does anyone reading this ever cross stitch?  I know that's usually thought of as a "grandmotherly" activity, but I used to love doing it when I was little.  I'd sit and watch tv while stitching whatever sampler my Mom had set up for me to work on.  

Anyway, whether you've ever done it before or not, I have a book to show you that might make you want to brush up on your skills (or learn how to do it!).  It's called Do-It-Yourself Stitch People by Elizabeth Dabczynski-Bean.  I discovered it on Instagram around the first of December and showed it to my Mom and we both agreed we had to order it.  We found it on Amazon for $49.

Stitch People Book.jpg

So the book is filled with tons and tons of different bodies and faces and clothes and hairstyles and you pick and choose which ones together to create a cross-stitched portrait.  I told my Mom she needed to do each of her kids' families and give them to us for Christmas and sure enough, she did!  Here is how she stitched our family of six.  I had to really zoom in to avoid the glare of the frame.  I love that KW and Thomas are in matching gingham and that she included Lolli!

Entrekins.jpg

While Mom was busy stitching all of us, I borrowed the book and made patterns of two of my friends and their families to stitch as their Christmas gifts.  When we got together to celebrate the holiday with them, I had only finished stitching the Cooks!  I scribbled out a stand-in for the Earls since I didn't have it ready yet. 

IMG_2763.JPG

But I did end up getting the Earls done and I added their cat, Sophie.  I love how she turned out!

IMG_3751.JPG

While making these, I stalked all their pictures on Instagram trying to determine the correct shades of hair and eyes.  I tried to make their outfits match something they actually owned too.  

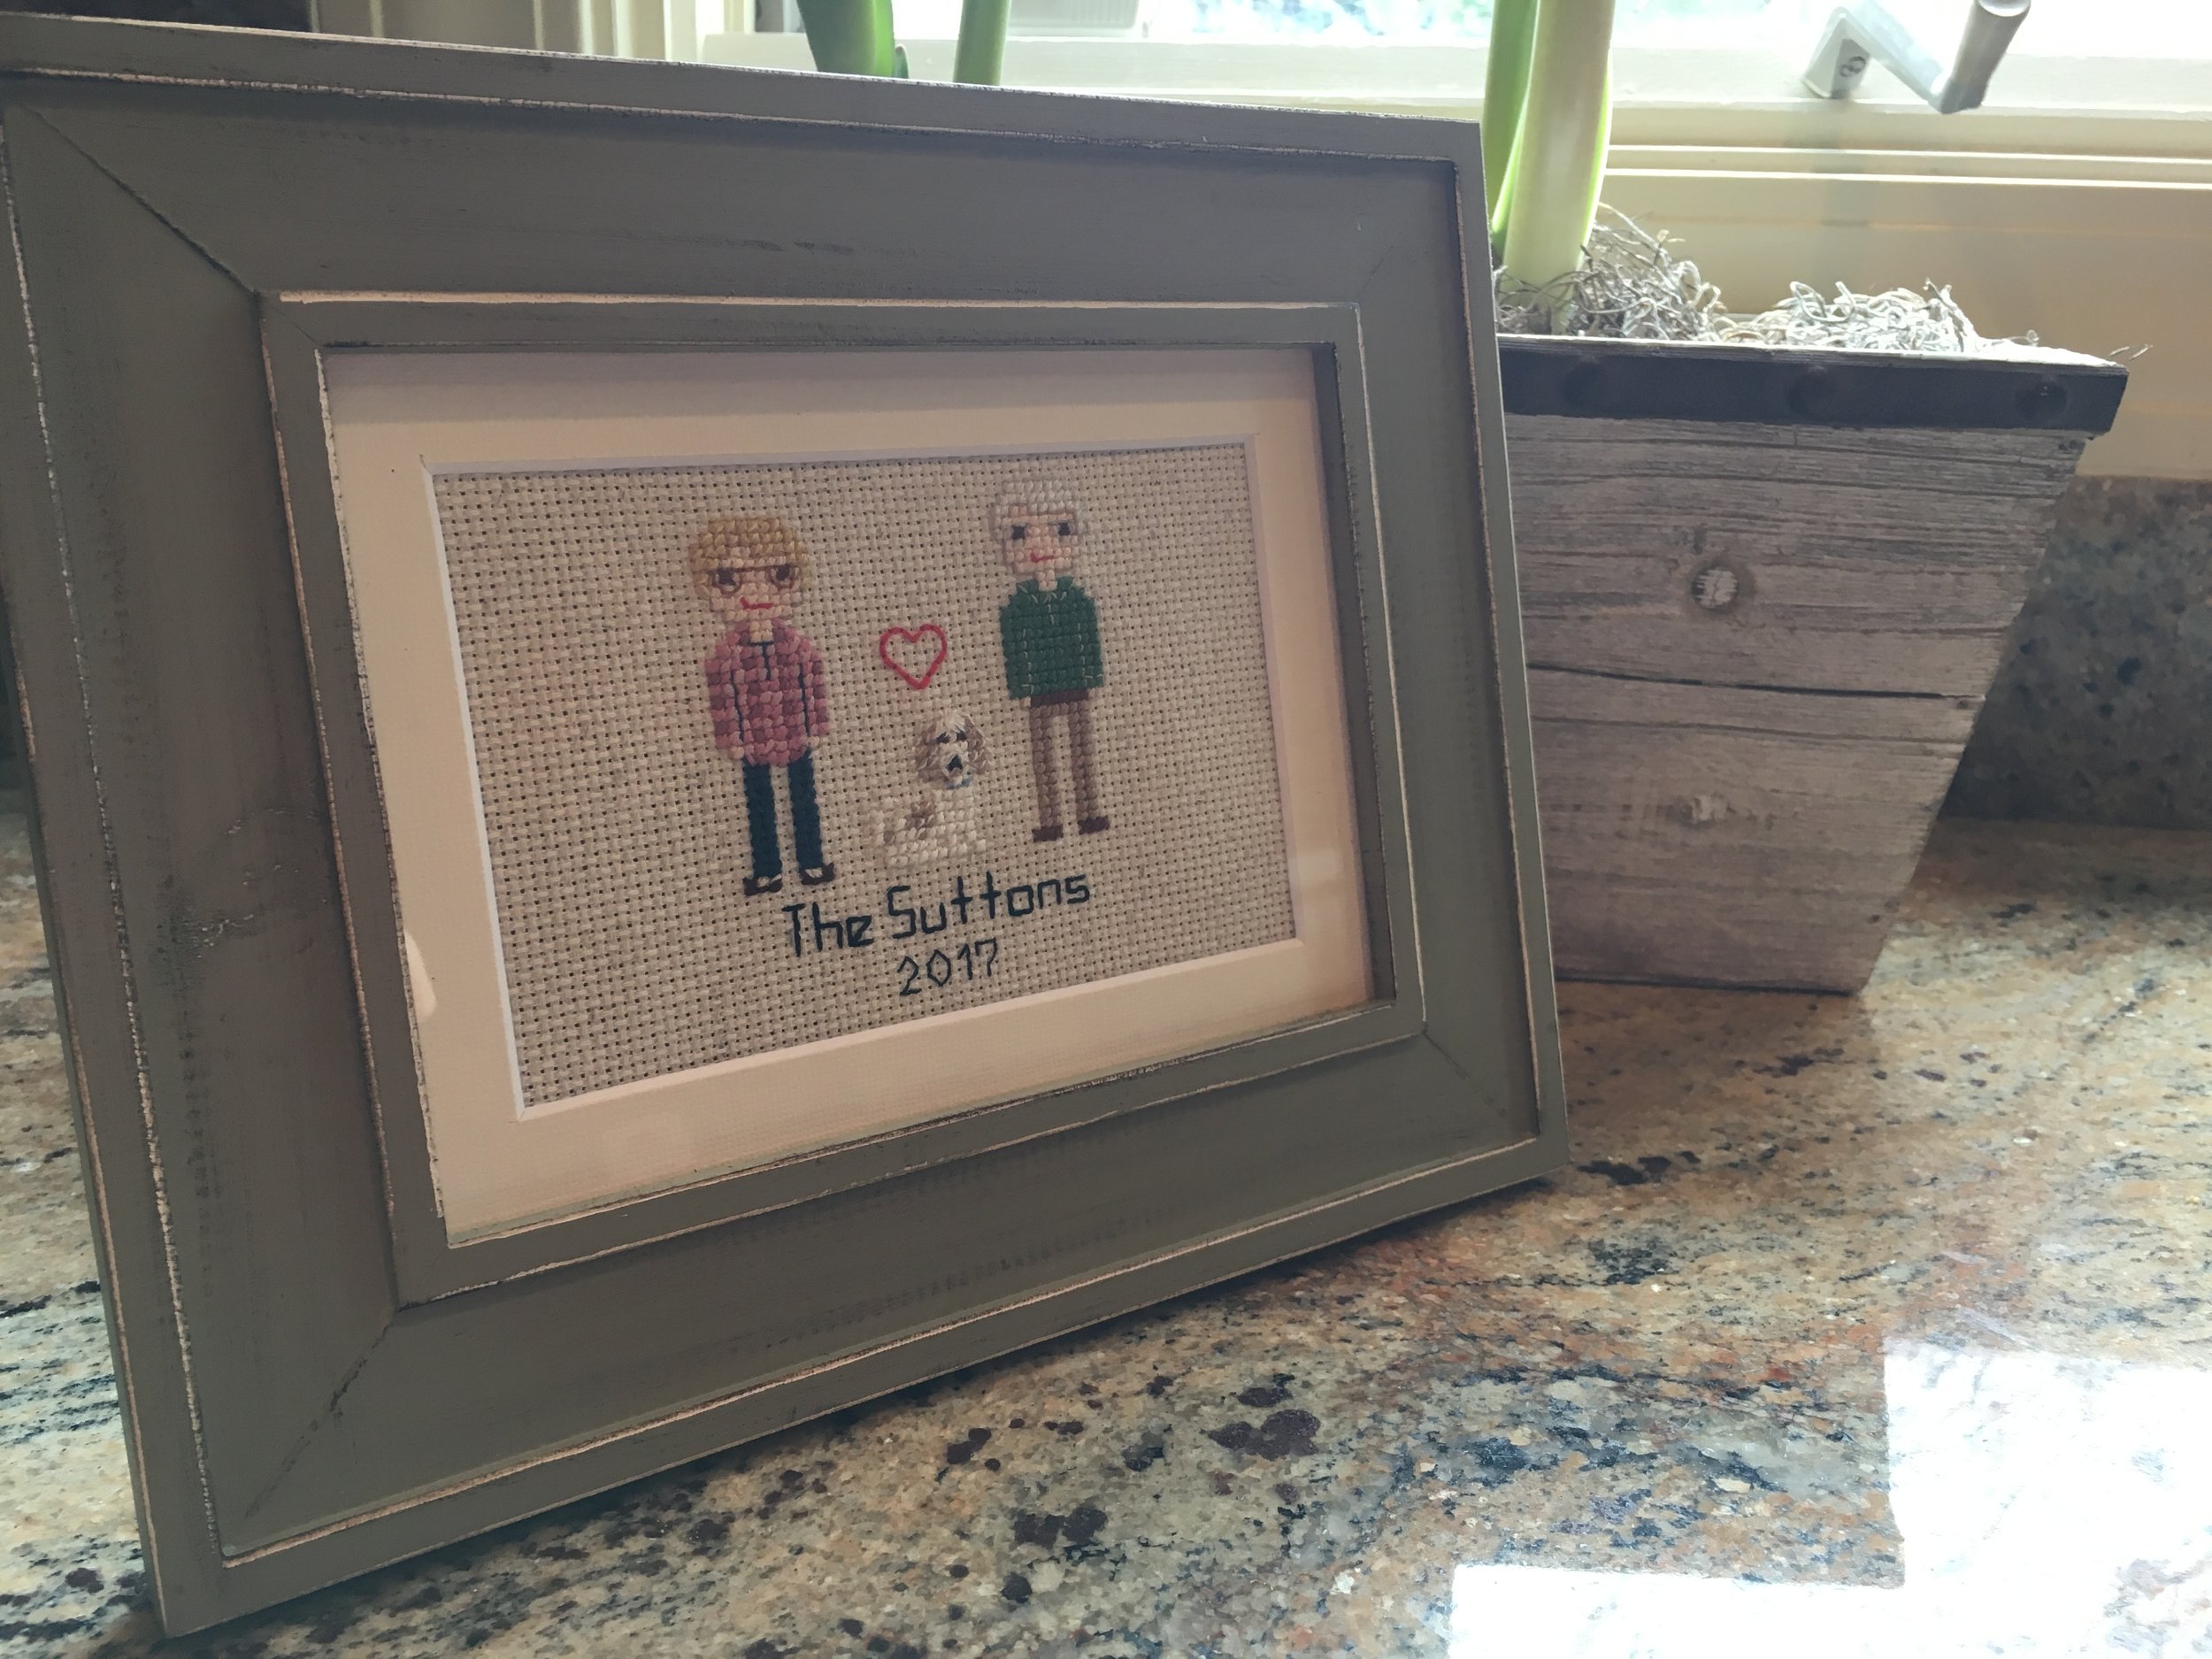
As a surprise, I stitched out my Mom and Dad with their dog, Charlie, to give to them for Christmas.  She had no idea she was going to get to unwrap a stitched portrait with the rest of us!

IMG_3396.JPG

Then, as another surprise, I stitched out Matt's parents too!  

IMG_3458.JPG

It's hard to get good pictures of them because of the glares and reflections from the glass, but they really look so stinking cute framed up and sitting on a shelf.  I love passing by ours in the living room, and seeing both of our parents' in their houses too.

IMG_3395.JPG

There is really no point to this post except to maybe show you this cute craft if you need a good gift idea for someone!  If you've never cross-stitched, it's super easy to do and you could order the book and learn.  She walks through all the steps in the first few pages of the book.  

And since I've done those, I've discovered that she has also put out books for occupations and farm animals.  In the book I have she also includes lots of different ways to do wedding dresses - wouldn't a stitched wedding portrait be an awesome gift for newlyweds?!  Now I have to think of more people I can stitch out...it's nice to have something to sit on the couch and do at night while watching tv! 

Door Hanger Paint Party

One day I was out in my dad's shop painting some Patriotic hearts for Mom and me to hang on our front doors and I said to Mom, "Wouldn't it be fun to have a paint party for door hangers?" Well of course that got my mind rolling and since her birthday was coming up, I decided it would be the perfect kind of birthday party for her!

IMG_6715.JPG

Her birthday is in mid-July so we brainstormed season-appropriate door hangers.  It was too late to do something summery but too early for pumpkins and super fall-ish stuff, so we landed on sunflowers.  Perfect!

Mom and I had a mini paint party by ourselves so that we could have two different examples to show her friends.  I made my sunflower kind of whimsical and she did hers realistic.  Both turned out really cute, I think!

IMG_6878.JPG
IMG_6879.JPG

I cut out and sanded all the sunflower templates before party time and we cleaned Dad's shop up enough for us to spread out on the tables.  Earlier in the day I had stopped by a field and clipped fresh sunflowers to use as inspiration too.  

IMG_6876.JPG
IMG_6877.JPG

As soon as Mom's friends arrived, I made them get to work!  :)  It was a lot of fun painting together.  They took different ideas from each of our examples or came up with ideas on their own.  They helped each other while parts of their own flowers were drying.  Mom and I provided a taco bar for dinner so we had lots of food breaks, too!

IMG_6901.JPG
IMG_6902.JPG
IMG_6905.JPG
IMG_6911.JPG

In progress and drying while we stuffed our faces...

IMG_6912.JPG
IMG_6913.JPG

Since we were celebrating Mom's birthday, I attempted to make sunflower cupcakes.  I probably should've started working on them with more than thirty minutes before party time because they weren't the best sunflowers I've ever seen.  I forgot to take a picture of the full platter; these are just the ones that were leftover at the end of the night.  

IMG_6924.JPG

By the end of the night, everyone had a super cute door hanger to take home with them!  I love how they all look alike but different at the same time.  Everyone did such an awesome job painting them.  

IMG_6919.JPG

Everyone left with strict instructions to send me a picture of their sunflower on their front door, or I threatened to ride by their houses to see for myself.  They all did as they were told! :)  It was fun getting all the group texts with everyone's door picture.  I actually ended up being the last one to get mine up because I forgot to take it home with me.  D'oh!

IMG_6922.JPG
IMG_6927.JPG

I hope Mom and her friends had as much fun as I did!  I don't think it's something I would want to do every night (it took a lot of pre-work getting ready!) but definitely something worth doing every couple of months.  Now I just have to figure out what we can paint next!

Paper Dolls

When the time came for us to transition Katie Wynn from her crib to a big girl bed (yes, over a year ago!), the hardest part of the switch was figuring out what to do above her bed!  I adored her alphabet collage but, while it was so cute above her crib, it just did not work with the lines of the new bed.  I had an idea early on that I couldn't figure out how to execute so I scrapped it.  After that, I was STUMPED.

Then, I found inspiration in these little girls that I cut out.

Big paper dolls on the wall would be so cute, right?!

I liked the shape and proportions of the ones I had cut out of paper so Mom and I measured and drew a larger template to use.  Then I passed it over to my Dad so he and Matt could cut them out of a thin wood.  (It's not really wood, I can't think of what the material is called.  It's what pegboard is made out of, just without the holes.)  After they had five girls cut out, I painted them the same grey as her walls (except the white plank wall that they would be going on).  The first one went on, centered above the bed...

And then the other four were lined up with her!

Mom's part (probably the hardest part!) was next.  We cut out triangles for the girls' dresses and picked out fabric that would match the room.  Then she fashioned them into dresses that would cover the triangle forms and attach to the girls.  Scroll through the pictures below to see the dresses she made.  I love that the middle one has KW's monogram...it's like a tiny nod to the alphabet wall that was there before it (that had her monogram in the middle).  

We weren't able to cut all five paper dolls out of one solid piece of wood.  And I really didn't want the seam where their arms met up to be visible.  So I purchased precut wooden hearts from Michael's and painted them pink.  They were the perfect finishing touch for our row of dolls!

Here's the complete view of all five dolls:

The dresses are just velcroed on to the doll forms.  I initially had thought it would be fun to let Katie Wynn take them off and redress them, but I still haven't told her about that idea.  Not sure I'm ready to encourage her to pull things off the wall.  And I know it would bug me if they weren't on straight or in the "right" order.  :)  Maybe one day...

I LOVE how this little project turned out and it was so easy to do.  This row of girls makes me smile every time I come into the room, especially when Katie Wynn names them all with her friends' names.  And this project just proves that sometimes you have to sit and wait and stare at an empty wall before the right idea hits you.  That's what I'm going to keep telling myself since there are still big empty walls in our house...

School Days Door Hanger

With the first day of Pre-School quickly approaching, I started thinking about how I wanted to do First Day of School pictures each year.  I knew I wanted them to be the same each year but there was no way I could trust myself to always print out one of those cute chalkboard-ish signs in time or list out all of the kids' likes, dislikes, and what they want to be when they grow up.

So, after doing some thinking, I decided I just wanted a school themed door hanger for the front door.  But, I needed the door hanger to pull double-duty.  I wanted it to be something cute enough that it could stand alone and be used as decoration on our front door for a couple weeks at the beginning of the school year.  And I wanted it to somehow display each grade the kids were starting that year - for both individual pictures and pictures of them together.

My original idea was to do a box of crayons with a couple crayons spilling out that had their grades on them.  Then my Mom suggested a school house and I liked that idea better.  It just seemed cuter for the front door.

The afternoon before school started, here's what I whipped up!  My dad cut the outline of the school house out for me on thin plywood and I painted it.  I found a couple pictures of schoolhouses online that I liked and flipped between them as a guide.  

Every color took two coats which made painting it more time consuming that I thought it'd be.  After a solid base coat on it, I outlined everything with black paint.

And then, to make it a little more whimsical and less....cartooni-ish?...I added some highlights in white.  This step is what really made it cute!

Here's a close-up of the bell tower.  The painting isn't perfect at all, but cute enough for a door sign.

The final step was adding the wording but I didn't take pictures.  Mom and I voted on "School Days" instead of "Back to School" or "First Day of School" because we thought it would allow me to leave it on my front door for more than just the first day.  I hate how my lettering turned out but not enough to redo it at this point. 

For the grade requirement of the sign, I picked up two pre-made chalkboards from Michael's.  Mom painted them for me while I worked on the schoolhouse.  She did the frame in yellow to coordinate with the bell and added an apple that I outlined to match the schoolhouse.  Had we really used our heads, we would've added the apples on opposite sides of the chalkboards, but whatever.  They still work fine.  :)

I used velcro and burlap ribbon to hang the chalkboards from the schoolhouse.  It works out great because I can hang just one of them for individual pictures, two of them for pics together, and then take them off to leave just the schoolhouse.  

The following day, I added Pre-K 3 to one of the chalkboards and hung it up.  It looked great on the front door!

Stay tuned for pictures of my preschooler with the door sign!

Katie Wynn's Kitchen

So last year, Katie Wynn got the cutest little shopping cart for Christmas and with it came lots of food that she could fill it up with.  Shortly after Christmas, my Dad and I built a tiny pantry for her to store all her groceries in so that they wouldn't be scattered all over my kitchen.  When I found the plans for the pantry (here, from Ana-White.com), I saw that it had a coordinating kitchen set to go with it (here).  I immediately told Dad that Katie Wynn would be getting the rest of the kitchen from Santa Claus the following year so we should do it when we had free time and not wait til the last minute.

Fast forward 11 months and I emailed him a link to the plans just before I left for Palm Springs.  "We should probably build this soon..."  I told him.  

Well.  Have I ever told you how awesome my Dad is?  I was just going to make K-dub the stove to go with her pantry and maybe save the sink for a later occasion.  And I had no idea when I was planning on doing it with Christmas just three short weeks away.  But while we were living it up on vacation, my Dad built BOTH the sink and the stove for me (er, Katie Wynn).  Isn't he amazing?!  I had no idea he was doing it either.  When we got home from Cali, he told me to come over and see what he had built.  Such a weight lifted off my shoulders!  

It's funny, before having kids, I would've been really sad if he had worked on a shop project without me.  This time I was just so glad I didn't have to figure out when I was going to get it done!

I'd like to say that after he built it I took over and finished it up, but the truth is, this Santa gift would not have been possible if it weren't for him and my Mom.  I think the only thing I did was prime and paint it white.  Dad even did a touch-up coat of paint after that.  Then he attached the oven door and all the cute little accessories.  Mom shopped for hardware for me and sewed the tiny curtain.  All I did was pop my head in occasionally to see how things were going.  They are the best!  

We moved it to our house the day after Christmas.  (Santa brought it to Katie Wynn at my parents' house.)  One day, when I trust my kiddos to go up and down the stairs by themselves without getting hurt, the play kitchen will move to our bonus room.  But for now, we officially have a kitchen in our kitchen.  It's actually great because Katie Wynn cooks while we do!  (By "we" you know I mean "Matt.")

We had to do a little furniture shifting to have it all fit in one spot together, so I had to move some art around on the walls too.  This big cake painting was done by my sister-in-law, Beth, and used to hang in our dining room.  I LOVE it on the brown wall though and love that it goes so well with the color of the sink skirt.  Hooray for coincidental matching!

One of Katie Wynn's favorite things about her kitchen is the dish rag that has her name on it.  Go figure - that was a last minute addition that I whipped up on the morning of Christmas Eve!  She loves telling everyone that it has her name on it and using it to "dry" her hands after "washing" them in the sink.

My mom and Aunt Kim were superstars when it came to shopping for hardware.  I really wanted a cute little faucet for the sink but did NOT want to spend a lot of money on it.  They found this perfectly sized silver one from the Habitat for Humanity ReStore for just six bucks!  And they bought the towel holder for one dollar!  I was amazed.  The sink basin was my Dad's idea (I think) and makes me so happy...it was the water bowl that their dog, Taylor, used.  She was such a good dog; I'm glad that something of hers is living on in the kitchen!  

For the stove top, Mom and Aunt Kim picked up some thin wooden circles from Michael's that I painted black.  We had four of them to use but only two fit on top; I think that works just fine!  I wanted to add a little kitchen timer up here too but could only find ones that had really long times - like an hour - on them.  I don't think KW can wait that long for the ding! to go off.  What I really need is the timer from a board game or something.  If I ever come across one, I'll add it on here somehow.

The little oven door has a plexiglass window so we can see what she's baking inside.  She loves getting to open it up and put things in it.  She knows to turn the knobs to turn the oven on to bake.

It looks like on this particular day, she had a tray of cookies and a pan of cupcakes baking.  That's my kind of oven!  She'd tell you that red pot is full of soup.

The pantry and shelves under the sink are great for storing all of her other foods.  Under the sink she has fruits, meats, and cake that she can "cut" with her play knives.  I, of course, love that there's a curtain to keep it all concealed when she's not playing with it (which is not very often).

Speaking of playing with the kitchen, here are some recent phone pics of Katie Wynn playing with her kitchen and accessories.  She spends time playing here every single day!

The pan of cupcakes is pretty awesome because it's also a shape sorter.  She has to match the shape of the top up with the right shape on the bottom.  She's getting so good at it!  The cupcakes are also helping her learn her colors...orange is still her favorite.

Sometimes we bake cookies in bed and then she runs the cookie sheet into the kitchen to put in the oven and bake while we get ready for the day.  These are fun too because they velcro together into a roll so that they slice like Slice-N-Bake cookies.  She likes decorating the ones that have sprinkles.

When Big Sister isn't looking, Thomas likes to play with the kitchen too.  Notice he went straight for the steaks!

I'd say that Santa Clause (ahem...Poppy and Mimi) did a really good job with his gift this year.  It has already gotten so much use and I hope that she continues to play with it for a while.  Her daddy hopes this will spark an interest in cooking for Katie Wynn and that she might enjoy it more than her mama does.  I hope so too so that she can cook for me on nights that he's not here.  :)