Burlap Door Hanger

My mom and I got crafty this past weekend and tried our hand at making those burlap door decorations you see everywhere.  I love the "burlees" because they're cute, come in a huge variety of different designs, and they don't scratch up your doors.  Win, win, win!

This reversible pumpkin is the first one I ever bought and it might still be my favorite. 

pumpkin 1.jpg
pumpkin 2.jpg

The other two that I have are a Christmas stocking and the "It's A Girl" one from when Katie Wynn was born.  It hangs on her bedroom door now.

stocking.jpg
it's a girl.jpg

My mom's front doors are double doors so she always has to buy two door hangers.  She's got two cute Christmas ones in the shape of ornaments but I don't have a picture of them.  This past spring we both bought burlap door hangers that look like flower pots with three flowers in them.  These are not the official Burlee brand that you can buy in boutiques, but instead made by someone local.  They were ok, but neither of us LOVED them and by now we were ready for a change. 

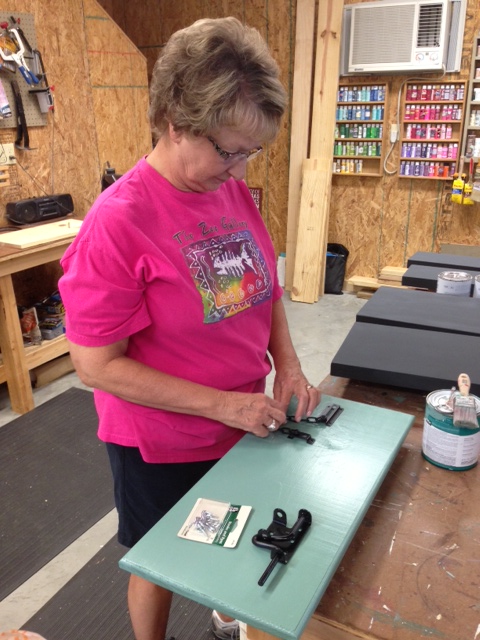
I took pictures along the way of our process so that I could do a tutorial for you, but we know we did a few things wrong so I'm not ready to share the process yet.  We have plans to have another craft weekend and make more so I'll do a tutorial after we've worked out some of the kinks. 

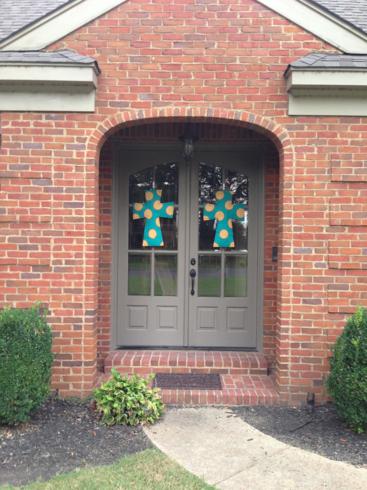
Even with our mess-ups, though, I think our reversible crosses came out pretty cute!  We both have a side that is turquoise with big yellow polka dots.  I didn't take a good detail shot but the yellow polka dots are lined with small brick red polka dots.  Super cute up close.  (And looks really nice with those really dead ferns, no?)

The other side of my cross is yellow with brown polka dots and a blue and white striped trim.  And yes, it looks like a chocolate chip cookie.  That was not really intentional.

IMG_5171.JPG
IMG_5172.JPG

I think Mom's look great!  It's hard for her to find door decorations that are affordable enough to buy two and don't look silly having two side by side.  I think these work as a set of two and since we had all the materials already, you can't beat free! 

IMG_5160.JPG
IMG_5161.JPG

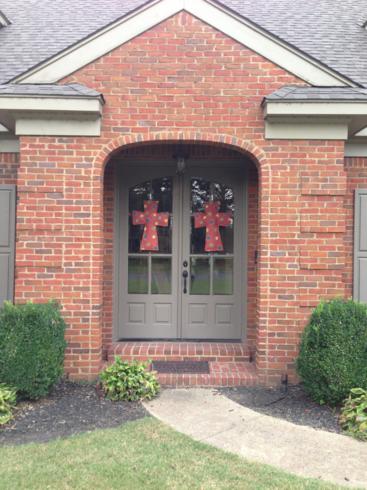
I need to take a close-up of her brick red side because it's really cute too.  

Now that we know we can do this and think we know how to do it better, the wheels are really turning in my head of all the different designs we could do.  I can't wait to get back at it!

Latch Board

Last week I made a new toy for Katie Wynn.  In all honesty, she's probably too young for it, but this toy is going to live at my parents' house and I have a feeling all of KW's cousins will enjoy playing with it too.  It's the perfect thing for us to keep out in my Dad's woodshop so that when the adults are building or painting or refinishing, the kids have something to do. 

The toy is a latch board, like this one that John and Sherry did on Young House Love

I used a piece of scrap wood that we already had, so the only thing I had to buy for this project was a whole bunch of latches.  I probably could've scrounged around the woodshop to find old ones but when I originally planned this it was gonna be a birthday gift for someone so I bought new ones.  (And obviously I ended up buying something else for the birthday gift.)  I chose to go with latches in different finishes to mix it up a little and I got them in bigger sizes than what John and Sherry used. 

After cutting the scrap board down to size, my mom put two coats of paint (on both sides) on it for me.  Then, the hardest part of this whole DIY was figuring out the arrangement of all the latches.

1.JPG
2.JPG

I had randomly grabbed this package of hook and eye closures to use in as filler if we needed them.  I'm glad I did because we ended up using all three of them in blank spaces.

3.JPG

After getting the arrangement figured out, then it was just a matter of screwing them all in place.  Easy peasy!

Latches closed...

Latches closed...

Latches open!

Latches open!

To finish it off, I adhered some small bumpers on the back so that the wood wouldn't scratch up any floors.  I know I said this toy was for out in the shop but I couldn't resist taking it inside to see what my little girl thought of it. 

7.JPG
8.JPG
9.JPG
11.JPG

So far it's a hit!  And I think she'll only grow to love it more when she figures out how to work the harder latches.  Right now, she's perfectly content with flipping the hinges back and forth.  :)  Yay for quick and easy projects!

Patio Makeover

A few weeks ago, my mom and I were out shopping and hitting up our favorite stores looking for some chairs to go with my new dining table (more on that later).  We had zero luck on finding the right dining chairs, but while we were at Garden Ridge we moseyed on over to the patio cushions and spotted some that looked like they might actually fit our old patio furniture.  A miracle! 

I say a miracle because I've been hunting for the right sized cushions for years!  We bought a set at an end-of-season JC Penny sale years ago and I've never really liked the striped fabric that was on the cushions that came with the set, but they worked fine for a while.  Then they set out in the elements and started to get a little worn looking so I started trying to replace them.  Every cushion I found, though, was sized to fit wicker or really small furniture. 

Furniture out on the patio of our old house. 

Furniture out on the patio of our old house. 

Obviously this furniture traveled with us to our new/current house and we plopped it down on our back patio.  We have big plans for this space...it has a great herringbone patterned brick floor and you can access it from three different rooms in the house.  The eventual plan will be to screen it in and then lay another brick patio out past it to extend it some.  We've already met with a contractor about it so now we're saving our pennies! 

The nice thing about this patio is that it's already covered so the furniture doesn't get rained on like it did at our other house.  Too bad the damage was already done! 

before 3.JPG
before 4.JPG

Can you say gross?  I mean, really, who wants to sit on that?  The view from the backyard really wasn't anything to write home about. 

before 2.JPG

So when we were at Garden Ridge and spotted the cushions that would actually fit this furniture, I forgot all about my dining room and started picking out a pattern.  I chose a khaki colored trellis-ish pattern that I thought would be safe a neutral.  I decided I could paint the wood part of the furniture any color I wanted and it would pop with the khaki. 

Boy was I wrong.  Matt's parents were visiting us when I came home with the new cushions.  We all decided a light blue would look good and luckily, I already had a gallon of it leftover from another project.  The next afternoon I got to work. 

Y'all, I think I chose the most humid day of the century to paint those dang pieces.  "Dripping with sweat" doesn't even accurately describe what I looked like.  More like, "jumped into a pool of smelly sweat."  It was miserable!!  Not only was it ridiculously hot outside, but the wood was soooo dry that it drank all of my paint right up!  I used almost a whole gallon on the four pieces (one loveseat, two chairs, one table) and it took for-ev-er.

The worst part?  When I was done with the first coat of paint, I could immediately tell that I hated it. 

mid 1.JPG

The light blue paint didn't pop at all and it made my neutral khaki colored cushions look yellow.  But still, I decided to sleep on it and see how it looked out on the patio the next day. 

The pale blue alone wasn't too bad on the patio.   

mid 3.JPG

Then I added the cushions and blah!  The clashing colors!  The competing patterns!  I was back to hating it. 

mid 4.JPG

I had no idea what to do.  Pick a different color of paint or find different cushions that would work with the blue?  I knew a second coat of paint was going to be necessary from the get-go, so all was not a total waste.  If I went with a different color this light blue would just be like my primer.  No biggie.  And thankfully, I had not ripped the tags off the cushions and I still had the receipt (this is rare for me!) so I could return the cushions.

In the end, I did both.  I went back to garden ridge and got different cushions and this time, found some paint that I knew would match them.  And since I was buying new paint, I went with exterior paint in a satin finish (the light blue was interior eggshell).   

Please tell me you love this new look as much as I do! 

after 3.JPG
after 5.JPG

The teal pops way more than the light blue, right??  And the cushions are really growing on me.  They weren't necessarily my favorites at the store, but I'm really starting to like how they look with the teal.  I also picked up some green throw pillows and a big green pouf that can serve as an ottoman or extra seating if we had a crowd. 

after 6.JPG
after 1.JPG

The view above on the right is what I see when I walk in from our garage door.  Sometimes I have to just stop and stare for a minute.  What a difference some paint and cushions can make!  The furniture looks brand new again.

Since I was sprucing up the patio, I also bought this cool mason jar that I found at Home Depot.  I couldn't resist!  It looks like a mercury glass jar during the day and then at night, thanks to it's solar-powered lid, it lights up like a little lantern!  LOOOOOOVE it!  I wish I could buy 28 more of them and string 'em up around our backyard.  Makes me wanna host an evening party.  :) 

after 9.JPG

Now that it looks so much better out on the patio, I really want to spend all my time out there.  But unfortunately we've recently learned that our little Katie bug is a magnet for mosquitoes so we haven't been able to spend as much time out there as I'd like.  It's got me itching to get the area screened-in as soon as possible.  If only I could figure out how to make those pennies we're saving magically multiply...

School Is In Session

If you're on Facebook, then your news feed has probably been full of first-day-of-school pictures lately.  At least I know mine has!  Now that it's late August, I think all schools are back in session and students and teachers are getting back into their daily routines. 

So when I started thinking about what Katie's monthly themed picture should be for August, it made sense to play off of going back to school.  It's what all the other kids are doing, right? 

I set up an old wooden desk in my mom's backyard this week and added a simple red apple.  I just loved the simplicity and old-school-ness of it all.   Feast your eyes on these precious pictures of my star pupil!

1.JPG
3.JPG
1.JPG
4.JPG
5.JPG
IMG_3841.JPG

One of my favorite things about these pictures, other than the cute little student, is that the desk she's sitting in is actually one from my alma mater, Lambuth.  When it closed a few years ago, I was able to purchase the desk for $25.  I had already started a mini collection of vintage school desks (I have three total now) and so I was thrilled to get this one.  It's probably one that I sat in at some point!  The plan will be for these to eventually go in the playroom, but I think I may have to creatively disguise some of the non-kid-friendly carvings in this one first.  

6.JPG
7.JPG
9.JPG
10.JPG

I know I'm totally biased, but I just think these pictures are too cute for words!  How will I ever pick a favorite for her official August one? 

11.JPG
12.JPG
13.JPG
14.JPG

She is the apple of my eye!! Har har har.

The Abundant Life Project

Welcome to the new blog, friends! 

I hope you found your way over here pretty easily from the old space.  I've been tinkering over here for so long now that it already feels more like home to me.  Hopefully it soon will to you too!

First things first, if you're a subscriber of posts (meaning you have posts sent to you through email whenever a new one appears), you will need to re-subscribe to this web address.  You will no longer receive updates from Give Everybody Nice Sweaters as new posts will no longer go there.  (But never fear, all the posts from there are over here now too!)

Why The Abundant Life Project?

I'm glad you asked.  :) 

Long time readers probably noticed several months ago that the layout of the old blog got a little wonky.  I'm by no means a techy person so I don't necessarily understand it all, but I think I was using a template that expired (?) and so it automatically switched to a default one that was not so great, to say the least.  It really limited me on what I could do. 

Obviously that had to be addressed. 

Also, I felt like it was time for a change.  It's crazy to think that I started blogging three and half years ago.  At the time, I had no idea if it was something I'd keep doing or not.  While I've definitely had some long...pauses, if you will...during busy times, I'm glad I've kept it up.  This is the scrapbook of our life and I want to be able to share it with our kids someday.  Three and half years is a LONG time when it comes to anything tech-related (would you keep a cell phone that long these days?) so we were definitely due a little upgrade.

I loved Give Everybody Nice Sweaters.  It continues to be one of my very favorite song lyrics.  But I suppose it didn't really make sense to anyone who showed up looking for a free winter wardrobe.  Ha!  Those people were probably very disappointed to see my blog.

So I was ready for a new name and with that, a new look.  I mentioned it to my favorite Tech Support, Matt, and he jumped on board to help me.  But first, he introduced me to Squarespace.  That means nothing at all to you non-bloggers, but it's a new platform that promises to be better all around - from writing posts to uploading (and editing!) pictures and on and on.  Now, normally I don't like learning new technology - I'm perfectly fine staying in the semi-dark ages - but Tech Support Matt made me think I could do this so I got out my credit card and bought in. 

But still, why The Abundant Life Project?

Oh right.  The name.   

Here's the thing: I am so not good with coming up with clever titles.  Nothing rhymes with my name.  There's nothing witty about what I do.  We don't live anywhere unique.  I just really could not come up with anything. 

And Doc?  Well, I love him but he just really wasn't coming up with anything good either.  The best I had come up with was playing off the literal location of our new house and calling the new blog The Corner House.  Turns out, though, that there are already a bunch of corner house blogs out there.  (Just google it!)  I really didn't want to be one of many.  I wanted something a little more unique than that.

Finally, one Sunday morning while we were getting ready for church, I thought I had it.  I was leaning hard towards something like The Family Project that had a tagline along the lines of "from power tools to sewing machines."  I really hadn't figured out the exact wording but it seemed to touch on all the main things I blog about.  There was the Family part, which I definitely ramble on and on about!  And the power tools tied into all of our renovations or restorations or woodshop creations.  The sewing machines is probably the newest main topic on the blog, but I have a feeling it's here to stay a while so it made sense to include it too.   And the word "project?"  Well, I cannot tell you how many times I'm asked "What project are you working on now?"  People who know me know I've always got something in the works.  I'm just living from project to project.

Later that same morning, while sitting in church mulling over how I would exactly word everything, our preacher started talking about living abundantly.

The thief comes only to steal and kill and destroy. I came that they may have life and have it abundantly.
— John 10:10

Hmmm...now that's food for thought.  Isn't one of my biggest projects to make sure I live abundantly?  Doc and I talked about it and we think characteristics of living abundantly include being generous, caring, thoughtful, happy, forgiving, and, as Doc put it, being the sunshine on someone's rainy day.  Y'all, that's something I can get behind.  That's what I want to be. 

I was torn.  Do I go with the name I'd been brainstorming all morning, or focus more on this idea from church and call the new blog something like Living Abundantly?  I had no idea.  I texted Tech Support Matt to see what he thought and, because he is a genius with all things creative and brand-y and design-y, he suggested smashing the two names together.   

And that's how The Abundant Life Project was born.   It helped that the domain was available for purchase too.  :)

So yay!  New space!  New name!  I hope you like it.  I promise I won't disappear for so long again.

Now, it's not quite perfect yet.  I'm still learning how it all works - it's COMPLETELY different from wordpress - so bear with me if things get wonky occasionally.  I can be a slow learner and sometime technology makes me want to cry.  But I'm trying my best here!

Oh!  Before I wrap this up, I'd love your thoughts and opinions.  What do you think of the new space?  Love it or hate it?  Have a better name idea?  (I suppose it's not too late to change it again...)  Something missing that you'd like to see?  Font too small?  Too light?  Pictures too big or too small?  Please leave me a comment!  Actually, even if you don't really have anything to say, leave a comment anyway...I haven't really tested to see how those work yet.  Lemme know if it's easy or hard to do. 

After you comment, be sure to check out the test posts I did.  There's a super yummy and easy recipe for you, an update on our never-ending rental house saga, and some fun pictures of my favorite little girl! 

Once again, welcome to The Abundant Life Project!!  Glad to have you here.  :) 

Fun fact: While writing this post, I typed the word "abundant" wrong every. single. time. and had to backspace to correct it.  I may have chosen poorly on this new name... 

Fun fact #2: My husband's real name is Matt (but no, not Tech Support Matt).  I think I'll call him that from now on.  :)