Labor Day Weekend

I wish I was here to tell you about the fun vacation we want on over the long weekend, but there was no fun vacation.  We were just home for three days with absolutely nothing we HAD to do.  Sometimes these are my very favorite weekends! 

I was scrolling through my phone pictures so I could at least give some kind of update, but I didn't do a very good job of taking pictures.  I guess we didn't really do anything interesting!  One thing is for sure, we slept in every morning.  Lately, this little girl has been coming to our bed in the 6 o'clock hour so we can all catch another hour or two of sleep.  I love snuggling with her, but sometimes she just outright takes over my spot in the bed!   Pictured on the right is Katie bug napping in her crib.  I can't remember why I had stripped her clothes off her.  I'm sure she had gotten into something!

IMG_5164.JPG
IMG_5181.JPG

Have I ever told you about how she loves admiring herself in the mirror?  #girlproblems

IMG_5198.JPG
IMG_5199.JPG

For the most part, Katie Wynn loves any and every kind of food we put in her mouth.  She has not really turned her nose up at anything, nor does she get over excited about any one particular food.  There is one thing that gets her kickin-her-legs excited, though...sweet tea.  Her Mimi usually always orders a glass of it and lets her have a sip or two from her straw.  This girl can't get enough of it!  I guess she really is a true Southern girl. 

IMG_5200.JPG
IMG_5201.JPG
IMG_5202.JPG

Katie Wynn spent Labor Day in a new outfit her Mimi made.  The top is reversible and the bloomers are red with little white polka dots.  Too cute!  I've been trying to do a better job of putting bows in her hair since her bangs are getting so long, but she immediately tries to yank them out.  The picture on the far right shows the look she gives me when I won't let her grab it and she's tired of taking pictures.

IMG_5218.JPG
IMG_5219.JPG
IMG_5223.JPG

Check out these monogrammed shoes we made her.  Almost all of it was done on the embroidery machine!  The very last step is done on the sewing machine, but that's it.  These pictures don't really do them justice; I think they're a lot cuter in person.  Of course, hers were practically black after crawling around the floors in them all day! 

IMG_5226.JPG
IMG_5227.JPG

I'm in the middle of a bunch of different projects right now.  I want to update you on all of them but most of them are only half-finished.  A lot of the weekend was spent on a woodshop project for KW's upcoming birthday party (!).  Dad and Matt spent a lot of time on it.  Mom and I are still working on the burlap door hanger tutorial for you. We, uh, figured out another way NOT to make them.  Third time's a charm, right?  I have a really good feeling about the method we're trying out now so hopefully a tutorial will be coming soon.  

I'm also in the midst of trying to figure out our dining room.  That deserves a post of its own.  But as of this weekend, I'm the proud owner of this pretty dining set.   

IMG_5168.JPG

I purchased it at the Habitat for Humanity Restore for a whopping $122.  I only wanted the four chairs but they wouldn't split up the set.  I plan on donating the table to our fall church auction.  I have another set of four chairs very similar to these headed my way.  I hope to be able to pick them up on Friday, which means this coming weekend may be spent painting chairs!  Hopefully I can make them look better than they currently do...I don't plan on adding a plastic covering over the seat cushions! 

We ended our holiday weekend with a cookout at my parents' house.  Before dinner was ready, we walked over to their neighbors' for one last summer swim.  I had snagged this suit off the Gap clearance rack about a month ago, but hadn't had a chance to put it on KW yet.  I'm glad she got to at least wear it once before outgrowing it!  It should still fit when we go to the beach in a few weeks, so that's good.  Aren't those ears and ruffles just the cutest? 

IMG_5231.JPG
IMG_5233.JPG
IMG_5238.JPG

Does anyone want to come over to play "Nail Salon?"  I think Katie Wynn is ready to start giving manis and pedis! 

IMG_5242.JPG

Hope you all had a fantastic long weekend!  What'd you do?  Anything fun?  I'll be back with more soon. 

Burlap Door Hanger

My mom and I got crafty this past weekend and tried our hand at making those burlap door decorations you see everywhere.  I love the "burlees" because they're cute, come in a huge variety of different designs, and they don't scratch up your doors.  Win, win, win!

This reversible pumpkin is the first one I ever bought and it might still be my favorite. 

pumpkin 1.jpg
pumpkin 2.jpg

The other two that I have are a Christmas stocking and the "It's A Girl" one from when Katie Wynn was born.  It hangs on her bedroom door now.

stocking.jpg
it's a girl.jpg

My mom's front doors are double doors so she always has to buy two door hangers.  She's got two cute Christmas ones in the shape of ornaments but I don't have a picture of them.  This past spring we both bought burlap door hangers that look like flower pots with three flowers in them.  These are not the official Burlee brand that you can buy in boutiques, but instead made by someone local.  They were ok, but neither of us LOVED them and by now we were ready for a change. 

I took pictures along the way of our process so that I could do a tutorial for you, but we know we did a few things wrong so I'm not ready to share the process yet.  We have plans to have another craft weekend and make more so I'll do a tutorial after we've worked out some of the kinks. 

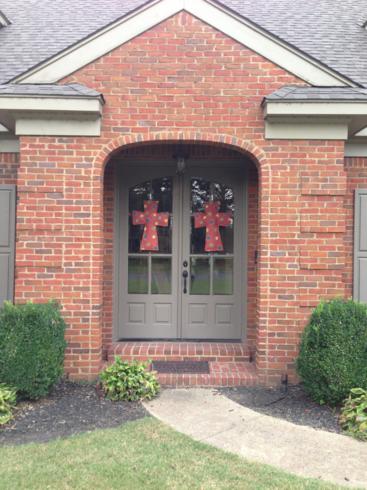
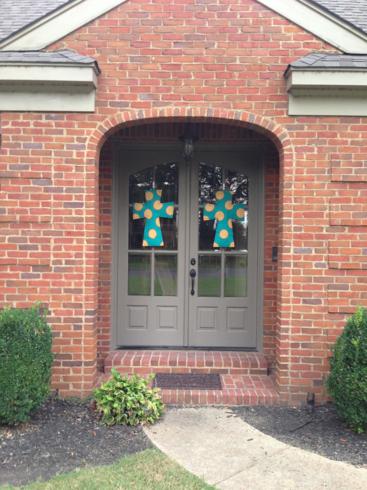
Even with our mess-ups, though, I think our reversible crosses came out pretty cute!  We both have a side that is turquoise with big yellow polka dots.  I didn't take a good detail shot but the yellow polka dots are lined with small brick red polka dots.  Super cute up close.  (And looks really nice with those really dead ferns, no?)

The other side of my cross is yellow with brown polka dots and a blue and white striped trim.  And yes, it looks like a chocolate chip cookie.  That was not really intentional.

IMG_5171.JPG
IMG_5172.JPG

I think Mom's look great!  It's hard for her to find door decorations that are affordable enough to buy two and don't look silly having two side by side.  I think these work as a set of two and since we had all the materials already, you can't beat free! 

IMG_5160.JPG
IMG_5161.JPG

I need to take a close-up of her brick red side because it's really cute too.  

Now that we know we can do this and think we know how to do it better, the wheels are really turning in my head of all the different designs we could do.  I can't wait to get back at it!

Latch Board

Last week I made a new toy for Katie Wynn.  In all honesty, she's probably too young for it, but this toy is going to live at my parents' house and I have a feeling all of KW's cousins will enjoy playing with it too.  It's the perfect thing for us to keep out in my Dad's woodshop so that when the adults are building or painting or refinishing, the kids have something to do. 

The toy is a latch board, like this one that John and Sherry did on Young House Love

I used a piece of scrap wood that we already had, so the only thing I had to buy for this project was a whole bunch of latches.  I probably could've scrounged around the woodshop to find old ones but when I originally planned this it was gonna be a birthday gift for someone so I bought new ones.  (And obviously I ended up buying something else for the birthday gift.)  I chose to go with latches in different finishes to mix it up a little and I got them in bigger sizes than what John and Sherry used. 

After cutting the scrap board down to size, my mom put two coats of paint (on both sides) on it for me.  Then, the hardest part of this whole DIY was figuring out the arrangement of all the latches.

1.JPG
2.JPG

I had randomly grabbed this package of hook and eye closures to use in as filler if we needed them.  I'm glad I did because we ended up using all three of them in blank spaces.

3.JPG

After getting the arrangement figured out, then it was just a matter of screwing them all in place.  Easy peasy!

Latches closed...

Latches closed...

Latches open!

Latches open!

To finish it off, I adhered some small bumpers on the back so that the wood wouldn't scratch up any floors.  I know I said this toy was for out in the shop but I couldn't resist taking it inside to see what my little girl thought of it. 

7.JPG
8.JPG
9.JPG
11.JPG

So far it's a hit!  And I think she'll only grow to love it more when she figures out how to work the harder latches.  Right now, she's perfectly content with flipping the hinges back and forth.  :)  Yay for quick and easy projects!

Patio Makeover

A few weeks ago, my mom and I were out shopping and hitting up our favorite stores looking for some chairs to go with my new dining table (more on that later).  We had zero luck on finding the right dining chairs, but while we were at Garden Ridge we moseyed on over to the patio cushions and spotted some that looked like they might actually fit our old patio furniture.  A miracle! 

I say a miracle because I've been hunting for the right sized cushions for years!  We bought a set at an end-of-season JC Penny sale years ago and I've never really liked the striped fabric that was on the cushions that came with the set, but they worked fine for a while.  Then they set out in the elements and started to get a little worn looking so I started trying to replace them.  Every cushion I found, though, was sized to fit wicker or really small furniture. 

Furniture out on the patio of our old house. 

Furniture out on the patio of our old house. 

Obviously this furniture traveled with us to our new/current house and we plopped it down on our back patio.  We have big plans for this space...it has a great herringbone patterned brick floor and you can access it from three different rooms in the house.  The eventual plan will be to screen it in and then lay another brick patio out past it to extend it some.  We've already met with a contractor about it so now we're saving our pennies! 

The nice thing about this patio is that it's already covered so the furniture doesn't get rained on like it did at our other house.  Too bad the damage was already done! 

before 3.JPG
before 4.JPG

Can you say gross?  I mean, really, who wants to sit on that?  The view from the backyard really wasn't anything to write home about. 

before 2.JPG

So when we were at Garden Ridge and spotted the cushions that would actually fit this furniture, I forgot all about my dining room and started picking out a pattern.  I chose a khaki colored trellis-ish pattern that I thought would be safe a neutral.  I decided I could paint the wood part of the furniture any color I wanted and it would pop with the khaki. 

Boy was I wrong.  Matt's parents were visiting us when I came home with the new cushions.  We all decided a light blue would look good and luckily, I already had a gallon of it leftover from another project.  The next afternoon I got to work. 

Y'all, I think I chose the most humid day of the century to paint those dang pieces.  "Dripping with sweat" doesn't even accurately describe what I looked like.  More like, "jumped into a pool of smelly sweat."  It was miserable!!  Not only was it ridiculously hot outside, but the wood was soooo dry that it drank all of my paint right up!  I used almost a whole gallon on the four pieces (one loveseat, two chairs, one table) and it took for-ev-er.

The worst part?  When I was done with the first coat of paint, I could immediately tell that I hated it. 

mid 1.JPG

The light blue paint didn't pop at all and it made my neutral khaki colored cushions look yellow.  But still, I decided to sleep on it and see how it looked out on the patio the next day. 

The pale blue alone wasn't too bad on the patio.   

mid 3.JPG

Then I added the cushions and blah!  The clashing colors!  The competing patterns!  I was back to hating it. 

mid 4.JPG

I had no idea what to do.  Pick a different color of paint or find different cushions that would work with the blue?  I knew a second coat of paint was going to be necessary from the get-go, so all was not a total waste.  If I went with a different color this light blue would just be like my primer.  No biggie.  And thankfully, I had not ripped the tags off the cushions and I still had the receipt (this is rare for me!) so I could return the cushions.

In the end, I did both.  I went back to garden ridge and got different cushions and this time, found some paint that I knew would match them.  And since I was buying new paint, I went with exterior paint in a satin finish (the light blue was interior eggshell).   

Please tell me you love this new look as much as I do! 

after 3.JPG
after 5.JPG

The teal pops way more than the light blue, right??  And the cushions are really growing on me.  They weren't necessarily my favorites at the store, but I'm really starting to like how they look with the teal.  I also picked up some green throw pillows and a big green pouf that can serve as an ottoman or extra seating if we had a crowd. 

after 6.JPG
after 1.JPG

The view above on the right is what I see when I walk in from our garage door.  Sometimes I have to just stop and stare for a minute.  What a difference some paint and cushions can make!  The furniture looks brand new again.

Since I was sprucing up the patio, I also bought this cool mason jar that I found at Home Depot.  I couldn't resist!  It looks like a mercury glass jar during the day and then at night, thanks to it's solar-powered lid, it lights up like a little lantern!  LOOOOOOVE it!  I wish I could buy 28 more of them and string 'em up around our backyard.  Makes me wanna host an evening party.  :) 

after 9.JPG

Now that it looks so much better out on the patio, I really want to spend all my time out there.  But unfortunately we've recently learned that our little Katie bug is a magnet for mosquitoes so we haven't been able to spend as much time out there as I'd like.  It's got me itching to get the area screened-in as soon as possible.  If only I could figure out how to make those pennies we're saving magically multiply...

School Is In Session

If you're on Facebook, then your news feed has probably been full of first-day-of-school pictures lately.  At least I know mine has!  Now that it's late August, I think all schools are back in session and students and teachers are getting back into their daily routines. 

So when I started thinking about what Katie's monthly themed picture should be for August, it made sense to play off of going back to school.  It's what all the other kids are doing, right? 

I set up an old wooden desk in my mom's backyard this week and added a simple red apple.  I just loved the simplicity and old-school-ness of it all.   Feast your eyes on these precious pictures of my star pupil!

1.JPG
3.JPG
1.JPG
4.JPG
5.JPG
IMG_3841.JPG

One of my favorite things about these pictures, other than the cute little student, is that the desk she's sitting in is actually one from my alma mater, Lambuth.  When it closed a few years ago, I was able to purchase the desk for $25.  I had already started a mini collection of vintage school desks (I have three total now) and so I was thrilled to get this one.  It's probably one that I sat in at some point!  The plan will be for these to eventually go in the playroom, but I think I may have to creatively disguise some of the non-kid-friendly carvings in this one first.  

6.JPG
7.JPG
9.JPG
10.JPG

I know I'm totally biased, but I just think these pictures are too cute for words!  How will I ever pick a favorite for her official August one? 

11.JPG
12.JPG
13.JPG
14.JPG

She is the apple of my eye!! Har har har.