The Abundant Life Project

Welcome to the new blog, friends! 

I hope you found your way over here pretty easily from the old space.  I've been tinkering over here for so long now that it already feels more like home to me.  Hopefully it soon will to you too!

First things first, if you're a subscriber of posts (meaning you have posts sent to you through email whenever a new one appears), you will need to re-subscribe to this web address.  You will no longer receive updates from Give Everybody Nice Sweaters as new posts will no longer go there.  (But never fear, all the posts from there are over here now too!)

Why The Abundant Life Project?

I'm glad you asked.  :) 

Long time readers probably noticed several months ago that the layout of the old blog got a little wonky.  I'm by no means a techy person so I don't necessarily understand it all, but I think I was using a template that expired (?) and so it automatically switched to a default one that was not so great, to say the least.  It really limited me on what I could do. 

Obviously that had to be addressed. 

Also, I felt like it was time for a change.  It's crazy to think that I started blogging three and half years ago.  At the time, I had no idea if it was something I'd keep doing or not.  While I've definitely had some long...pauses, if you will...during busy times, I'm glad I've kept it up.  This is the scrapbook of our life and I want to be able to share it with our kids someday.  Three and half years is a LONG time when it comes to anything tech-related (would you keep a cell phone that long these days?) so we were definitely due a little upgrade.

I loved Give Everybody Nice Sweaters.  It continues to be one of my very favorite song lyrics.  But I suppose it didn't really make sense to anyone who showed up looking for a free winter wardrobe.  Ha!  Those people were probably very disappointed to see my blog.

So I was ready for a new name and with that, a new look.  I mentioned it to my favorite Tech Support, Matt, and he jumped on board to help me.  But first, he introduced me to Squarespace.  That means nothing at all to you non-bloggers, but it's a new platform that promises to be better all around - from writing posts to uploading (and editing!) pictures and on and on.  Now, normally I don't like learning new technology - I'm perfectly fine staying in the semi-dark ages - but Tech Support Matt made me think I could do this so I got out my credit card and bought in. 

But still, why The Abundant Life Project?

Oh right.  The name.   

Here's the thing: I am so not good with coming up with clever titles.  Nothing rhymes with my name.  There's nothing witty about what I do.  We don't live anywhere unique.  I just really could not come up with anything. 

And Doc?  Well, I love him but he just really wasn't coming up with anything good either.  The best I had come up with was playing off the literal location of our new house and calling the new blog The Corner House.  Turns out, though, that there are already a bunch of corner house blogs out there.  (Just google it!)  I really didn't want to be one of many.  I wanted something a little more unique than that.

Finally, one Sunday morning while we were getting ready for church, I thought I had it.  I was leaning hard towards something like The Family Project that had a tagline along the lines of "from power tools to sewing machines."  I really hadn't figured out the exact wording but it seemed to touch on all the main things I blog about.  There was the Family part, which I definitely ramble on and on about!  And the power tools tied into all of our renovations or restorations or woodshop creations.  The sewing machines is probably the newest main topic on the blog, but I have a feeling it's here to stay a while so it made sense to include it too.   And the word "project?"  Well, I cannot tell you how many times I'm asked "What project are you working on now?"  People who know me know I've always got something in the works.  I'm just living from project to project.

Later that same morning, while sitting in church mulling over how I would exactly word everything, our preacher started talking about living abundantly.

The thief comes only to steal and kill and destroy. I came that they may have life and have it abundantly.
— John 10:10

Hmmm...now that's food for thought.  Isn't one of my biggest projects to make sure I live abundantly?  Doc and I talked about it and we think characteristics of living abundantly include being generous, caring, thoughtful, happy, forgiving, and, as Doc put it, being the sunshine on someone's rainy day.  Y'all, that's something I can get behind.  That's what I want to be. 

I was torn.  Do I go with the name I'd been brainstorming all morning, or focus more on this idea from church and call the new blog something like Living Abundantly?  I had no idea.  I texted Tech Support Matt to see what he thought and, because he is a genius with all things creative and brand-y and design-y, he suggested smashing the two names together.   

And that's how The Abundant Life Project was born.   It helped that the domain was available for purchase too.  :)

So yay!  New space!  New name!  I hope you like it.  I promise I won't disappear for so long again.

Now, it's not quite perfect yet.  I'm still learning how it all works - it's COMPLETELY different from wordpress - so bear with me if things get wonky occasionally.  I can be a slow learner and sometime technology makes me want to cry.  But I'm trying my best here!

Oh!  Before I wrap this up, I'd love your thoughts and opinions.  What do you think of the new space?  Love it or hate it?  Have a better name idea?  (I suppose it's not too late to change it again...)  Something missing that you'd like to see?  Font too small?  Too light?  Pictures too big or too small?  Please leave me a comment!  Actually, even if you don't really have anything to say, leave a comment anyway...I haven't really tested to see how those work yet.  Lemme know if it's easy or hard to do. 

After you comment, be sure to check out the test posts I did.  There's a super yummy and easy recipe for you, an update on our never-ending rental house saga, and some fun pictures of my favorite little girl! 

Once again, welcome to The Abundant Life Project!!  Glad to have you here.  :) 

Fun fact: While writing this post, I typed the word "abundant" wrong every. single. time. and had to backspace to correct it.  I may have chosen poorly on this new name... 

Fun fact #2: My husband's real name is Matt (but no, not Tech Support Matt).  I think I'll call him that from now on.  :) 

Recent Happenings

Here are some pics from my phone from what we've been up to over the past month. 

Fun times at the swimming pool!

Fun times at the swimming pool!

Helping trim Mimi's flower beds for her birthday.

Helping trim Mimi's flower beds for her birthday.

Happy times out at a restaurant with friends!

Happy times out at a restaurant with friends!

Llama, Llama, Nighty Night read by Poppy.

Llama, Llama, Nighty Night read by Poppy.

We have been so incredibly busy the last month with work and other projects, but we've managed to squeeze in some fun times too.  We had the big kids a couple weekends ago and they just play so well with Katie Wynn!  They adore her and she loves them right back.  We signed up as a 5K together and all did well.  Wyatt finished 20th overall!  I pushed Katie Wynn in the stroller and am just glad we finished! 

Before

Before

After

After

I ordered this cute push wagon toy for Katie Wynn for her upcoming birthday.  The day it came in, I put it together to see how it looked and Katie Wynn grabbed hold of it and just took off walking!  We decided to let her go ahead and have it since she may be already walking on her own by the time her birthday gets here.  She LOVES it!  She walks behind it some but mostly she loves crawling in and out of it.  And if you're around when she crawls into it, you better get ready to give her a push!

wagon.JPG
wagon.JPG
wagon.JPG
wagon.JPG

Speaking of her new favorite toy, we had friends over for dinner one night and Katie Wynn did a good job of sharing the wagon her friend Addi Clare.  By "sharing," though, I mean she somehow convinced Addi Clare she should push her around in it.  

IMG_5016.JPG
IMG_5018.JPG
IMG_5019.JPG

Another one of Katie Wynn's current favorite activities is making a royal mess.  I imagine this is an activity she will continue to perfect over the years.

IMG_5004.JPG
IMG_4910.JPG
IMG_4977.JPG

While we were visiting my aunt a week or two ago, Katie bug found a horsie her size! 

IMG_4970.JPG
IMG_4972.JPG

One day while shopping I set KW down on the floor in Gymboree so I could skim the sale rack.  Next thing I knew, she was standing up going through the clothes rack too!  My job here may be done...

IMG_4948.JPG

My mom was keeping Jett and Bren one day and KW and I came to visit.  We told the kids that if they behaved all morning we could go out to eat for lunch and they could even choose the place.  That's how we ended up sitting in a booth at the gas station McDonald's enjoying some fine dining.

mcdonalds.JPG

I think that gets us pretty caught up.  It's been a busy summer but we have been enjoying every minute with this sweet little girl!

IMG_5036.JPG
IMG_5038.JPG

Rental House Update

It's been a while since the ceiling fell in at our old house.  Almost three months, I think.  And, thankfully, a lot has happened in those three months.  The condition of the house is much, much better, but it got a lot worse first.

When we last talked, I showed you these sad pictures of our living room with no ceiling.  

photo 4.JPG
photo 1.JPG

Before we left on our beach vacation, we had lots of choices to make.  The extent of the damage was so great that nearly everything in the house had to be replaced.  Not wanting to hold up any renovation progress, we quickly selected hard woods, carpet, tile, paint colors, light fixtures, vanity, and who knows what else.  For the most part, we stuck with what was already there. 

Mid-summer, we visited the house to check on the progress and saw that LOTS of demo had taken place.  While the ceiling had already been patched and looked much better, everything else had been torn out.  Gone was the upstairs carpet, all the hardwoods, bathroom fixtures, and window blinds.  When our contractor removed the hardwood floors, they found standing water on the foundation so they had to wait a week for it to dry out and then had to let the new wood acclimate inside the house.  Talk about a long drawn out process! 

photo 2 (3).JPG
photo 3 (3).JPG
photo 1 (3).JPG
photo 3 (2).JPG
photo 5 (2).JPG
photo 1 (4).JPG

We stopped by a few weeks later to see that the new hardwoods were in and the thin set was drying in the master bath.  The new chandelier was also hanging in the dining room.

photo 2 (4).JPG
photo 2 (2).JPG
photo 1 (2).JPG

Work continued until finally, about two weeks ago, we visited the house one last time before our tenant was set to move in the next day.  The new carpet had been installed; the new hardwoods were in; the master bath had been tiled; and new light fixtures were in.  All the walls had a fresh coat of paint.  We learned that they also had to re-tile around our fireplace, and that was finished.  While there was still a lot of cleaning up and finishing touches left to do - including hooking up bathroom fixtures and setting kitchen appliances back in place - it was finally starting to look like a real house again!

photo 1 (5).JPG
photo 2 (5).JPG
photo 5 (3).JPG
photo 4 (5).JPG
photo 3 (5).JPG

Practically a brand new house!!

So that was the last time we saw our house.  The sealer was going to be applied to the stairs and banisters later that same afternoon and then our tenant would move in the next morning.  A terrible situation was coming to an end. 

If only it had all ended there.  What we know now is that the new vanity in the master bathroom is four inches too short.  Grrrr.  And it was custom made so a new one had to be re-ordered.  Thankfully, it's set to go in this Friday.  Also, the tenant complained of the master shower leaking.  Grrrr again.  Luckily this is a fairly easy fix with some re-caulking.  So, fingers crossed, by the weekend the house repairs will be D-O-N-E. 

But we all know the landlord fun never ends, right?   

We received a formal complaint from our HOA this week about the noise and parties that go on at our house.  Apparently, our tenant likes to party hard and, as the email sent by a neighbor said, is turning our house into a fraternity house.  Parties go on until the wee hours of the morning and the party-goers litter our neighbors' yards with cigarette butts and vomit.  Awesome.   

Our management company is working on the situation and giving some kind of "cease and desist" letter to the tenant.  If he doesn't clean up his act, he'll get the boot.  It's possible that less than a month after our first major landlord renovation, we'll get to serve our first eviction notice!

Ay, yi, yi.  When does it ever end? 

S'more Bites

Here's a quick recipe you're sure to love.  It's quick, easy, and tastes delicious!   I can't for the life of me find where the original recipe was posted.  Someone shared it on Facebook and now it's not on their page anymore.  Doesn't really matter, though, because I changed it just a tad.  Here goes!  (Full recipe at bottom of post.)

1.JPG
2.JPG
3.JPG
4.JPG
5.JPG
6.JPG
7.JPG
8.JPG
9.JPG

S'more Bites

  • 1 heaping cup graham cracker crumbs
  • 1/4 cup powdered sugar
  • 1 stick butter, melted
  • 12 large marshmallows
  • 3 chocolate bars

Mix cracker crums, powdered sugar, and butter.  Press crust into 2 greased mini muffin pans.  Bake crusts at 350 degrees for 4-5 minutes, or until bubbly.  While that's baking, break apart chocolate bar and slice marshmallows in half.  Remove crusts from oven and add chocolate (I break my pieces in half) and top with marshmallow half, sticky side down.  Return to oven for another 1 to 2 minutes, just allowing marshmallows to start melting.  Remove from oven and place on cooling rack.  Cool completely.  Melt remaining chocolate bar and dip bites into chocolate.  Allow to cool and enjoy!  Yields about 24 bites.

10.JPG
By far one of my most favorite desserts!
— Doc

Put A Shelf On It

As you probably know from reading this blog, I love a good room makeover.  And I've realized that when I'm working on rooms, one of my go-to decor items is a shelf to hang on the wall.  Who doesn't love a place to display cute things? Let's go ahead and queue up some Beyonce for this post..."If you like it, then you prob'ly put a shelf on it..."

You can buy a wall shelf practically anywhere.  But why would you when they're so darn easy (and cheap!) to make?  I think the first one I did was for my friend Kim's room.  This picture isn't great but I LOVED how the distressed blue turned out on it.

Shortly after Kim's shelf was hung, my mom demanded requested we make one for above her bed.  Again, you can't really tell in the picture, but hers is a distressed black to match her black and brown furniture.

shelf.jpg

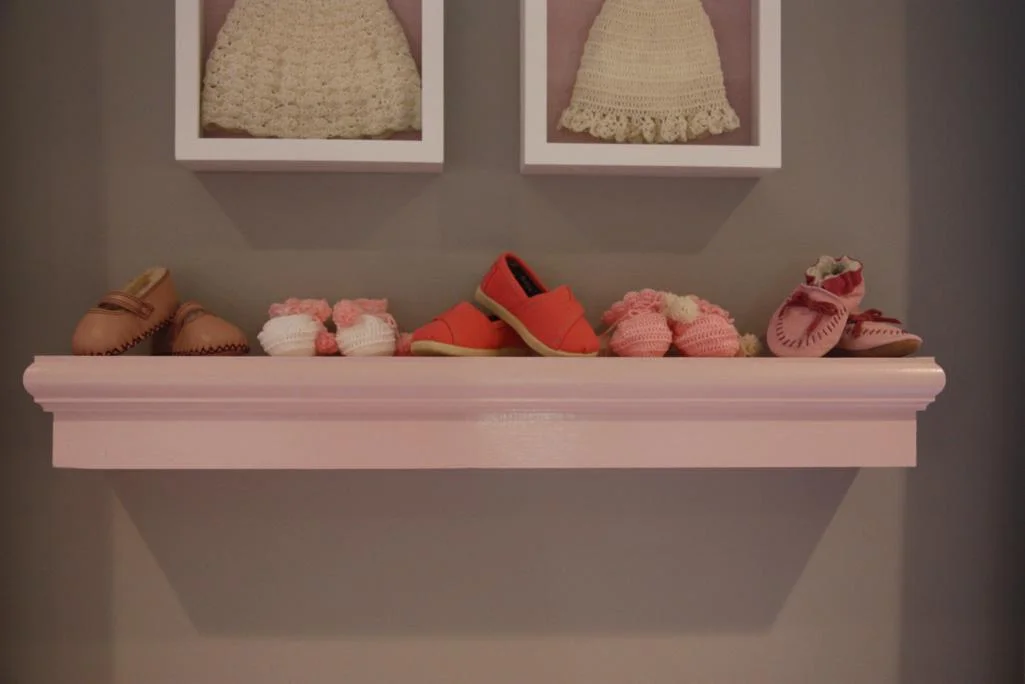
Last summer we made another shelf and painted it pale pink for Katie Wynn's nursery.  It's the perfect place for little pink shoes!

IMG_8174.jpg

And then this winter we made two matching shelves for our favorite little twins.

So last weekend when we were wrapping up our mini bathroom renovation (pics coming soon!) and I was hunting for something to hang on the wall, I thought, duh! I'll make another little shelf.  Perfect for a bathroom!

I thought I'd take pictures along the way so that you guys can give your walls some shelf lovin' too.

Here are the supplies I started with from left to right: one 1x6  (I usually use a 1x4 but wanted a wider shelf this time) one 1x4 three different moldings in varying sizes

1.jpg

The first thing I did was figure out how long I wanted the shelf to be (about shoulders' width) and cut my 1x6 to length.  I also cut two pieces out of the 1x4 the same length.  I used a miter saw but you could use a hand saw if it's all you have.

2.jpg

Next, I nailed the three boards together in a U shape, making sure the 1x6 was on front of the 1x4s.  (That probably doesn't make sense, but see pictures below.)  You could do this with just wood glue, but you'd need to clamp it and wait for it to dry before moving on.

3.jpg
4.jpg

I measured the openings on the ends and cut two more pieces of my 1x4 to fit inside.  Then I just nailed them in place.  At this point I basically had a long rectangular box with no lid on it.

5.jpg

You could totally stop here if straight lines are your thing and you just want a boxy shelf.

6.jpg

I wanted to fancy mine up though, so I got busy cutting my molding.  I started with my widest piece and cut it into three pieces that would wrap around the shelf.  I mitered my edges so I used the miter saw again, but a miter box would work too.

7.jpg

This picture is just so you know what mitered edges are.  They're cut at an angle instead of meeting at 90 degrees.

8.jpg

Once the pieces were cut to the right size (I always remind myself here that wood putty is my friend!), I tacked them with nails around the top edge of the shelf.  Wood glue would work here too, just clamp and let dry.  In this picture, the open side of the box is now in the back.  That's the side that will eventually go up against the wall.

9.jpg

I always attach my trim just a little bit above the top of the shelf to create a little lip.  This keeps items on the shelf from rolling off.

10.jpg

You could stop here too if you wanted - that's where I stopped on all the shelves pictured at the top of this post - but I wanted to fancy mine up a little bit so I kept going.  I cut my next piece of molding to fit the shelf and bumped it up right underneath the top piece.

11.jpg

And just for fun, I decided to add one more piece of trim.  I wanted something with lots of curves because the wall I planned to hang it on has lots of straight lines.  Instead of bumping my third piece of trim up against the other two, I lined it up with the bottom of the box.  You can see in the picture below that there is a small gap with no molding.

12.jpg

My apologies, but this is where my step-by-step pictures fall off a little.  I must've gotten excited about the end product and forgot to snap pics along the way.  The last step in the "construction" face is to wood putty all the holes and imperfections, let it dry, and then sand it smooth.  Wood putty can hide lots of boo boos!

Later, I painted the shelf a solid blue-green color.  I had a specific look I was going for though (I was trying to match something I already had) so leaving it with just that solid coat of paint wouldn't work.  After it dried, I barely roughed it up with some sandpaper.  Just enough for the wood to show through in a few spots, but not crazy distressed.  Then I started adding a brown glaze to it.  In the picture below, I've started adding the glaze to the left side of the shelf.  The right side is just the paint that has been sanded a little.

13.jpg

The top of the shelf before glaze was added.

14.jpg

Bottom of the shelf that has already been glazed.

15.jpg

Shoot.  I'm kicking myself for totally slacking on the pictures after this.  You'll just have to imagine it from here on out.  I glazed over the whole thing, wiping it off and adding more until I got the finish I was going for.  Once it was dried, I added a coat of water-based polyurethane.

To hang the shelf, you have to put a cleat on the wall.  It's important to make sure whatever you're using for your cleat fits inside the back of your box/shelf.  I used a 2x2 that was cut about 5 inches shorter than my shelf.  After deciding where I wanted the shelf to hang, I screwed my cleat into the wall, making sure to hit at least one stud.  Then, I placed the shelf over the cleat and screwed two short screws down on the top of the shelf attaching it to the cleat.  Make sure you use screws instead of nails so you can eventually remove it without killing your walls!

Here's the final product this time!  Ignore what's sitting on top of the shelf...I haven't figured out what I want up there yet.  But the curvy lines look good, no?

16.jpg

Details coming soon of our bathroom makeover!