Put A Shelf On It

As you probably know from reading this blog, I love a good room makeover.  And I've realized that when I'm working on rooms, one of my go-to decor items is a shelf to hang on the wall.  Who doesn't love a place to display cute things? Let's go ahead and queue up some Beyonce for this post..."If you like it, then you prob'ly put a shelf on it..."

You can buy a wall shelf practically anywhere.  But why would you when they're so darn easy (and cheap!) to make?  I think the first one I did was for my friend Kim's room.  This picture isn't great but I LOVED how the distressed blue turned out on it.

Shortly after Kim's shelf was hung, my mom demanded requested we make one for above her bed.  Again, you can't really tell in the picture, but hers is a distressed black to match her black and brown furniture.

shelf.jpg

Last summer we made another shelf and painted it pale pink for Katie Wynn's nursery.  It's the perfect place for little pink shoes!

IMG_8174.jpg

And then this winter we made two matching shelves for our favorite little twins.

So last weekend when we were wrapping up our mini bathroom renovation (pics coming soon!) and I was hunting for something to hang on the wall, I thought, duh! I'll make another little shelf.  Perfect for a bathroom!

I thought I'd take pictures along the way so that you guys can give your walls some shelf lovin' too.

Here are the supplies I started with from left to right: one 1x6  (I usually use a 1x4 but wanted a wider shelf this time) one 1x4 three different moldings in varying sizes

1.jpg

The first thing I did was figure out how long I wanted the shelf to be (about shoulders' width) and cut my 1x6 to length.  I also cut two pieces out of the 1x4 the same length.  I used a miter saw but you could use a hand saw if it's all you have.

2.jpg

Next, I nailed the three boards together in a U shape, making sure the 1x6 was on front of the 1x4s.  (That probably doesn't make sense, but see pictures below.)  You could do this with just wood glue, but you'd need to clamp it and wait for it to dry before moving on.

3.jpg
4.jpg

I measured the openings on the ends and cut two more pieces of my 1x4 to fit inside.  Then I just nailed them in place.  At this point I basically had a long rectangular box with no lid on it.

5.jpg

You could totally stop here if straight lines are your thing and you just want a boxy shelf.

6.jpg

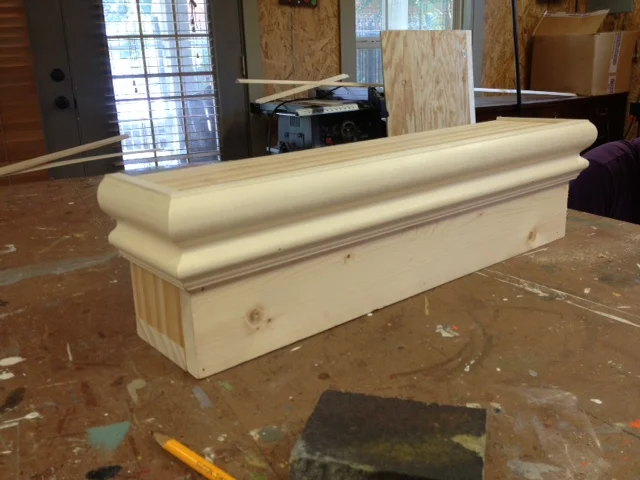
I wanted to fancy mine up though, so I got busy cutting my molding.  I started with my widest piece and cut it into three pieces that would wrap around the shelf.  I mitered my edges so I used the miter saw again, but a miter box would work too.

7.jpg

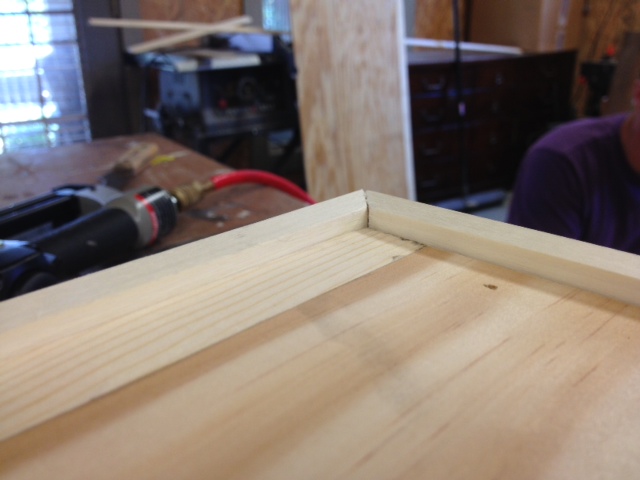
This picture is just so you know what mitered edges are.  They're cut at an angle instead of meeting at 90 degrees.

8.jpg

Once the pieces were cut to the right size (I always remind myself here that wood putty is my friend!), I tacked them with nails around the top edge of the shelf.  Wood glue would work here too, just clamp and let dry.  In this picture, the open side of the box is now in the back.  That's the side that will eventually go up against the wall.

9.jpg

I always attach my trim just a little bit above the top of the shelf to create a little lip.  This keeps items on the shelf from rolling off.

10.jpg

You could stop here too if you wanted - that's where I stopped on all the shelves pictured at the top of this post - but I wanted to fancy mine up a little bit so I kept going.  I cut my next piece of molding to fit the shelf and bumped it up right underneath the top piece.

11.jpg

And just for fun, I decided to add one more piece of trim.  I wanted something with lots of curves because the wall I planned to hang it on has lots of straight lines.  Instead of bumping my third piece of trim up against the other two, I lined it up with the bottom of the box.  You can see in the picture below that there is a small gap with no molding.

12.jpg

My apologies, but this is where my step-by-step pictures fall off a little.  I must've gotten excited about the end product and forgot to snap pics along the way.  The last step in the "construction" face is to wood putty all the holes and imperfections, let it dry, and then sand it smooth.  Wood putty can hide lots of boo boos!

Later, I painted the shelf a solid blue-green color.  I had a specific look I was going for though (I was trying to match something I already had) so leaving it with just that solid coat of paint wouldn't work.  After it dried, I barely roughed it up with some sandpaper.  Just enough for the wood to show through in a few spots, but not crazy distressed.  Then I started adding a brown glaze to it.  In the picture below, I've started adding the glaze to the left side of the shelf.  The right side is just the paint that has been sanded a little.

13.jpg

The top of the shelf before glaze was added.

14.jpg

Bottom of the shelf that has already been glazed.

15.jpg

Shoot.  I'm kicking myself for totally slacking on the pictures after this.  You'll just have to imagine it from here on out.  I glazed over the whole thing, wiping it off and adding more until I got the finish I was going for.  Once it was dried, I added a coat of water-based polyurethane.

To hang the shelf, you have to put a cleat on the wall.  It's important to make sure whatever you're using for your cleat fits inside the back of your box/shelf.  I used a 2x2 that was cut about 5 inches shorter than my shelf.  After deciding where I wanted the shelf to hang, I screwed my cleat into the wall, making sure to hit at least one stud.  Then, I placed the shelf over the cleat and screwed two short screws down on the top of the shelf attaching it to the cleat.  Make sure you use screws instead of nails so you can eventually remove it without killing your walls!

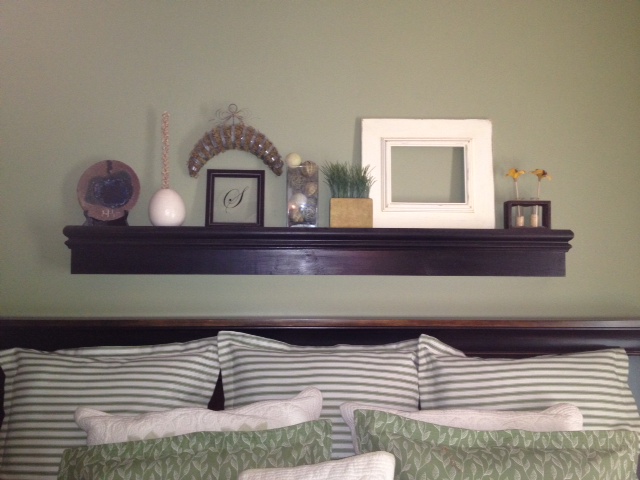
Here's the final product this time!  Ignore what's sitting on top of the shelf...I haven't figured out what I want up there yet.  But the curvy lines look good, no?

16.jpg

Details coming soon of our bathroom makeover!

Saturday Evening Photo Shoot

A few Saturdays ago, we had an evening photo shoot of Katie Wynn with a local photographer.  I had actually scheduled this shoot so we could get some full-family photos, only to realize the day before that we had our weekends backwards and weren't going to have the big kids with us after all.  So the photographer focused on Katie Wynn and we'll schedule some more full-family ones later. All of these pictures are courtesy of Kasey Mcalpin Photography.  I have resized them for the blog so if they aren't showing up perfectly crisp, that's why.

Katie-2.jpg
Katie-5.jpg

Kasey just plopped this yellow chair down right outside where we'd parked our cars, and Katie Wynn went straight to posing and smiling.

I love this one of her on the gravel road.

Katie-11.jpg

We are pretty smitten with this little girl.

Katie-17.jpg
Katie-16.jpg
Katie-18.jpg
Katie-22.jpg

Kasey was sweet enough to let us do a few outfit changes while we were there so all the pictures didn't look exactly the same.  Sitting KW in front of these pink flowers was a good idea...I love how they look in the background!

Katie-24.jpg
Katie-25.jpg
Katie-27.jpg

You can see her two little teeth in this one!  (She's totally cracking up at her Daddy.)

Katie-29.jpg

Oh man, I love this one too.  Kasey got so many great shots!

Katie-33.jpg
Katie-34.jpg

Kisses!

Katie-35.jpg

I think I'll get this one framed for my desk. :)

Katie-37.jpg

I can't believe Kasey got this shot below.  As soon as I put KW down, she pretty much immediately sat down.  Kasey must've gotten her right before she sat.  Love it!

Katie-38.jpg

And I saved my absolute favorite for last.  (We actually got a lot more shots than I've included here.)  Expect to see this one in a big frame at our house.  As soon as I get it printed, that is...

KatieBW-1.jpg

4th of July

Sorry for the absence this week...a certain dog I know chewed through my laptop's power cord so I've been stuck with a dead computer.  I'm borrowing my mom's power cord right now and crossing my fingers that my new one comes in soon. How about a quick 4th of July weekend recap?  We started our festivities on the third with some fireworks.  But, as you can see in the picture below, we started well before dark. :)

photo-2-2.jpg

Love these two!

photo-1-3.jpg

A little girl on a big country road.  How cute is she??

photo-2-3.jpg

Bren is so sassy that she can't even pose with her sparkler without putting her hand on her hip.  Love it.

photo-3.jpg

Girl cousin love!!

photo-4.jpg

The boys broke rule #1 listed on the roman candles: do not hold them in your hand while lit!  They are so brave.  (Where is that sarcastic font when you need it??)

photo-5.jpg

My oldest brother texted me yesterday to inform me that I was behind on the blog.  I didn't realize he was such an avid reader.  For calling me out on it, I give you this picture of him.  Maybe I had really good timing with my camera clicking, or maybe he had tacos for dinner.  Who really knows?

photo-3-2.jpg

Doc started his fourth of July out on the golf course, while Katie bug and stayed home and made some treats.  These were s'more bites with a little 4th of July flair added on top.  They were pretty good, but the batch I made the next day was even better!

photo-4-2.jpg

That afternoon, we all gathered at my brother Ben's house for some fun in the pool.  But, we couldn't jump in before taking a picture of the matching cousins in their fireworks shirts.  :)

photo-5-2.jpg

Katie Wynn found herself in the middle of a game of water basketball between the guys.

photo-1.jpg

This float was perfect for these two cuties.

photo-41.jpg

All that swimming wore my baby girl out, and she passed out in her Mimi's arms.

photo-2.jpg

As the final shot from our 4th of July holiday, I give you my first homegrown bouquet!!  I am so proud of all my zinnias...they are really blooming now!

photo-1-2.jpg

It was a great holiday and we enjoyed having lots of time off work.  (I personally had a five day weekend...why isn't every weekend like that??)  I'll be back soon with more...maybe of the bathroom reno we knocked out last weekend!

9 Months!

Can you believe my last post didn't have a single picture of Katie Wynn in it?? This post should make up for that. :)

Time is just trucking along and Katie Wynn continues to grow like a little weed.  I think this past quarter has brought the most changes in her.  I had to go back to her six month post to see what she was up to then, and man, she has really grown since then!  Before I get into her stats, here are her monthly pictures.

Love this little grin!  Can you tell from the sign that she had a good time smearing all the writing?

I chose this one for 8 months because of that little elbow on the arm of the chair.  Just love it.

I was working alone for the 9 month picture and she was not in the mood to sit still.  I snapped this before running to grab her before she crawled out of the chair.

Playing with mama on the front porch.

This face cracks me up.  What kind of grin is that?

And what kind of face is this?  This was the closest I had to a smile in this set.

You may remember the rainy day photos we took.  This was perfect for April Showers.

And those April showers brought May flowers.  In this case, the flowers were hydrangeas in my parents' yard.

My little swimmer!

Here's what's up with Katie Wynn at 9 months old:

  • At her 9 month check up, she weighed in at 19.2 pounds and was 27.75 inches long.
  • Two teeth!  Her bottom two teeth broke through when she was about 8 months old, and they're still the only two she has.  It wasn't too terribly bad the week they came in and thankfully, the drooling has majorly slowed down.  Maybe it'll be a while before more come?  Either way, it hurts when she bites now!
  • She really took off crawling on her official 7-month birthday.  She had taken just a few steps (crawls?) before that but April 23 is when she really took off.
  • About three weeks after learning to crawl, she started pulling up on EVERYTHING.  She can now cruise around a piece of furniture and has, on several occasions, let go and stood on her own.  We think she will walk any day now!
  • She has a head full of hair!  I actually have to fix it in the mornings because she wakes up with crazy bed hair.  I wet it down each morning and brush it (like really brush it) into place.  We have teeny bows that she is now wearing on occasion.
  • Occasionally she also wears shoes.  :)  I went a little crazy and bought about 8 pairs of shoes in the span of about a month, but apparently her feet are really short (and very chubby).  Only a couple of them fit her but she isn't crazy about having them on her feet.
  • She still loves to talk and jibber jabbers all day, but is most talkative in the mornings right when she gets up.
  • We are very much in the middle of a clingy stage.  It has been going on for about 3 weeks now.  She doesn't want to go to anyone else if she's being held by me or Doc.  And she gets upset if we set her down and walk out of the room.  Girl doesn't like to be alone!
  • Katie Wynn eats food three times a day now.  She has two just-bottle feedings too.  She love, love, loves to eat and will gobble up anything we give her.  We've tried just about every flavor of baby food now and so far, there hasn't been one that she wouldn't eat.  She now also eats lots of snacks throughout the day and is using her pincer fingers to eat things like banana pieces, avocado, puffs, crackers.  She has also tried water from a sippy cup, though she still won't hold it or her bottle by herself.
  • She can wave bye-bye and loves to get high fives!
  • She has said mama on a few occasions but it's not consistent enough for me to say she's talking.  Doc and I love interpreting her jabbers.
  • Katie still sleeps through the night but has learned that if she gets up around 6am, she might get to lay in our bed and snuggle.  I will have to break this habbit but right now I'm just enjoying our snuggle time!

I can't believe we've made it three quarters through her first year already!  The next quarterly update I do she will be ONE.  Woah.

Half a Party!

Saturday, June 8th was Doc's exact half birthday, so I threw him a party!  That might sound weird but it wasn't just any half birthday, it was his 39 and a half birthday.  As in, he'll be FORTY in December.  And we all know December is the worst time of year to try to plan a non-Christmas party.  Plus, I thought this would be a much better way to catch him off guard.  Did I mention it was a surprise party??

First, the details: I rented out a bar, yes a bar - one that used to be an old brothel, actually - for the party.  Obviously I couldn't have it at our house because he might notice me getting ready for it.  As far as food and drinks went, I just had to supply the wine (it's a beer-only bar and we kept it simple) and the sweets.  Since I knew I wouldn't be able to decorate myself before the party (because I'd be with Doc), I kept the party decorations very simple.  For the tables, I bought silver sparkly trees to sit next to black and white photos of Doc through the years.  But not a whole picture, just half. :)

DSC_0625.jpg
DSC_0610.jpg

I'll go ahead and confess that I didn't actually know his ages in these pictures, so it's a total guess.  Bill and Pat, feel free to correct me!

The cook, pictured above with half of Doc, kept the soul burgers coming hot off the griddle all night long.  Man, these cheeseburgers are sinfully good!  In keeping with the theme, they were served in halves.

DSC_0638.jpg

The birthday cake was made to match the party invitation - both designed to look like they had been cut in half.

DSC_0614.jpg

Now, getting the birthday boy to the party venue was a little tricky.  It started at 7:00 and this is a bar that doesn't get hoppin' until well after midnight.  I tried my best to make it seem like we were going out to dinner, and then right when we were passing the bar on the sidewalk I grabbed him and said "Hey, let's stop in here!"

SURPRISE!

DSC_0627.jpg

Truthfully, I think he knew something was going on because I don't often make plans without including him.  But hopefully he was at least surprised at the location and the number of our friends that showed up.  I was so thrilled to see such a crowd!

DSC_0630.jpg

Here are pics of a bunch of the people that came to party.

DSC_0611.jpg
DSC_0612.jpg
DSC_0616.jpg
DSC_0617.jpg
DSC_0618.jpg
DSC_0619.jpg
DSC_0620.jpg
DSC_0621.jpg

(Jenny's date was out of town!)

DSC_0626.jpg
DSC_0631.jpg
DSC_0632.jpg

Me and my bridesmaids!  So glad these girls are still a big part of my life!

DSC_0634.jpg

One of the most popular things about this bar - right after the soul burgers - is that the music is all from the juke box.  I didn't really think that through when I was planning the party but our guests didn't seem to mind filling it with dollars to pick good tunes.  These guys were pros at picking the best ones!

DSC_0636.jpg

Only Emily would "halfway" pose with half of my husband.  :)

DSC_0637.jpg
DSC_0641.jpg

This was really the most perfect venue to have the party.  Good food, good beer, good music, tables to sit at, room to mingle, dance floor and pool tables to further entertain you.  Oh, and no cleaning up at the end of the night!

Christopher and Matt carefully line up a good shot.

DSC_0643.jpg

Obligatory picture with the cake before cutting into it.

DSC_0644.jpg

Looks like he loves me!  I wonder if I'd told him yet that there'd be a bill to pay at the end of the night, and that I was going to let him take care of that.  SURPRISE!

DSC_0646.jpg

It's not a half party without half a party hat.  We sang the birthday song to him too - but just half of it.

DSC_0649.jpg
DSC_0655.jpg

Dancin' the night away.

DSC_0659.jpg

Several guests brought gifts for Doc, so towards the end of the night we sat him down to open them.

DSC_0657.jpg

He got SO many fun gifts!  Half pints of beer, half handles of liquor, half six packs, cards cut in half, half boxes of golf balls.

DSC_0681.JPG

Allison and Jenny brought a half martini tray.

DSC_0661.jpg

Hopefully you can read all the half items included in the picture below.  So creative!

IMG_4433.JPG

My dad gave him a half of a golf hat.

DSC_0676.jpg

And with it came - wait for it - a half a golf glove!

DSC_0677.jpg

Not pictured is the half a bag of tootsie rolls from my mom (Doc's very favorite candy!).  The first thing he said the day after the party was, "I wonder where the other half of the bag of tootsie rolls is."

DSC_0681.jpg

This is the picture of all his loot that we took the next morning, and I think a couple things are actually missing.  We'll have to have another party just get rid of it all!

birthday loot.JPG

More partying!

DSC_0679.jpg
DSC_0682.jpg

My mom and three of her besties.  My friends and I hope we're like them when we grow up.

DSC_0693.jpg

So we tried to recreate their picture together.  Not too bad, I think.

DSC_0695.jpg

The party was so, so, so much fun!  And I think Doc really enjoyed it!  I am so grateful to all of our friends that came out (and go babysitters!) to spend their evening with us; it really means a lot.

Oh, and this post would not be possible at all if it weren't for Allison graciously taking pictures all night.  She also decorated for me in advance.  Many, many thanks, Allison!