We have made a lot of progress on the new nursery!! For those of you that have not toured our home in person, here are some details about our house and the room that will soon occupy our newest family member. We purchased our house as a four-bedroom house and if you count all of our family members (Me and Matt, Katie Wynn, Wyatt, and Anna), that means we are already at max capacity when it comes to bedrooms. So where would we put our little man? We did lots of brainstorming on bedroom arrangements - it didn't seem fair to have him and KW share a room since they're both here full time, but it also wouldn't be good for Anna and Wyatt to share rooms as opposite sex moving into their teenage and high school years. And we definitely weren't ready to move KW upstairs so putting A and W together to clear a bedroom wouldn't really have helped anyway.
So, we decided to turn our office into a new nursery. What office? Right. It has never been pictured on this blog because it has never been used! I have said since the day we moved in that it would eventually become my craft room (aww, yeah!) but fixing it up and adding cabinetry was loooooow on the priority list. So for the most part, it has held junk for the past 18 months and pretty much served no purpose.
Here's how it looked right when we moved in...this is where we unloaded all of our "decorations" - things like picture frames, candles, vases, and all the junk we didn't know what to do with. What a mess!


As for where this is in our house, it's right up front off the entry hall. In fact, it's right across the entry hall from the dining room that I just wrote about. Not necessarily the most ideal place to put a brand new baby, but we figured we could make it work.
You know what I have always thought was really weird about this room? The previous owners used it as a formal sitting room that also housed a mini grand piano and it has two nice french doors with glass panels that open into it. So kinda a formal-ish room...yet it's the ONLY room in the house that didn't have crown molding. Isn't that bizarre?
Ok, so obviously the biggest problem about using an office as a nursery is that it didn't have a closet. We figured that was just as good as any place to get started! We called Cesar, the skilled trim carpenter that did our mudroom cabinetry, and got on his schedule as soon as possible! I think I've already shown you these drawings but this is what we gave him as our inspiration. I had drawn out my vision on a piece of paper at work one day, and then that night Matt and I tried to draw it to scale on the wall (albeit with VERY crooked lines!). (And yes, that's five outlets right in a row on that wall. Who knows?)


I met with Cesar one afternoon and he spent about thirty minutes measuring everything out so he could price his materials and give us a price. The price was right so we told him to come on over and make it happen! Luckily for us, he had a spot open in his schedule the week we were at the beach on vacation. My mom and oldest brother, Nick, took turns letting him in and stopping by the house to check on his progress. I loved receiving pictures of the transformation that was happening while we were gone!

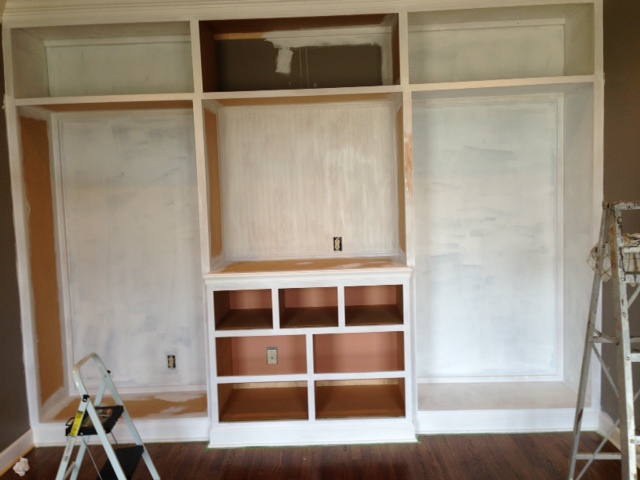
End of day one...and you can see it matches up pretty closely to my drawings! :)

End of day two - trim has been added and construction is done!
From the pictures, it looks like most of the work was completed on the first day. But, the wall unit was only half the work. In addition to adding trim on the second day, Cesar also made all of the doors, shelves, and drawers. If you look closely at the top left corner of the Day Two picture, you can see that Cesar also added crown molding to the rest of the room. Fixed that weird little problem!


We were thrilled to get to come home to finished construction, except that it meant it was now our turn to get to work. Despite the sinus infection I was fighting, duty called and we got busy painting!
I spent Friday morning prepping the wall unit for paint...lots of nail hole filling and caulking up seams. By lunch time, it was ready to be primed and my rockstar Mama came over to lend a hand! The picture below on the left shows how far we got before running out of primer. Agh! So frustrating to be so close to being done and have to stop to get more paint. I made a quick trip to the store and was able to finish the coat of primer before Matt made it home from work.


I did not do a very good job of taking progress pics throughout the weekend. The big kids - especially Anna - were a great help in keeping Katie Wynn occupied so that Matt and I could paint both Saturday and Sunday. She and Lolli both were very curious about what we were doing. Thankfully, we only had to clean up one set of white painted doggy prints across the wood floors!
It took two coats of white paint after the primer and then we still had a few touch-ups to do.
Painting the huge wall unit was actually the EASY part of the job. The hard part was the seven drawers, four shelves, and ten doors that had to be painted. That part was hard because, since there were so many pieces and our indoor space was limited, we had to do them in shifts. Plus, every side and edge had to have a coat of primer and two coats of paint. Ugh. We laid out the drawers and shelves and painted them as we painted the wall unit, so they weren't too bad. Once all that was done, we were pretty excited that we only had ten doors left to go.
Of course, that's when the stomach bug from hell hit.
I returned home from the hospital late Wednesday afternoon and Cesar was scheduled to arrive out our house early the next Saturday morning to hang all the doors, add hardware, etc. We had no choice but to push onward and keep painting. Matt was a superstar and was able to get the backs of all the doors primed and painted while still taking care of me. We primed the fronts together and then by Friday afternoon, I had enough energy to get them painted while he was at work. (That's kind of a lie as it totally wore me out, but at least they were done!) The paint was barely dry when Cesar arrived Saturday morning!
We were pretty limited on the hardware we could select because of how he put the trim on the drawers, but we found some that we thought would work at Home Depot. I was naive and thought he'd be able to finish everything up in about an hour on Saturday. He and his brother were at our house working for five hours! I'm just glad it was them hanging the doors and not me...I can't hang a door straight to save my life. :)
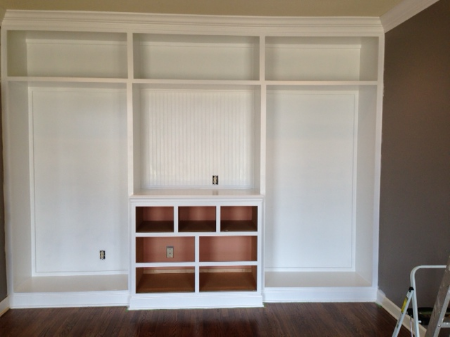
The finished wardrobe!! (Well, except for the face plate that goes on that outlet...)

Here's a view of the inside of the side cabinets. Each one has two shelves at the bottom right now, but they are removable and adjustable, so who knows how they'll actually end up. Oh, and these pictures were taken after we'd painted the walls khaki.


We painted the built-ins and the walls ourselves but hired painters to paint the ceiling and the rest of the trim work. They just finished painting yesterday afternoon so I'm pumped about getting to start putting this room together! And I can finally hang some tiny boy clothes into those brand new closets! I am not by any means ready for this little boy to grow up, but man-oh-man I can't wait for this to eventually become my craft room...SO much storage!!! One day...
Here are some sneak peeks of a few things I recently purchased for the room. The rug and mirror were both super scores at Home Goods. If you look closely at the mirror you can see that it has slid down in it's frame - I was able to weasel an extra discount for that "flaw" even though I knew it would be a simple fix. :) Also in the mirror's reflection you can see a rope lamp...that came home with us too!


We officially have a changing table too! Now, the DIY-er in me would much rather have found a cool piece of furniture to refinish and use as a changing table like we did for Katie Wynn's room, but the very tired, pregnant part of me saw this changing table for the low, low price of 25 bucks at Bargain Hunt and said it'll do. :) The baskets on it were another Home Goods find and I've since added two more coordinating ones to the bottom.
The chair is one that we already had. It was a red stationary chair that sat in our little sitting nook at our old house, but has been in the attic since we moved here. We added a swivel glider base to it, had it recovered (along with a storage cube ottoman) and just like that we have a nursery-appropriate rocker!


Mom has been furiously sewing away on the curtains and bedding, so hopefully we'll be able to add them to the room soon. There are days when I think we have done so much and this room is practically done, but then I remember that we only have 6 weeks left and I haven't even started on the craft projects I want to do. Eep! Better get busy!