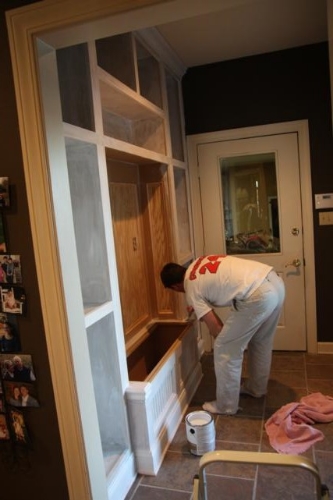
Ok, I'm finally back to continue the tale of our Mudroom makeover. In Part One, I shared how we decided to hire out the actual construction work and our guy, Cesar, was able to build a masterpiece in just one day. We planned to do all the finish work, though, so when his job was finished, we were left with this:
Nice handiwork, but still a LOT left to do!
We couldn't just pull out the paintbrushes and get to painting, though. First, we had to do a bit of clean up. The demolition process left a few bruises on our walls that needed to be smoothed over.
The day before Thanksgiving, I broke out the hand sander and sanded the walls down as smooth as I could get them. Then, I used spackling to smooth over the rough spots on the walls. I also used wood putty to fill in all of Cesar's nail holes and LOTS of caulk to seal the seams.
Thank goodness I had help with all the caulking!
By day's end, it was ready for primer! And get this: Thanksgiving morning I slept in. When I finally woke up, I found my husband up and at it, already almost through with the coat of primer! Isn't he the best?
Now, we decided to tackle a lot more with this mudroom renovation than just the new built-ins. One reason is because we wanted to paint the new built-ins white-white - the same color we're slowly updating all the trim in the house too - but that wasn't going to look good with the cream trim and cream doors that were in this little entryway. So it made sense to go ahead and paint them white-white, too.
In all the other rooms we've tackled, we've also painted the ceiling white when we updated the trim, so we added the ceiling to the list. And, why not put a fresh coat of paint on the walls while we were at it?
While he finished up the primer, I took a good look at the doors and decided they needed a little bit of cleaning up before we could paint them. I mean, just look at this horrible caulk! I'm pretty sure the only rule in Caulking 101 other than seal whatever it is you're sealing is not to let it look like crap. This is a big fat fail.
I went through about four razor blades scraping it all off, but I finally got a big portion of the sticky crap off.
As far as paint on the built-ins goes, I think we had to put two solid coats on it and then a little more for touch-ups. In the pictures below, the trim also has fresh paint but the door has only been primed. The nice thing about also painting the walls is that we didn't have to be careful while painting the trim.
Since our ceiling paint was not VOC-free and ladders don't jive well with pregnancy, Matt had ceiling duty by himself.
The reason I didn't paint the doors when I painted the trim is because I wanted to add a splash of color to the room by painting the doors something fun. I ended up going BOLD with Posh Red. Here they are after one coat of red (and fresh paint on the walls).
It felt like we painted nonstop for days. Probably because we did. In addition to every single surface in the entryway, we also had 8 doors and 12 shelves that had to be primed and painted (twice!) on both sides and all four edges. It was quite the task! We had them laid out all over our front entryway and office floors. (This is an area where we haven't updated the trim yet. See how much brighter white these look compared to the trim and french doors in the background?)
We made HUGE progress over our Thanksgiving break, but it seemed to take us forever to knock out the last final steps. I didn't want to do the touch-ups on the red doors until after we switched out the hinges and hardware and, thanks to a wave of cold weather, we had to wait a while for a warm enough day to do it.
As time-consuming as it was, I'm so glad we saved money by finishing it all off ourselves. And I'm SO pleased with how it all turned out. Stay tuned, I'll be back soon with the finished pictures so you can see it for yourself!


