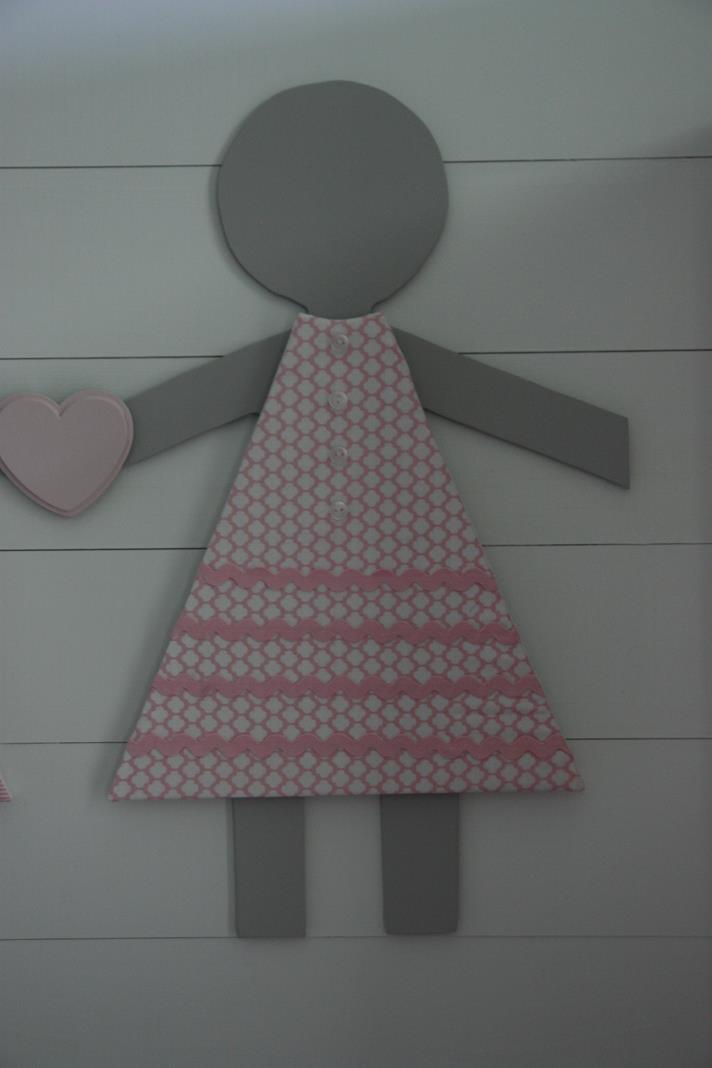
Paper Dolls

When the time came for us to transition Katie Wynn from her crib to a big girl bed (yes, over a year ago!), the hardest part of the switch was figuring out what to do above her bed!  I adored her alphabet collage but, while it was so cute above her crib, it just did not work with the lines of the new bed.  I had an idea early on that I couldn't figure out how to execute so I scrapped it.  After that, I was STUMPED.

Then, I found inspiration in these little girls that I cut out.

Big paper dolls on the wall would be so cute, right?!

I liked the shape and proportions of the ones I had cut out of paper so Mom and I measured and drew a larger template to use.  Then I passed it over to my Dad so he and Matt could cut them out of a thin wood.  (It's not really wood, I can't think of what the material is called.  It's what pegboard is made out of, just without the holes.)  After they had five girls cut out, I painted them the same grey as her walls (except the white plank wall that they would be going on).  The first one went on, centered above the bed...

And then the other four were lined up with her!

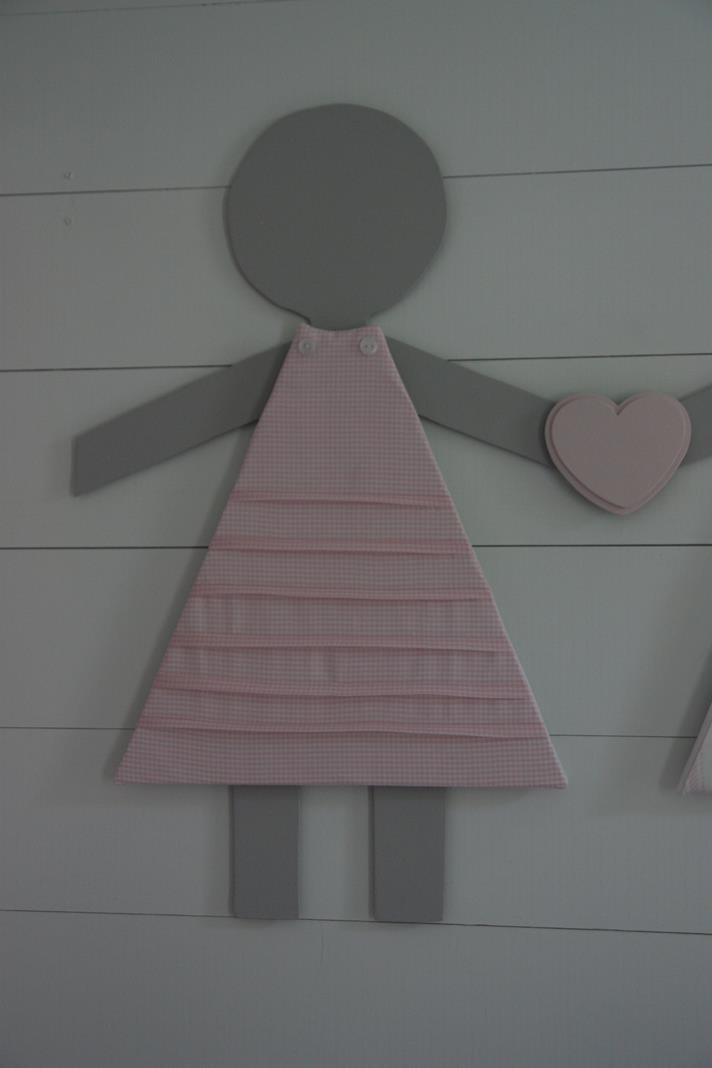
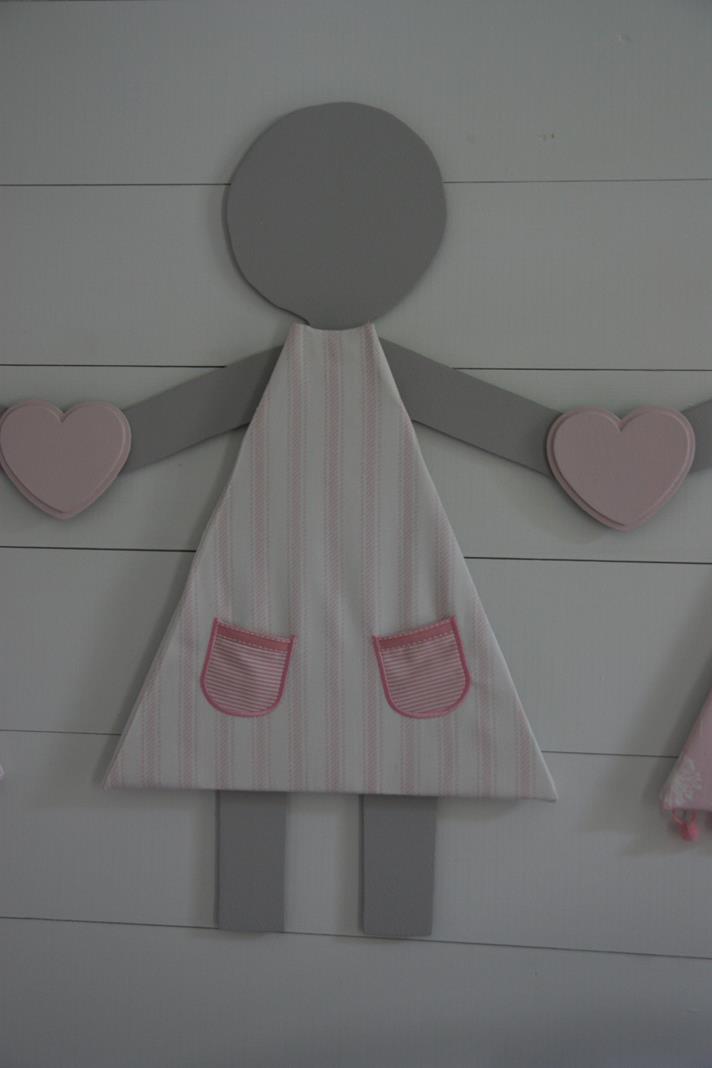
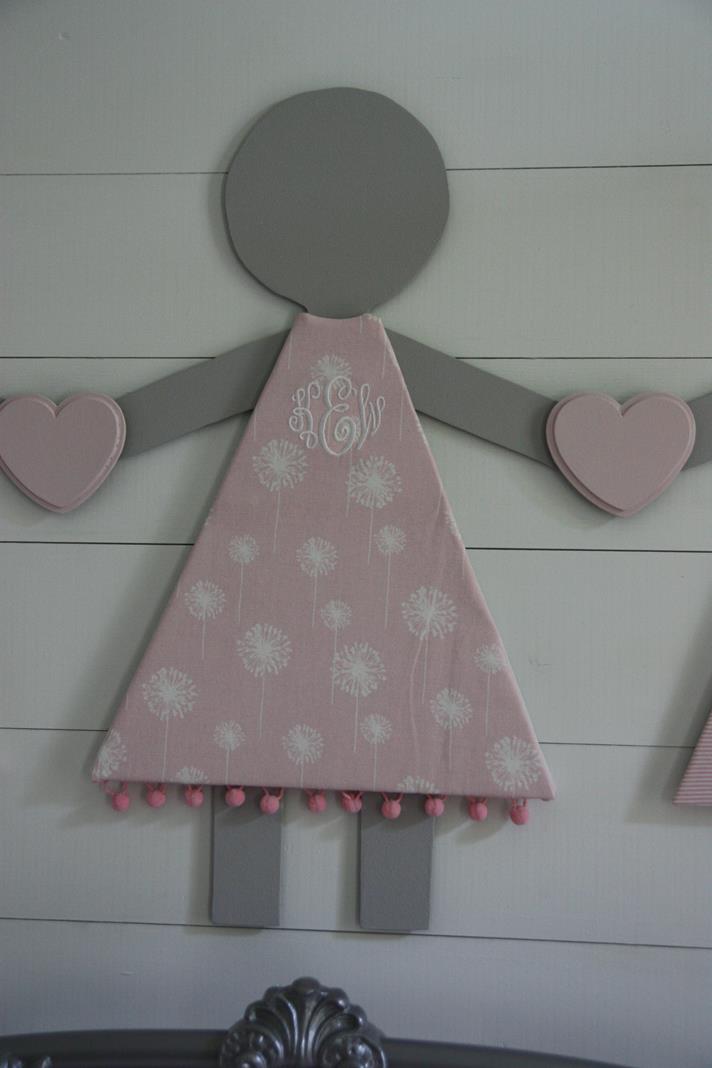
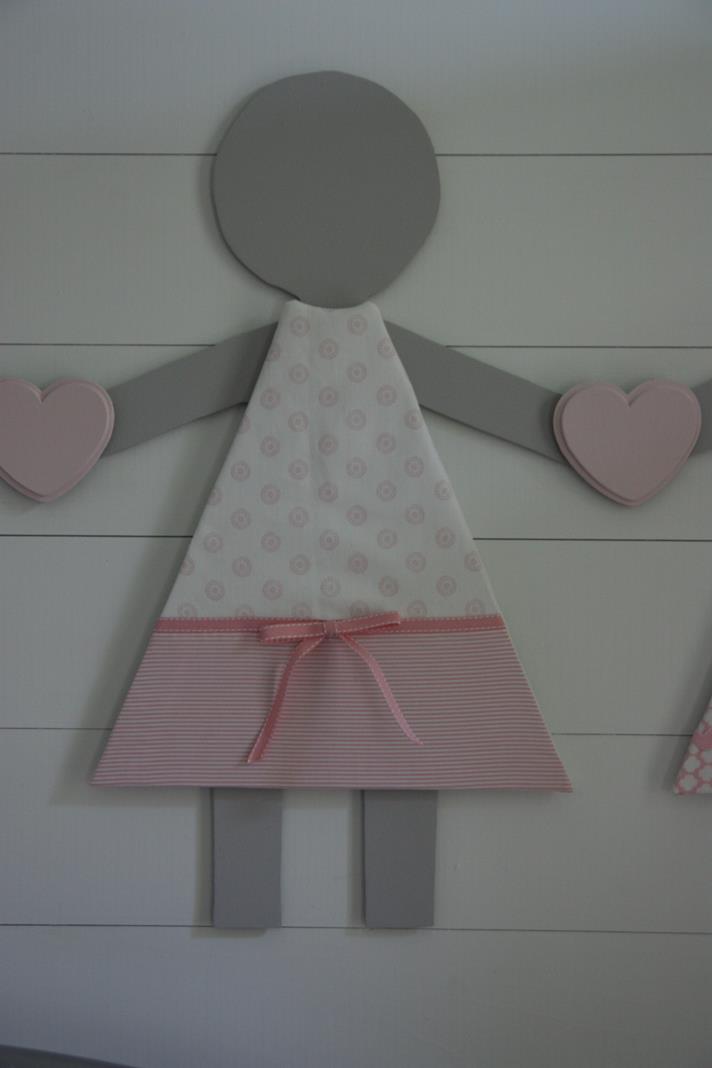
Mom's part (probably the hardest part!) was next.  We cut out triangles for the girls' dresses and picked out fabric that would match the room.  Then she fashioned them into dresses that would cover the triangle forms and attach to the girls.  Scroll through the pictures below to see the dresses she made.  I love that the middle one has KW's monogram...it's like a tiny nod to the alphabet wall that was there before it (that had her monogram in the middle).  

We weren't able to cut all five paper dolls out of one solid piece of wood.  And I really didn't want the seam where their arms met up to be visible.  So I purchased precut wooden hearts from Michael's and painted them pink.  They were the perfect finishing touch for our row of dolls!

Here's the complete view of all five dolls:

The dresses are just velcroed on to the doll forms.  I initially had thought it would be fun to let Katie Wynn take them off and redress them, but I still haven't told her about that idea.  Not sure I'm ready to encourage her to pull things off the wall.  And I know it would bug me if they weren't on straight or in the "right" order.  :)  Maybe one day...

I LOVE how this little project turned out and it was so easy to do.  This row of girls makes me smile every time I come into the room, especially when Katie Wynn names them all with her friends' names.  And this project just proves that sometimes you have to sit and wait and stare at an empty wall before the right idea hits you.  That's what I'm going to keep telling myself since there are still big empty walls in our house...

Finally...A Front Walk!!

For years, our poor ol' mailbox has stood out in our front yard with no walk leading to it.  :(

Our beautiful brick front steps have led to nothing but a sea of grass.

When we purchased our home, it was 16 years old and we could not figure out how the previous owners had gone so long without a front walk.  Or WHY a front walk wasn't put in when the house was built.  It was very high on our to-do list when we moved in.  But then we had a baby and then another one and the front walk slid down on the priority list.  Still, I cringed every time the UPS guy or our postal lady had to carry a package through our wet grass, or I hosted a shower and guests tromped through the yard to get to the front door.

I knew I wanted a front walk, but I also knew when we got one, I didn't want it to just be a strip of bright white concrete.  I wanted a brick path that would match our front porch and steps.  Obviously, that kind of path costs more.  So we waited and saved our money and as we got bids from contractors to screen in our porch and pour a new patio in the back, we added this to the list.  Might as well have it done while all the big equipment was at our house anyway, right?

You can slightly tell from the picture above that the brick on the face of our house and the brick on our steps (and the top of our porch) are not the same.  Antique bricks were used for the porch and steps and we opted to have those matched for the walkway.  Luckily, our contractor was able to find them pretty quickly and could get to work!

We had no idea they were starting the front walk the day we arrived home to the view above, so it really was a fun surprise to drive up to.  We quickly consulted Thomas's big book of trucks to identify the machinery parked in our yard.  I think we had a mini excavator and a skid steer.  

Here are my superheroes surveying the scene.  

And the blank stares I got when I asked them what they thought.

The walkway crew was already hard at work when I left for work the next morning.

And by the time I got home, we had a concrete path!  

I'm not sure if you can tell from the photo above or not but it was raining that evening when we got home.  I'm glad they got it poured and it set up before the rain came!

After dinner, the rain was gone so we walked around to the front to check it out.  The kids were really excited to be the first ones to run up the walk!

Shortly after that picture was taken, Thomas fell down while running on the walk, officially making him the first person to scrape his knees on the walkway too.

The pathway stayed like that for a few days until one morning I noticed some supplies had been dropped off (like, before 6am).  

That afternoon we got to watch the brick masons hard at work.  I'm sure they didn't love us staring over their shoulders, but we were all pretty glued to it.  It was fascinating to watch!

When they left that day, they had the brick laid on the top half of the walk and the bottom three steps were left to be done.

I loved getting to watch them fill the cracks with mortar (I think?) because it looked like they were icing a cake.

It took a span of three days for all the bricks to be laid, set up overnight, and then get cleaned up.  Before they left, the filled in around the sides with dirt so that our grass will grow right up to the edge of the steps.  We are SO pleased with how it turned out!

Look at the beautiful herringbone pattern.  Sometimes, like last night, I just go outside to stand on it and admire it.

The new walkway is even Lolli-approved.  But she and I both agree that it will look EVEN better once the grass fills in through that dirt.

I have already had two Mint Tulip customers drop stuff off on my front porch and comment on how nice our walkway is.  I'm so glad no one has to traipse through the yard anymore!  Next time you come visit us, park out front and take a walk down our new front path.  :)

Screened-In Porch and a New Patio

Exciting news...the construction we've had going on at our house this summer has officially wrapped up!  And we can already tell that we will be living out on our new porch this fall.

Longtime readers may remember this post I wrote just over 2 years ago about the temporary paver patio we installed so the grill would have a place to live.  In that post I said that this small paver square would eventually be replaced with a real patio and our existing covered porch would get screened-in.  

Two years later of saving our pennies, we finally knocked those projects out!  Or, rather, we hired a contractor and his crew to knock them out for us.  We pitched the projects to a couple of different contractors in early May, and I was naive enough to think this could maybe be completed in time for Thomas's birthday party the first weekend in June.  Ha!

We chose a contractor and went on vacation.  When we got home, HE went on vacation.  And then it rained a lot.  So basically, it was a long time before things got started.  We did our part, though.  We cleared off our patio and picked up the pavers so that the crew would have a blank slate to work with.

The patio ended up sitting empty like that for the back half of June and the first week or so of July.  You can imagine how excited we were the day we came home from work to see that they had FINALLY gotten started!!  Framing was first.

I seem to have lost some of my pictures because the one above is actually of Framing Take Two.  Yep, at first I was excited to see the framing up and then my excitement quickly faded when I realized I hated the spacing of the columns.  And while I normally try hard not to complain, I knew this was something I didn't want to just live with forever so I called the contractor and asked him to move the columns.  We were already way behind schedule, so no big deal to take a step backwards at this point! 

Little did we know, there would be an even bigger step backwards in the next couple of days!

Framing continued that week.  The columns were boxed out and the supports for the screens were added.

On days that the workers came, they arrived EARLY!  As in, before I'm normally dressed.  I learned real fast that I had to get dressed quickly in the mornings cause I never knew when men would be right outside the windows!  The kids LOVED watching them work.  I had to pull them away from the windows to go to daycare.

One morning when we left, the painters were there to paint all the framing.  I couldn't wait to get home to see how it looked painted!  But when we got home, we found that it had all been taken apart and the columns weren't boxed out anymore...

I won't go into much detail here but apparently our contractor came to check on things while the painters were painting, saw that the columns had been boxed in such a way that the seams were visible, and made them take it apart to box it out the other way.  The seams are now on the insides where the screen goes instead of on the front and back that you can see.  I wasn't going to complain about this (I had noticed it though and mentioned to Matt that I thought they were going to need a lot of wood filler to fill the seams) but I'm really glad he made them change it himself.  

Here it is re-done and half painted since they re-used some of the boards that had already been painted.  This added another two days to the process.

Side note: I'm realizing while writing this I'm missing a lot of my progress pictures.  Oops.

Sometime during the columns' deconstruction fiasco, the new beadboard ceiling got its final coat of paint (Sherwin Williams Atmospheric) and the trim was installed (and painted - custom color match) on the inside of the porch.

View from the yard of the half-painted framing.

They finished the framing up on a Friday, which meant more waiting before the painting continued.  But, the sun went down that night on a mini excavator parked in our yard - a nice promise that more progress would be made the following week!

Painting continued on schedule the next Monday and we were pleased with how it looked!

With the painting done, the next steps were adding the screens and installing the door, can lights, fans, and outdoor light.  I don't have progress pics but you can see the screens and outdoor light in this picture with Katie Wynn.  We chose pet screens that are supposedly unable to tear, so we hope they last a long time.  There was only one mishap with this step - the door was hung the wrong way - but it was fixed within the same day so no hold-up.  (Our screen door was custom made by Screendoors.com.)

One morning when I left for work, the men there were demo-ing off the bottom brick step to make room for concrete.

When I returned home that afternoon, the brick step was gone and that mini excavator had filled in dirt and shaped out the soon-to-be-poured concrete patio.  And had also really torn up our yard!

Matt got home in time to capture the excavator in action.  

I don't remember why but it sat like this for a couple of days which was kinda annoying since it was really dirty.  

For the patio, we really went back and forth on how we wanted it done.  Originally, I wanted it to be brick to match the porch.  But the bricks wouldn't create a smooth surface and I thought a smooth surface would be better for toys or sliding chairs out from a table and things like that.  We knew we didn't want just bright white concrete but stained concrete had it's cons too - it would be really slick when wet (not good if we ever add in a pool and kids are running around) and if it ever got scratched or nicked, the concrete under the stain would not match in color.  We ended up going with dyed brushed concrete.  A liquid dye was added to the big drum of concrete so it was dyed all the way through and then the concrete was brushed so that the surface would be smooth but not slick.

It started out much browner than the color I thought we had picked!

The color has lightened up significantly over time and we really kinda like the "splotchiness" (for lack of a better word) of the color.

Once the concrete was nice and cured, they filled in around it with dirt and tried to straighten our yard back up some.  And with that, this project was D-O-N-E, done!

We snagged a new outdoor table and chairs on clearance during the process, but the rest of the patio is still pretty empty.  I have lots of plans for it though!  The ground is still pretty muddy around the patio thanks to the week of rain we just had, but it has definitely helped in getting the grass to start filling back in.  Hopefully next summer our lawn will look much better!  

We have some landscaping to address too.  We plan to add new beds to each side of the patio, hopefully sooner rather than later.

Here are a few more snapshots of the finished project that I snapped last night.

We LOVE our new fans, especially the oscillating feature!

Matt's favorite part is the TV he mounted on the wall.  Pretty sure he will be spending all of football season out here!

It's probably no surprise to anyone that I'm now shopping for new furniture.  I'm just not digging the turquoise out there anymore.  Fingers crossed that I can find some good end-of-season sales!!

But wait!  That's not all!!  While we were having our porch screened in and the new patio poured, we also installed a new front walk!!  Post coming about it next.  :)

First Day of Pre-School

We have just completed our first week of preschool and what a fun, but exhausting, week it was!  I showed you in my last post the door hanger I made for pictures, and now I'm back to show it to you in action.  

In the past, Matt has taken the kids to daycare and I've had a few minutes on my own to get ready for work in peace and quiet.  But now that Katie Wynn can't be dropped off that early, I'll be taking her to school.  It's quite an adjustment to my schedule having her home with me and we have to get out the door quite a bit earlier too!  For the first day, though, we were up early and had time for some pictures.

A new school year meant a new matching backpack and lunchbox.  And she took an apple to give to her new teacher.  :)

As we drove to school, I prepared myself for clingy-ness and tears, but neither came!  She climbed out of the car with no hesitation and walked to her building just as brave as could be.  

Before going in, I tried to get her to sit on a pretty bench for a picture and she practically rolled her eyes and groaned at me about it.  I thought I had until the teenage years before that started happening.  :(

Walking into her classroom, two of her buddies were already there to greet her!

I am so glad she will be in class with Levi, Addi Clare, and Mason (not pictured).  I'm sure it made switching to a new school so much easier on her.

I briefly spoke with her new teacher, Mrs. Gladys, and then left her playing on the floor with friends.  I'll be honest, it made me just a little bit sad that she didn't need me, but I'm more glad that she was brave and being a big girl.  

As if a full day of school and after-school care wasn't enough for one day, Katie Wynn also started gymnastics on Monday!  It's her first extra-curricular activity and she was SO excited about it.  I took her to my niece, Bren's, gymnastics meet last spring and she has been asking ever since then when she could do it too.  She is in the youngest class (besides Mom and Tot classes) and it's just 45 minutes each week.

I was sitting pretty far away so my pictures were all zoomed in and grainy.  The gym looked old when I took gymnastics in it many, many years ago, so you can imagine how old it looks now!  Katie Wynn got to do exercises on the bar, jump off a spring board, do forward and backward rolls on a wedge mat, walk on the balance beam, and climb a mini rock wall and slide down.

Given her shyness, I wasn't sure that she would actually participate in the class, especially on the first day, but she had SO much energy there and jumped right in.  She had a hard time waiting her turn while others went and her teacher had to ask her to sit back down several times. 

She absolutely loved the class and had a slight meltdown on the car ride home when I told her she didn't get to go again the next day.  With such a long day and so much excitement, she crashed early and hard that night!

Since Katie Wynn is in a uniform now (bummer), I made Thomas a "first day of school" shirt to wear.  It was just another regular day of daycare for him in the same classroom, but I took pictures of him too so he wouldn't be left out.  :)

And here is Katie Wynn dressed and ready for day two.  She does not like wearing her jumper so she will more than likely wear her navy shorts and navy polo (I know! Bluh!) most days.  She's required to wear the jumper on Fridays, though, so at least we'll get to see her in it some.

By Friday we were all completely exhausted from our new routines!  We have spent today (Saturday) completely lounging around the house and being lazy.  Here's hoping we get adjusted soon!

School Days Door Hanger

With the first day of Pre-School quickly approaching, I started thinking about how I wanted to do First Day of School pictures each year.  I knew I wanted them to be the same each year but there was no way I could trust myself to always print out one of those cute chalkboard-ish signs in time or list out all of the kids' likes, dislikes, and what they want to be when they grow up.

So, after doing some thinking, I decided I just wanted a school themed door hanger for the front door.  But, I needed the door hanger to pull double-duty.  I wanted it to be something cute enough that it could stand alone and be used as decoration on our front door for a couple weeks at the beginning of the school year.  And I wanted it to somehow display each grade the kids were starting that year - for both individual pictures and pictures of them together.

My original idea was to do a box of crayons with a couple crayons spilling out that had their grades on them.  Then my Mom suggested a school house and I liked that idea better.  It just seemed cuter for the front door.

The afternoon before school started, here's what I whipped up!  My dad cut the outline of the school house out for me on thin plywood and I painted it.  I found a couple pictures of schoolhouses online that I liked and flipped between them as a guide.  

Every color took two coats which made painting it more time consuming that I thought it'd be.  After a solid base coat on it, I outlined everything with black paint.

And then, to make it a little more whimsical and less....cartooni-ish?...I added some highlights in white.  This step is what really made it cute!

Here's a close-up of the bell tower.  The painting isn't perfect at all, but cute enough for a door sign.

The final step was adding the wording but I didn't take pictures.  Mom and I voted on "School Days" instead of "Back to School" or "First Day of School" because we thought it would allow me to leave it on my front door for more than just the first day.  I hate how my lettering turned out but not enough to redo it at this point. 

For the grade requirement of the sign, I picked up two pre-made chalkboards from Michael's.  Mom painted them for me while I worked on the schoolhouse.  She did the frame in yellow to coordinate with the bell and added an apple that I outlined to match the schoolhouse.  Had we really used our heads, we would've added the apples on opposite sides of the chalkboards, but whatever.  They still work fine.  :)

I used velcro and burlap ribbon to hang the chalkboards from the schoolhouse.  It works out great because I can hang just one of them for individual pictures, two of them for pics together, and then take them off to leave just the schoolhouse.  

The following day, I added Pre-K 3 to one of the chalkboards and hung it up.  It looked great on the front door!

Stay tuned for pictures of my preschooler with the door sign!