Dining Room...Finally!

As of about two months ago, our dining room finally looks like a place where you could possibly enjoy a nice meal!  Of course, we still haven't actually had a meal in there yet, but it's nice to know we could if we wanted to.  :)

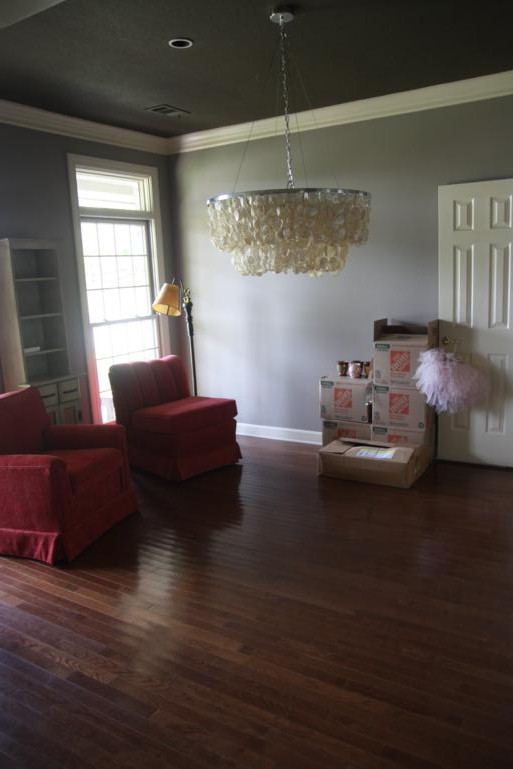
Let's back up about 18 months to when we first moved into the house.  We sold our kitchen table from our last house and plopped our old dining table down in the kitchen of our new house.  That meant we no longer had a dining table to go along with our large china cabinet.  So for months our dining room consisted of just the china cabinet and a couple of leftover chairs that we didn't have a place for.  (These pictures were taken before we had the hardwood floors refinished.)  (I just looked through the pictures from that old post and man, our house has come a long way since then!)

dining room before
dining room before

Like I said, the room sat like that for months.  It had grey walls, a chocolate brown ceiling that I love and that ties into the walls of the adjoining kitchen, and that hideous shell chandelier.  And some of those boxes may still not be unpacked, but at least they're up in the attic now!

Shortly after we moved in, I found a table that I immediately fell in love with.  Like, capital L love.  But I didn't buy it because A) it was expensive and B) it didn't come with chairs and C) we were focusing our energy (read: money) in the living room instead.  About a year later, though, the table was still for sale and I could get a deep discount on it if I bought the floor model with the so-small-no-one-would-ever-notice-it imperfection on it.  Um, yes please.  Mama likes a good deal. :)

With the table purchased, I felt motivated enough to start pulling this room together!  I usually don't drag my feet so long on things like that, but the table was ordered in early September and we didn't get it to its current state until this past February.  Life just kept getting in the way, I guess.

Also, I painted the room twice.  After picking out a rug and fabric for curtains, I decided the existing grey walls wouldn't work and that green might be nice.  I wish I had a picture of the first shade of green I painted.  It was like a green screen that the weatherman stands in front of to give his report.  Way too limey and way too bright!  My mom took pity on me and helped me repaint it in January.

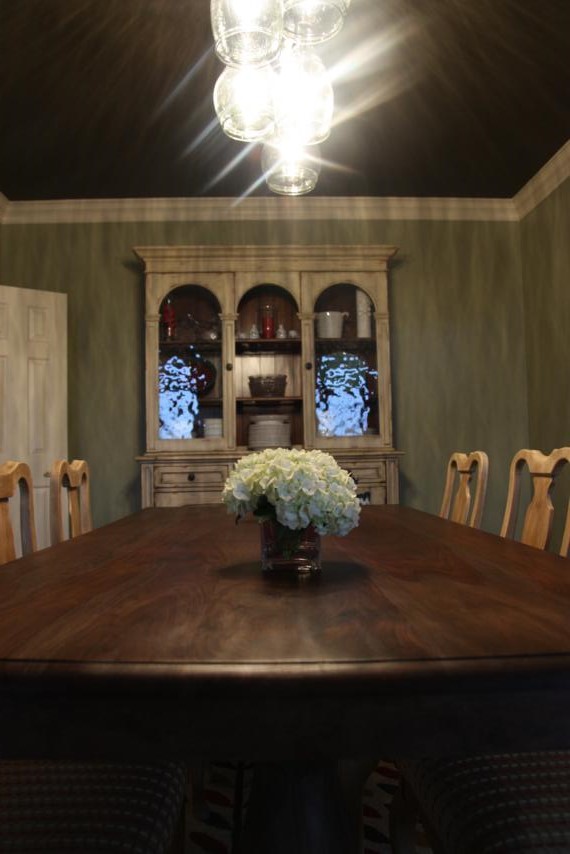
With the new table that I capital L love, a new light fixture that is WAY better than the seashell monstrosity, the freshly painted chairs, and some homemade chunky floating shelves, the room now looks like this.  Still not complete, but much further along than before!  (Crappy photos, sorry.)

dining room
dining room

I love the way the fixer-upper chairs turned out and look with the table.  We have seven of them so one end of the table remains empty right now.  The plan is to find a pair of affordable chairs - upholstered? wicker? - to use at the heads of the table and then that 7th chair would just be extra for when we're feeding a crowd.  

chairs

The bar is something I found at Pottery Barn Outlet a while back; it was a deal I just couldn't say no to.  :)  So far our sweet toddler has only thrown down and smashed one martini glass, despite our repeated "no touch!" warnings.  We made the floating shelves one afternoon in the woodshop.  I didn't take any in-progress photos or I'd type out a quick tutorial for you.  They were super easy though!  When I took the photo below in February, I had to borrow a few pitchers from my mom.  Now I've upped my collection size thanks to some birthday gifts so they've since been rearranged.

bar
floating shelves
floating shelves

The table top shows all kinds of pretty wood grain in shades of brown and grey and even some red.

table
table

Even with all this progress, there's still lots left to do.  I'd like to get a sidebar of some kind for the big empty wall and then there are lots of places that could use some artwork.  In time, I suppose!

christmas cards

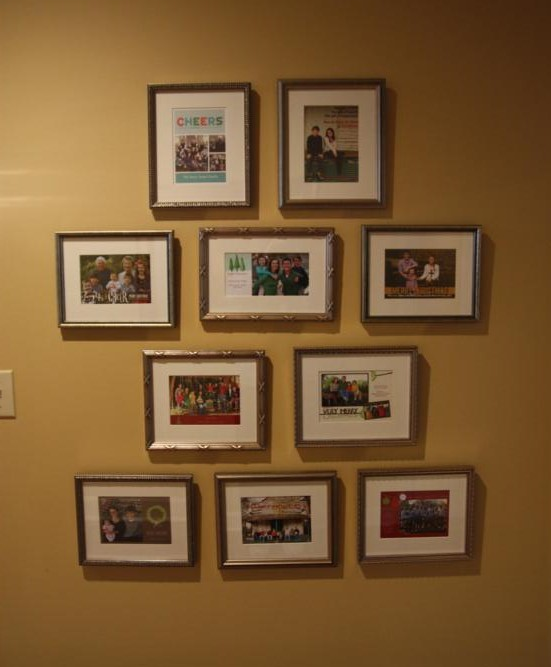
Our dining room opens up into our front entry hall (the first four pics were all taken from standing in the entry hall if that helps give you a reference?) and while we still haven't really done anything to it yet (we're painting it tonight though!), I did get one new project up on the wall.  I copied off several friends and had all of our Christmas cards framed to display.  I dug out all the ones we've sent since we've been married (5 Christmases) and then, since I wanted a fuller display, also found all the ones my Mom has sent since we're pictured in them too.  All ten cards got a white mat and a coordinating silver frame.  I can't wait to add to this gallery as the years go by!  

Christmas cards

I'm glad to finally have this Dining Room update post done so that I can move on and show you the progress we're making in the new nursery.  Things are coming along nicely in there and I hope to have some progress pics for you soon!

Chairs for the Dining Table

We have lived in our "new" house for 18 months now, and we've just now made our dining room look like an actual dining room.  It has been the slowest room to transform, mostly because we didn't want to spend money (or time) on a room we didn't even use.  I took some pictures of it yesterday to finally show it on the blog, but first, let's talk chairs.

I fell in love with a table a few months after we moved in and after about a year of pining for it, Matt finally let me purchase it.  He did give me one condition, though: "There's no point in us buying the table if we wait another year to get chairs for it."  I promised that I would not only look for chairs immediately, but I would find chairs I could buy on the cheap.  While I would love some fancy cloth chairs for our table, they would be a silly purchase to make while we're in this toddler-with-sticky-hands phase of life.  Add them to the wish list for later.

SO.  Right after buying the table (in September, I think?), I began the hunt for chairs.  Our table sits one inch higher than a standard table (thanks a lot, China) so it was important that I found chairs with a high back so they didn't look dwarfed compared to the table.  I decided maybe Queen Anne-style chairs would work if I could find some to make over.

After lots of antique store and thrift store shopping and more than a few sets of too expensive chairs, I finally found a set of four chairs I could buy from the Habitat for Humanity Restore.  Of course, I had to buy the table too, but the whole set cost me less than $100 which was a steal of a deal compared to the antique store prices.  Only problem was that four chairs were not enough!  

So I hunted around some more until I found another table and chair set - this time at a junk store - that was similar.  Once again, I had to buy the table but it was even cheaper than the first set so that was good.  This set only had three chairs though, so my chair count is stuck at seven.  Even though the two sets were not identical, they were a pretty close match.  In the pictures below, the one on the left is from the set of four and the one on the right is the set of three.  Love those vinyl covered seats!

chairs
chairs

As for the two tables, we donated them to our church's rummage sale in October since we had zero use for them and they were just taking up space.  

We got to work right away, taking off the seats and coating them in two layers of Annie Sloan Chalk Paint in Old White.  Thank heavens for chalk paint because there was no part of me that wanted to have to sand those chairs!  

old white

This is when things stalled.  Well, sort of.  I knew I wanted to add a glaze to the chairs so my mom got to it one day and got three of them done.  Then I made her stop because I didn't like the way they were looking (not her fault, just didn't like the method we had chosen).  THAT's when things really stalled.

Fast forward about four months and we finally got around to finishing them.  So much for keeping that promise to Matt that I wouldn't drag my feet on getting chairs around the table!

We repainted all the chairs in Old White again (we had already added a clear wax to all of them and brown wax to three, so we had to paint them all again to get back to our blank slate).  Actually Mom did all of this step because she's such a rock star.  Then together, we spent an afternoon reglazing all seven of them.  I liked the method we used this time much better!

glazed chairs
glazed chairs

The next step was to recover the seats.  But, I wanted to alter them a little bit first.  Remember how I said our table sits an inch higher than a standard table?  Well, I wanted to raise the seats of our chairs an inch too so that it felt normal when we sat at the table.  (I know an inch doesn't sound like much but it was noticeably high when sitting in a normal chair.)  My solution was to cut another seat out of 1" thick plywood (technically 3/4" but whatevs) and add it to the bottom of the existing seats.  The two pics below show the new plywood piece screwed to the bottom of a seat (I did not remove the old fabric, figured it'd just be extra padding).  My cuts are really wavy but I knew they wouldn't show.

plywood seat
plywood seat

With the seats officially thicker, we could finish them off by wrapping them in a new layer of batting and the fabric I had purchased.  We pretty much wrapped them like a package, but the curved corners in the front were a little tricky to get smooth.

wrapping seat

Finally, we just had to reattach the seats to the chairs!

reattaching seats
reattaching seats

Here is one of the finished chairs sitting in our dining room (more pics of the whole room coming soon).  

finished chair

I'm really glad I hosted Henry's shower because it gave me the kick in the rear I needed to finally get these chairs finished (about five months after I bought them...).  And I'm super pleased with how they turned out!  Now we just have to have some friends over to enjoy a meal in our dining room so we can break them in!

Mudroom Renovation, Finale

Part One of this renovation was all about how we hired someone to come rip out our old mudroom cubbies and build us something much better looking and more functional for our family.

Part Two was about our marathon days of painting every single surface in the entry hall, from the new built-ins to the walls and ceiling to the bright red doors.

And now, I'm back to show you the complete After pictures of this little renovation.  We have lived with it now for about three months and completely love it!  It is so nice to have a spot to throw our coats and bags as we walk in the door, and we still have room to store more stuff in the cabinets.

mudroom
mudroom

It was ridiculously hard trying to get a straight-on shot of the new built-ins in such a tight space.  I actually had to stand outside on the patio to try to get one.

mudroom

When I originally designed the layout of the cabinets, I intended to put baskets up in that open space to throw things like hats and mittens in.  We don't need the additional storage yet so for now I just added some knick-knacks to decorate it.  I'm sure what's up there will change as I acquire things I like better. 

Mom was kind enough to cover a cushion for me and sew a couple throw pillows.  She really is the best.  The top of the bench hinges open for more storage.  It's still empty right now but I have a feeling it will corral outdoor toys in a few years.

mudroom

My dad and husband updated the hardware on the two exterior doors (one goes to the garage, the other to our back patio).  Out with the gold and in with the oil rubbed bronze!  And so far I'm still loving the bright red doors.  But the fresh paint on the insides of them make the dirty outsides look horrible.  I think painting the other sides will be a good spring project.

I was super glad to move all of our beach towels out of my laundry room cabinets.  They were taking up way too much room!  This spot makes much better sense for them so that we can grab them on our way out the door to the pool.  Each cabinet has removable shelves like you can see in this one.

mudroom door
mudroom

Look at the difference between these Before and After pictures.  Can we all agree that this is a HUGE improvement?

before
after

With this project complete, we're already scheming up the next one.  We may be calling Cesar the trim guy to come back sooner rather than later!

Mudroom Renovation, Part Two

Ok, I'm finally back to continue the tale of our Mudroom makeover.  In Part One, I shared how we decided to hire out the actual construction work and our guy, Cesar, was able to build a masterpiece in just one day.  We planned to do all the finish work, though, so when his job was finished, we were left with this:

construction finished

Nice handiwork, but still a LOT left to do!  

We couldn't just pull out the paintbrushes and get to painting, though.  First, we had to do a bit of clean up.  The demolition process left a few bruises on our walls that needed to be smoothed over.

torn walls
torn walls
torn walls

The day before Thanksgiving, I broke out the hand sander and sanded the walls down as smooth as I could get them.  Then, I used spackling to smooth over the rough spots on the walls.  I also used wood putty to fill in all of Cesar's nail holes and LOTS of caulk to seal the seams.

wood putty

Thank goodness I had help with all the caulking!

helper
helper
helper

By day's end, it was ready for primer!  And get this: Thanksgiving morning I slept in.  When I finally woke up, I found my husband up and at it, already almost through with the coat of primer!  Isn't he the best?

primer

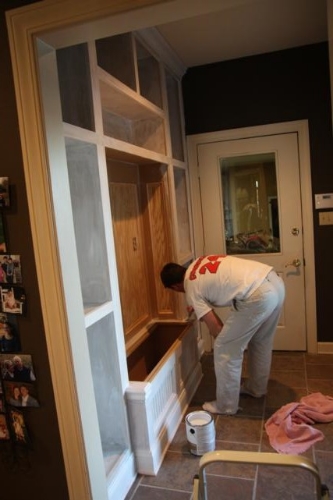
Now, we decided to tackle a lot more with this mudroom renovation than just the new built-ins.  One reason is because we wanted to paint the new built-ins white-white - the same color we're slowly updating all the trim in the house too - but that wasn't going to look good with the cream trim and cream doors that were in this little entryway.  So it made sense to go ahead and paint them white-white, too.

In all the other rooms we've tackled, we've also painted the ceiling white when we updated the trim, so we added the ceiling to the list.  And, why not put a fresh coat of paint on the walls while we were at it?  

While he finished up the primer, I took a good look at the doors and decided they needed a little bit of cleaning up before we could paint them.  I mean, just look at this horrible caulk!  I'm pretty sure the only rule in Caulking 101 other than seal whatever it is you're sealing is not to let it look like crap.  This is a big fat fail.

caulk fail
caulk fail

I went through about four razor blades scraping it all off, but I finally got a big portion of the sticky crap off.

As far as paint on the built-ins goes, I think we had to put two solid coats on it and then a little more for touch-ups.  In the pictures below, the trim also has fresh paint but the door has only been primed.  The nice thing about also painting the walls is that we didn't have to be careful while painting the trim.

paint
trim painted

Since our ceiling paint was not VOC-free and ladders don't jive well with pregnancy, Matt had ceiling duty by himself.  

ceiling

The reason I didn't paint the doors when I painted the trim is because I wanted to add a splash of color to the room by painting the doors something fun.  I ended up going BOLD with Posh Red.  Here they are after one coat of red (and fresh paint on the walls).  

red door
red doors

It felt like we painted nonstop for days.  Probably because we did.  In addition to every single surface in the entryway, we also had 8 doors and 12 shelves that had to be primed and painted (twice!) on both sides and all four edges.  It was quite the task!  We had them laid out all over our front entryway and office floors.  (This is an area where we haven't updated the trim yet.  See how much brighter white these look compared to the trim and french doors in the background?)

doors and shelves
doors and shelves

We made HUGE progress over our Thanksgiving break, but it seemed to take us forever to knock out the last final steps.  I didn't want to do the touch-ups on the red doors until after we switched out the hinges and hardware and, thanks to a wave of cold weather, we had to wait a while for a warm enough day to do it.  

As time-consuming as it was, I'm so glad we saved money by finishing it all off ourselves.  And I'm SO pleased with how it all turned out.  Stay tuned, I'll be back soon with the finished pictures so you can see it for yourself!

These little lights of mine..

...I'm gonna let 'em shine! Let 'em shine, let 'em shine, let 'em shine.

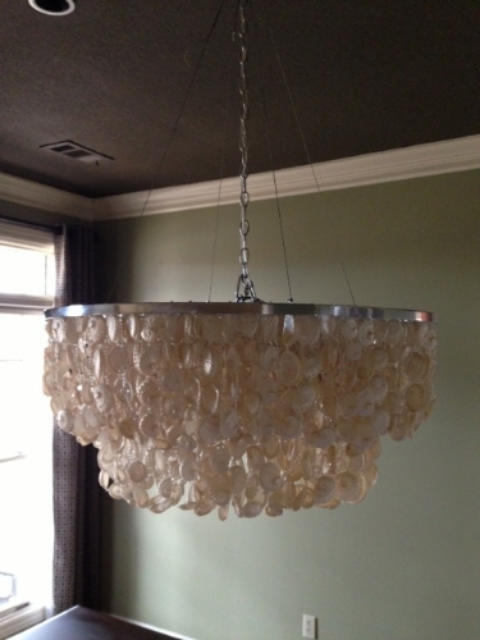
Have you ever been to my house?  If you have, then you know about the eye sore that is my dining room chandelier.  Correction: was my dining room chandelier.  I love when friends come over for the first time and we get to the dining room part of the house tour, just so I can hear their reactions.  "Oh, what a cool chandelier!" "Wow!  That's neat!"  And then when I immediately reply with "It came with the house.  I hate it.  You can have it if you want," their opinions seem to change a tad.  "Yea, it is kinda big."  "It would be cool for a beach house."  

Even after a year and a half of house tours, I still haven't been able to send it home with anyone!  My husband was even starting to offer some cash to go with it and still, no takers.  I knew it had to be new when we moved into the house because the previous owners hadn't even gotten around to clipping the extra length of wires hanging from after the installation.  I caught wind that the woman that used to live in our house had meant to take it with her, so I sent her an email and offered to sell it back to her for $200.  She seemed interested but said she'd get back to me.  I thought I'd made a quick, easy deal!  Two days later, she replied that her designer didn't think it'd work in her new house.  Imagine that.

Here's my pretty two-tiered plastic shell and bead light fixture in all its glory.

shell chandelier
shell chandelier

I had intended to immediately put it up for sale on Craigslist and put in something new, but we switched gears and started working on the living room and other areas of the house and it became a low priority.  It's not like we were even using the room since for a year it didn't have a table and even now, it still doesn't have chairs.

BUT!  Now I'm hosting my first shower in this house in a little over two weeks, and I've decided it's high time I start trying to pull this dining room together.  I spent last weekend repainting it for the second time, and am much happier with the color of the walls now.  I've had chairs purchased for a while but they're desperate for a makeover, so that's been put on this weekend's to-do list.

Before Christmas, Matt had given me the green light to order a new chandelier in January, but then we got hit with lots of vet bills and that purchase got put on hold.  I did a LOT of online shopping to see if I could find a chandelier I liked that was cheaper than the one I'd had my eyes on for MONTHS, but just couldn't find anything that fit the bill.  In fact, most of the ones I found made the one I wanted look relatively cheap.  Probably because he was tired of hearing my whining, but mostly because he's the best husband EVER, Matt gave me the green light again to make the purchase!

Pottery Barn was running a sale that weekend but, as my luck usually goes, my chandelier was one of the only things NOT on sale.  It didn't even come with free shipping!  After putting it in my online cart and seeing how much tax and shipping were going to up the total, I panicked a little.  It just seemed a little high for something I didn't HAVE to have right away.  Even though I really, really wanted it!

My good friend, Allison, has a connection with someone who works at Williams Sonoma (sister company to Pottery Barn) so I decided to hit her up and see if we could maybe get it ordered with a little employee discount.  Thankfully, she was happy to ask her friend and didn't make me feel completely awful for using her for her connection.  I got prematurely excited about my new chandelier at a discounted price so I was really let down when Allison's friend said she'd do it if I could wait 2-3 months.  So sad.  The baby shower is this month, not 2-3 months away!

Ok, fast forward a couple days and Allison forwarded me an email about free shipping from Pottery Barn.  I was doubtful that my chandelier would be included since it wasn't the last time but I checked anyway and low and behold, it had free shipping!  That was a good fifty bucks I could save.  I called Matt and woke him up (he was away on a business trip) because the offer ended at midnight and in his sleepiness, he told me I could order it.  Isn't he a doll?  :)  And hooray for saving on shipping!

Then guess what?  The next morning I had an email from Pottery Barn saying they were extending a 15% off all full-price online purchases sale for one more day.  Say whaaaa?!  I had just made a full-price online purchase less than 12 hours ago!  So I sent an email to customer service with my order confirmation number and the code for the 15% off offer and hoped for the best.  I was a little doubtful because I'm pretty sure when I made the original purchase, you could only enter one promotion code, so I would've had to have chosen between the free shipping and the 15% off.  However, if they came back and said I could only have one, the 15% off was a better deal so I could've asked for the extra credit for the difference.  I was supposed to get an emailed response to my inquiry within 24 hours.

I ordered the chandelier at 9:00 on a Wednesday night and got free regular shipping.  At 7:00 on Friday night, not even a full 48 hours later, the new chandelier was on my doorstep.  What?!  It arrived faster than my Amazon Prime items I'd ordered the same day!  Unfortunately, though, I had not received a response from my email so I accepted that I wasn't getting the extra 15% off and just got excited about it being installed so soon!

The very next day, Saturday, while my mom and I were out shopping and Matt and my dad were at home hanging the chandelier, I got the email from Pottery Barn that they had credited my credit card for the extra 15% off.  Awwwwwwwwwwwwwwwwww yeah!!!  

Oh my gosh, this has become the longest, most drawn out, boring story ever.  Sorry.  I'll cut to the chase.

Here are a couple more pictures of my original chandelier.  You can't really tell from the pictures but it was hung ridiculously low.  Like, so low even it was even at Anna and Wyatt's eye level.  It really made the room feel smaller than it is since it blocked your line of sight.

shell chandelier
up close

Are you ready for the most ridiculous part of this story?  As soon as I had these pictures taken (right before the guys took it down), I got ready to upload them to Craigslist to put the chandelier up for sale.  Before posting it, though, I did a little bit of research so I could figure out the correct name and brand of it.  Y'all, it came from Horchow and was originally FOURTEEN HUNDRED AND FIFTY DOLLARS.  Are you freaking kidding me?!?  It eventually went on sale for one thousand and fifteen dollars which I hope is when the previous homeowner bought it although either way that's the most overpriced light fixture I've ever laid eyes on.  The shells and beads are PLASTIC.  And now it's hanging in my garage.  I feel like maybe I'm totally missing something and I should bring it inside and put it in a glass case.  It's quite possibly the most expensive thing that we own.  And I've got it listed for $250 on Craigslist though, to be perfectly honest, if someone offered me fifty bucks I'd say SOLD!

I'm just glad it's finally out of my dining room.  And I love my new one!  It's the Paxton Glass 8-Light Pendant from Pottery Barn and, even at full-price, is only a third of the price of that other one.  

new chandelier
new chandelier

These pictures don't really do it's beauty justice, but I was using my iphone and trying to avoid all the piles of crap around the rest of the room.  :)  I'm debating switching to vintage bulbs for a warmer glow, though we also installed a dimmer switch which really helps tone down the brightness when necessary.  It's crazy how much bigger the room looks now that you can actually see it all at one time!  Now it's even more noticeable that we don't have chairs or anything hanging on the walls.  Gotta get on that ASAP.

Since the title of this post is plural, I'll move on to the next new light.  The original chandelier in the kitchen wasn't nearly as offensive to me when we moved in as the dining room one was.  However, it still wasn't really my style and I knew I'd eventually replace it with something I liked better.  

When we moved in, one of the 9 bulbs was out and during dinner one night, Matt jokingly told me that I could order a new light fixture as soon as all the lights burned out.  You better believe I didn't forget that promise!  Over the past 16 months, we have watched the lights slowly burn out one at a time, til we were down to just three of the nine lights still working.  It felt like we were having candle-lit dinners every night.  :)  

Since the bulbs were obviously way too high a wattage for the fixture, the bulbs that lasted a while started burning through the white shades making this chandelier look worse and worse over time.

burnt chandelier
burnt chandelier

My handy husband has become quite the electrician and was able to uninstall this one (and install a new one) on his own in the dark.  

handy man
burnt chandelier

I really didn't have plans to change this light fixture before the party, but I thought if I could find something reasonably priced at Home Depot or Lowe's that I could pay for with my own little stash of cash, that it would definitely look better than having burnt shades at the baby shower.  Even if it was just something to tide me over until I found a light fixture that I really loved.

I found this Allen + Roth pendant light fixture at Lowe's and thought it was just okay in the store, but I really love the way it looks hanging in my kitchen!  It's amazing how much light it adds!  I guess I hadn't really noticed how dim our lighting was getting...

Again, horrible pictures and please excuse the packaging mess on the table, but you can still tell it's much better, right?

allen + roth
allen + roth

Whew!  Are you ready for this incredibly too-long story about light fixtures to be over?  I am; I'm tired of typing.  :)  Maybe I'll have better pictures and less words next time!