Mudroom Renovation, Part One

We have this great little entryway at the back of our house where the garage door is (aka, the main way we come in and out 99% of the time).  I don't think I've ever shown it here on the blog, though.  (There are actually a lot of areas in our home that haven't made their blog debut yet.  They will, though, in time.)  

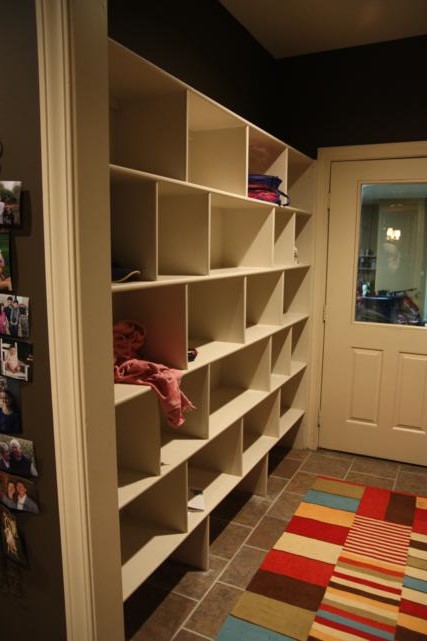
cubbies before

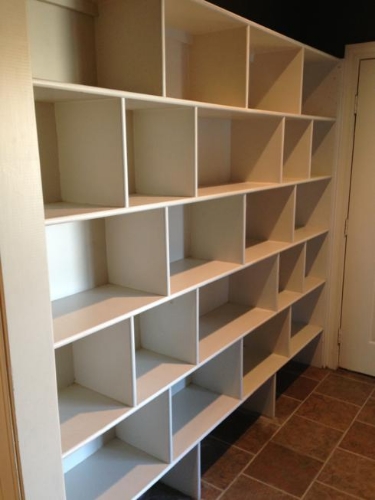
In this great little entryway is (was) this wall of cubbies which, in theory, is (was) pretty awesome.  In reality, though, it was a bit of a hot mess.  The cubbies became an indoor extension of the garage; a place where we just dropped crap on our way inside.  (This picture was taken after we'd mostly cleaned it out!)

It was kind of embarrassing when we had visitors and they had to walk past our mess to really get into our house.  I suppose I could've bought a gajillion baskets to try to conceal the junk, but then it would've just been a big wall-o-baskets.  Not to mention that it would've been nearly impossible to actually find coordinating baskets since all the cubbies were different sizes.

So anyway, it's been our plan all along to rip out the cubbies and build in some cute wall lockers or some other pinterest-worthy mudroom wall unit.  We figured it'd be a semi-big undertaking that would require assembly in the actual mudroom (picture at least three adults butting heads in here), but definitely not anything we couldn't handle.

A couple weeks ago, we were over at the new house my brother is in the process of building and admiring the mudroom bench and shelves his trim guy had just installed and started snapping pictures of every angle so that we could mimic his ideas when we built ours.  A day or two later, it hit me.  Uh, why don't we just see if Nick's trim guy can build ours too?  Holla!  Brilliant idea.  I was really itching to have the mudroom done (it's this time of year when we have no where to drop our coats that I really want some hooks on that wall) but my tired, preggo body wasn't super thrilled about doing the construction work.  And surely he could do it faster - and way better - than we could, right?

That was on a Friday.  By the following Wednesday, Cesar the trim guy was at my house going to work.  Aw yeah!

We completely cleared out the cubbies the night before he was set to arrive and I snapped one last shot of them in their before state.

cubbies, before

Wednesday morning, after meeting Cesar and describing to him what I envisioned for the space (poor guy, I think my brother completely undersold the job to him - he didn't know about the demo that needed to happen first and I wanted a more elaborate built in than my brother's), I hit the road to take Katie Wynn to get her second flu shot.

We were back in under an hour and the cubbies were gone!  Cesar said they were NOT easy to get all, thanks to all the glue and lots of nails, and that only made me more thankful that we weren't doing this job ourselves.

no cubbies

I had lots of errands to run that day so I was in and out checking on progress.  After my own doctor's appointment (heartbeat on new baby sounded good!) and some quick Christmas shopping, I returned home to see that the bench was already in!  (He'd even already re-installed the outlet covers and plugged my air freshener back in.)

mudroom - during

I was glad that we were home for the rest of the afternoon because I was able to talk with Cesar and adjust the plans as he built.  He's really good at his craft!  I would just give him an idea and he'd make it happen.

One main difference that I wanted from the original cubbies is that I wanted it to go to the ceiling and I wanted some concealed storage.  It just seemed like there was a lot of wasted space above the cubbies before.  Cesar was game and kept building up.

mudroom - during

It was late afternoon-ish when he finished the base of the wall unit.  I wasn't sure if he'd be ready to go and want to come back another day, or if he'd crank it all out that same day.  When I asked, he said he'd finish that day.  Well ok then!  

mudroom - during

We discussed the design of the doors and he cranked them out.  I can only imagine how many errors there would have been if we'd been making the doors ourselves! 

mudroom - during
mudroom - during

And, I didn't even know it while he was doing it, but he also made two adjustable shelves for every closed cabinet.  Awesome!

When we asked him to do the work, we said we'd just need him to do the construction.  All the sanding and nail-hole-filling and caulking and painting we'd do ourselves.  Around 6 that night, I shooed Cesar out the door, insisting that I'd clean up the dust, and he promised to come back and hang all the shelves and doors as soon as I had it all painted.

I love it!  Even in its raw state, it was still such an improvement from what we originally had!  Obviously, I wanted to roll up my sleeves and get right to painting, but that's not what was on the agenda.  Instead, we packed our bags, loaded up the car, and hit the road for the beach house.  I left knowing I had a big project to return home to.

Pics from our Florida trip up next!

Half Bath Makeover

Well, you've now seen the pallet wall we installed in the half bath and even the shelf we built to go on it, so how about some real Before and After shots now?  

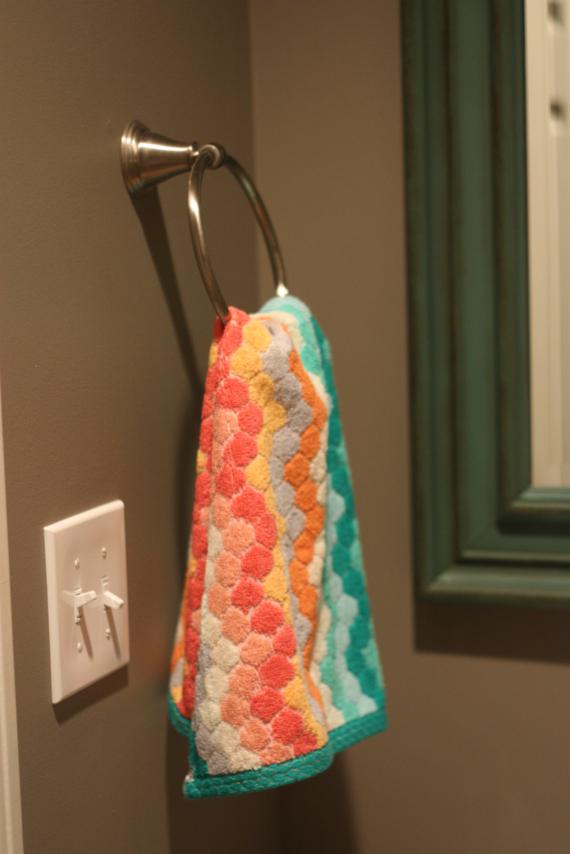
This half bathroom is off the kitchen, near our back door.  It was perfectly fine when we moved in, except that it was capital P Plain.  We only did two things immediately: hang the mirror (it was just sitting on the sink leaning against the wall) and hang a hand towel holder (how did they not have one of these?).  Other than hanging a red hand towel, nothing was done to the space.

before.JPG
before.JPG

Do you see in those Before pictures how all the hardware is gold but I plopped down our silver garbage can and soap dispenser??  Drove me crazy! 

The other thing that drove me crazy was the view from the hall as you walk in from the back door.  From that angle, you get a full view of the main wall of the bathroom (across from the door) but the only thing on it was a toilet paper holder.  Nice shot for all of our guests, no? 

before.JPG

It was high time this tiny room had a makeover!  Obviously the pallet board wall was the inspiration that got the ball rolling.  If you look up at the Before picture of the toilet, you can see that I had painted some blue swatches on the wall.  I toyed with painting the walls something bright so that the pallet boards would be a big contrast, but ultimately decided to keep it about the same shade that it was.  I found leftover paint in the garage from the previous homeowners that was just a hair of a shade darker and had it painted in less than two hours.

The pallet board wall went up on July 3rd and then on the 4th of July holiday, Matt was able to switch out the gold sink fixtures, hand towel holder, and toilet paper holder for brushed nickle ones.  Then it was just left up to me to accessorize!  Take a look... 

after.JPG
after.JPG

Those of you that are really observant will notice that we hung the new towel and toilet paper holders on the opposite walls.  No more view of the toilet paper from the hall...hooray!   

The new mirror - from Home Goods - is slightly smaller than the one that was there but much  more my style.  I painted the shelf above the toilet to match it.   

after.JPG
after.JPG

I thought the hand towels were a good way to introduce pops of more color.  The floral one is from Home Goods and the dotted chevron-ish one is from Target.  I couldn't decide which one I liked best so I got them both.  It's actually nice to be able switch it up occasionally and have a backup when I'm washing one. 

The big blank wall got decorated with a grid of six frames.  These were also found at Home Goods and I really wanted 9 instead of 6, but they didn't have enough.  If I ever find three more, I may add to the wall.  The original plan was to frame pen and ink drawings of outhouses since that seemed fitting for a bathroom.  Since I've been lazy and haven't actually obtained said drawings yet, I filled the frames with fabric scraps and called it a day.  I'm actually loving all the colors the fabric adds to the wall, though, so who knows how long these will stay.   

after.JPG
after.JPG

The view from the hallway is much better now!   No more toilet paper eyesore.  

after.JPG

I'm still struggling with what to put on the shelf.  I like the white vase (Home Goods) with the flowers (Pier One) for the touch of whimsy they add to the rustic wall.  And I like the color of the three candle holders, but I don't necessarily love that everything on the shelf is tall and skinny.  Anyone got any great ideas on what should go there?  Which should stay and what should I replace the other with? 

after.JPG

So that's how the bathroom looks today.  What does it still need?  The three more frames?  A rug on the floor?  Something better on the shelf?  I'd love your feedback!

Pallet Board Wall

Remember back when I told you how to put a shelf on it and then said I'd be right back to tell you all about the wall I put said shelf on and then disappeared for, like, a month?   

Yeah, sorry about that.   

Guess what, though.  I didn't forget.  I'm finally back to tell you about that wall. 

It all started when I saw this picture on pinterest and the wheels in my head started turnin'.   You already know I love a good plank wall and all things distressed, so using old pallet boards on a plank wall was right up my alley.  I loved the muted colors in the wood in this picture and especially the grey undertones.  And it just so happened that we had a half bath that could use some sprucing up...

via

When I get an idea in my head that I'm really excited about, I develop a one-track mind and start moving full-steam ahead.  In less than 48 hours, I had a pile of pallets delivered to our house...for free!  Gotta love having connections.  :)  (Thanks, Kim!) 

Slight problem with the f-r-e-e pallets, though.  They were brand new.  As in, the wood wasn't worn at all.  They were also really, really rough.  So rough that I think I got a splinter just by looking at them.  So it wasn't going to be as easy as just taking them apart and slapping them up on the wall.  A little pre-work was required. 

My dad worked on pulling the pallets apart for me.  I pulled up at his house one Saturday just after he'd finished the first one.  It took him over an hour!  After watching some YouTube videos of how to correctly dismantle a pallet, we were able to hammer the other ones apart much faster.  Thank goodness or this project still may not be done!  

A couple Christmases ago, we gave my Dad a wood planer for his wood shop.  It doesn't get used very often, but this was the perfect project for it.  We were able to run all the pallet boards through it and turn them from incredibly rough to nice and smooth.  That made a HUGE difference.  I wasn't so sure we were going to be able to use the boards in their original state, so I was really glad running them through the planer worked. 

Even after smoothing them out, they were still brand new wood.  (In case you can't tell, I forgot to take "before" pictures of my pallets.)  I really wanted those grey undertones so I went shopping for some stain.  At Lowe's, I found a sunbleached stain by Rustoleum that was perfect!   My husband stepped up for the staining part.  (I'm quickly learning that I have to do a lot of sweet-talking to get projects done these days since someone always has to be on baby duty too.)  He put two coats of stain on all the boards and then we were finally ready to put them up in the bathroom!
I think it was the evening of July 3rd when we installed it.  I remember because we didn't have to work the next day (4th of July holiday) because we didn't really even start working on it until after I'd put Katie Wynn to bed for the night.  As we ate dinner, the three of us (me, Matt, Dad) talked through the plan.  We were pretty sure we were going to be able to remove the tank of the toilet but the leave the seat in place and still get the boards in behind it. 

We used liquid nails to glue the boards to the wall and then nailed them in with the nail gun too.  I think we were all really nervous when the first one went up.  It won't be pretty should we ever decide to pull these down!  It would probably require re-sheetrocking the wall so the boards are here to stay for a while! 

As the second board went up, Matt turned to me and said: 

When we got married, I didn’t really think we’d ever be standing in the bathroom together watching your Dad sit on the toilet.

Then shortly after he said that, I texted this picture to my mom.   No maintaining-three-feet-of-personal-space for this project!

IMG_4779.JPG

After the first couple of boards were done, we really got into a groove and it started going up quickly.  My job was to cut the boards to length out in the garage (while fighting off mosquitoes and June bugs!)  and decide the pattern of the boards (we alternated between one full-length board across and two boards pieced together).  Matt then applied the liquid nails and then handed the board off to my Dad who nailed them in place.  All while never waking the baby.  :)

IMG_4780.JPG
IMG_4783.JPG
IMG_4786.JPG

In the picture above on the far right, you can see that when we made it to the ceiling, we were left with a sliver of space too narrow for a full board.  We measured it out and then sent my Dad home to cut it to size on his table saw.  Waiting for him to come back was probably the longest part of the whole project and he only lives 5 minutes away!   

I guess I forgot to take a picture of just the wall by itself before putting a shelf on it.  Here's my side-by-side before and after pictures like the Pinterest inspiration above. 

IMG_4876.JPG

It's been over two months now since we installed the pallet wall and I still love, love, love it!  More pictures of the complete bathroom redo coming next.  Promise.  :) 

Patio Makeover

A few weeks ago, my mom and I were out shopping and hitting up our favorite stores looking for some chairs to go with my new dining table (more on that later).  We had zero luck on finding the right dining chairs, but while we were at Garden Ridge we moseyed on over to the patio cushions and spotted some that looked like they might actually fit our old patio furniture.  A miracle! 

I say a miracle because I've been hunting for the right sized cushions for years!  We bought a set at an end-of-season JC Penny sale years ago and I've never really liked the striped fabric that was on the cushions that came with the set, but they worked fine for a while.  Then they set out in the elements and started to get a little worn looking so I started trying to replace them.  Every cushion I found, though, was sized to fit wicker or really small furniture. 

Furniture out on the patio of our old house. 

Furniture out on the patio of our old house. 

Obviously this furniture traveled with us to our new/current house and we plopped it down on our back patio.  We have big plans for this space...it has a great herringbone patterned brick floor and you can access it from three different rooms in the house.  The eventual plan will be to screen it in and then lay another brick patio out past it to extend it some.  We've already met with a contractor about it so now we're saving our pennies! 

The nice thing about this patio is that it's already covered so the furniture doesn't get rained on like it did at our other house.  Too bad the damage was already done! 

before 3.JPG
before 4.JPG

Can you say gross?  I mean, really, who wants to sit on that?  The view from the backyard really wasn't anything to write home about. 

before 2.JPG

So when we were at Garden Ridge and spotted the cushions that would actually fit this furniture, I forgot all about my dining room and started picking out a pattern.  I chose a khaki colored trellis-ish pattern that I thought would be safe a neutral.  I decided I could paint the wood part of the furniture any color I wanted and it would pop with the khaki. 

Boy was I wrong.  Matt's parents were visiting us when I came home with the new cushions.  We all decided a light blue would look good and luckily, I already had a gallon of it leftover from another project.  The next afternoon I got to work. 

Y'all, I think I chose the most humid day of the century to paint those dang pieces.  "Dripping with sweat" doesn't even accurately describe what I looked like.  More like, "jumped into a pool of smelly sweat."  It was miserable!!  Not only was it ridiculously hot outside, but the wood was soooo dry that it drank all of my paint right up!  I used almost a whole gallon on the four pieces (one loveseat, two chairs, one table) and it took for-ev-er.

The worst part?  When I was done with the first coat of paint, I could immediately tell that I hated it. 

mid 1.JPG

The light blue paint didn't pop at all and it made my neutral khaki colored cushions look yellow.  But still, I decided to sleep on it and see how it looked out on the patio the next day. 

The pale blue alone wasn't too bad on the patio.   

mid 3.JPG

Then I added the cushions and blah!  The clashing colors!  The competing patterns!  I was back to hating it. 

mid 4.JPG

I had no idea what to do.  Pick a different color of paint or find different cushions that would work with the blue?  I knew a second coat of paint was going to be necessary from the get-go, so all was not a total waste.  If I went with a different color this light blue would just be like my primer.  No biggie.  And thankfully, I had not ripped the tags off the cushions and I still had the receipt (this is rare for me!) so I could return the cushions.

In the end, I did both.  I went back to garden ridge and got different cushions and this time, found some paint that I knew would match them.  And since I was buying new paint, I went with exterior paint in a satin finish (the light blue was interior eggshell).   

Please tell me you love this new look as much as I do! 

after 3.JPG
after 5.JPG

The teal pops way more than the light blue, right??  And the cushions are really growing on me.  They weren't necessarily my favorites at the store, but I'm really starting to like how they look with the teal.  I also picked up some green throw pillows and a big green pouf that can serve as an ottoman or extra seating if we had a crowd. 

after 6.JPG
after 1.JPG

The view above on the right is what I see when I walk in from our garage door.  Sometimes I have to just stop and stare for a minute.  What a difference some paint and cushions can make!  The furniture looks brand new again.

Since I was sprucing up the patio, I also bought this cool mason jar that I found at Home Depot.  I couldn't resist!  It looks like a mercury glass jar during the day and then at night, thanks to it's solar-powered lid, it lights up like a little lantern!  LOOOOOOVE it!  I wish I could buy 28 more of them and string 'em up around our backyard.  Makes me wanna host an evening party.  :) 

after 9.JPG

Now that it looks so much better out on the patio, I really want to spend all my time out there.  But unfortunately we've recently learned that our little Katie bug is a magnet for mosquitoes so we haven't been able to spend as much time out there as I'd like.  It's got me itching to get the area screened-in as soon as possible.  If only I could figure out how to make those pennies we're saving magically multiply...

Landlord Woes

Let's talk about being a landlord, shall we? Last August, we moved out of our green house in the city but did not sell it, instead opting to try renting it out.  We prayed we wouldn't have to go long without a renter since paying two mortgages would definitely hurt our bank account.  Our prayers were answered when the first family to tour our house signed a lease and moved in the first of September.  We didn't have to go a single month with double-mortgages!  Being a landlord was off to a really good start.

In January, our tenants broke their lease and moved out (relocated for a new job).  They paid the penalties of breaking their lease early - two months rent plus forfeiting their security deposit (which equals another month's rent) - so we weren't too panic stricken.  In fact, if we had gotten a new renter as quickly as the first time, we could've had two months of double rental income.  Holla!  We crossed our fingers for that but unfortunately did not get a new renter that quickly.  We were thisclose to offering a rent special (third month half price or something) when our next tenant toured our house.  A lease was signed before we advertised our special.  Score!

We learned that our new tenant is a 20-something single male.  I briefly panicked while picturing our house turning into a bachelor pad and getting trashed.  Thankfully, that is not the case.  He's a responsible adult who pays his rent on time and, after multiple drive-bys by me, doesn't seem to be throwing too many parties.

So the second round of being a landlord wasn't looking so bad either.

Until just a couple weeks ago...

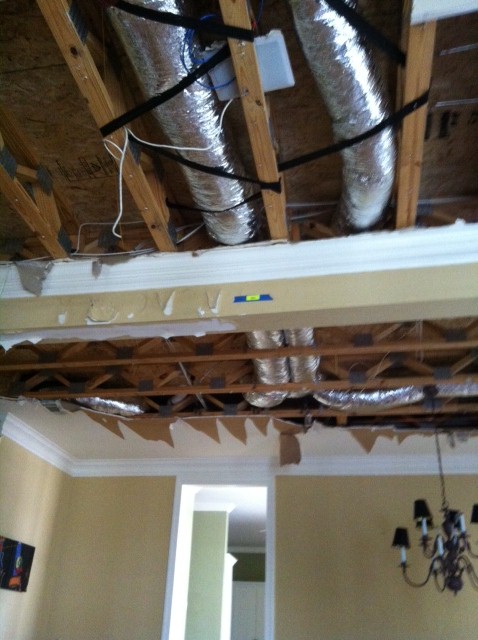
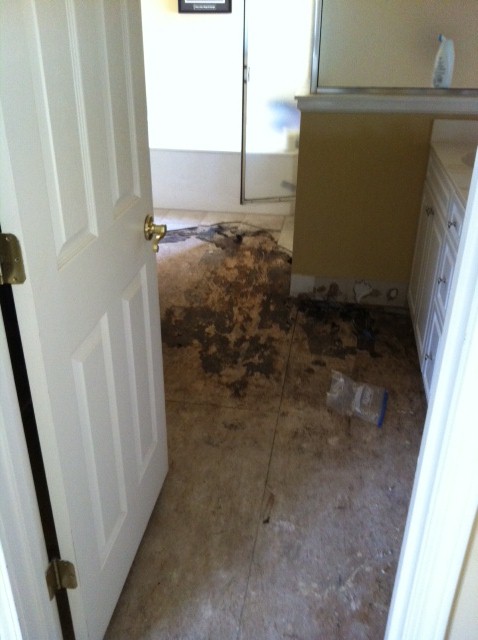
It was a Saturday afternoon when we received a call from the rental company that manages our house.  They'd gotten an urgent call from our tenant the night before and had been out to our house to do some inspections.  At some point in the night, the supply line to the sink in our master bathroom burst and, since the tenant wasn't home, water rushed out for several hours.  Our master bathroom was upstairs, so the space between the two floors filled with water until the ceiling in the downstairs finally collapsed.  That's what the tenant walked into when he got home.

Obviously, we were sick over this.  Doc spent a good portion of the afternoon on the phone with the maintenance man from our management company and our insurance provider.  They were able to send someone out immediately - a blessing in itself - to inspect all the damages.  Thanks to everyone's quick responses, damage mitigation was able to begin immediately.

Needless to say, it's been a stressful couple of weeks.  Doc wasn't sure that he wanted to go to the house to see the damages because it would make him so mad, but last Thursday he had no choice but to go.  It was finally time to meet with our contractor to discuss repairs.

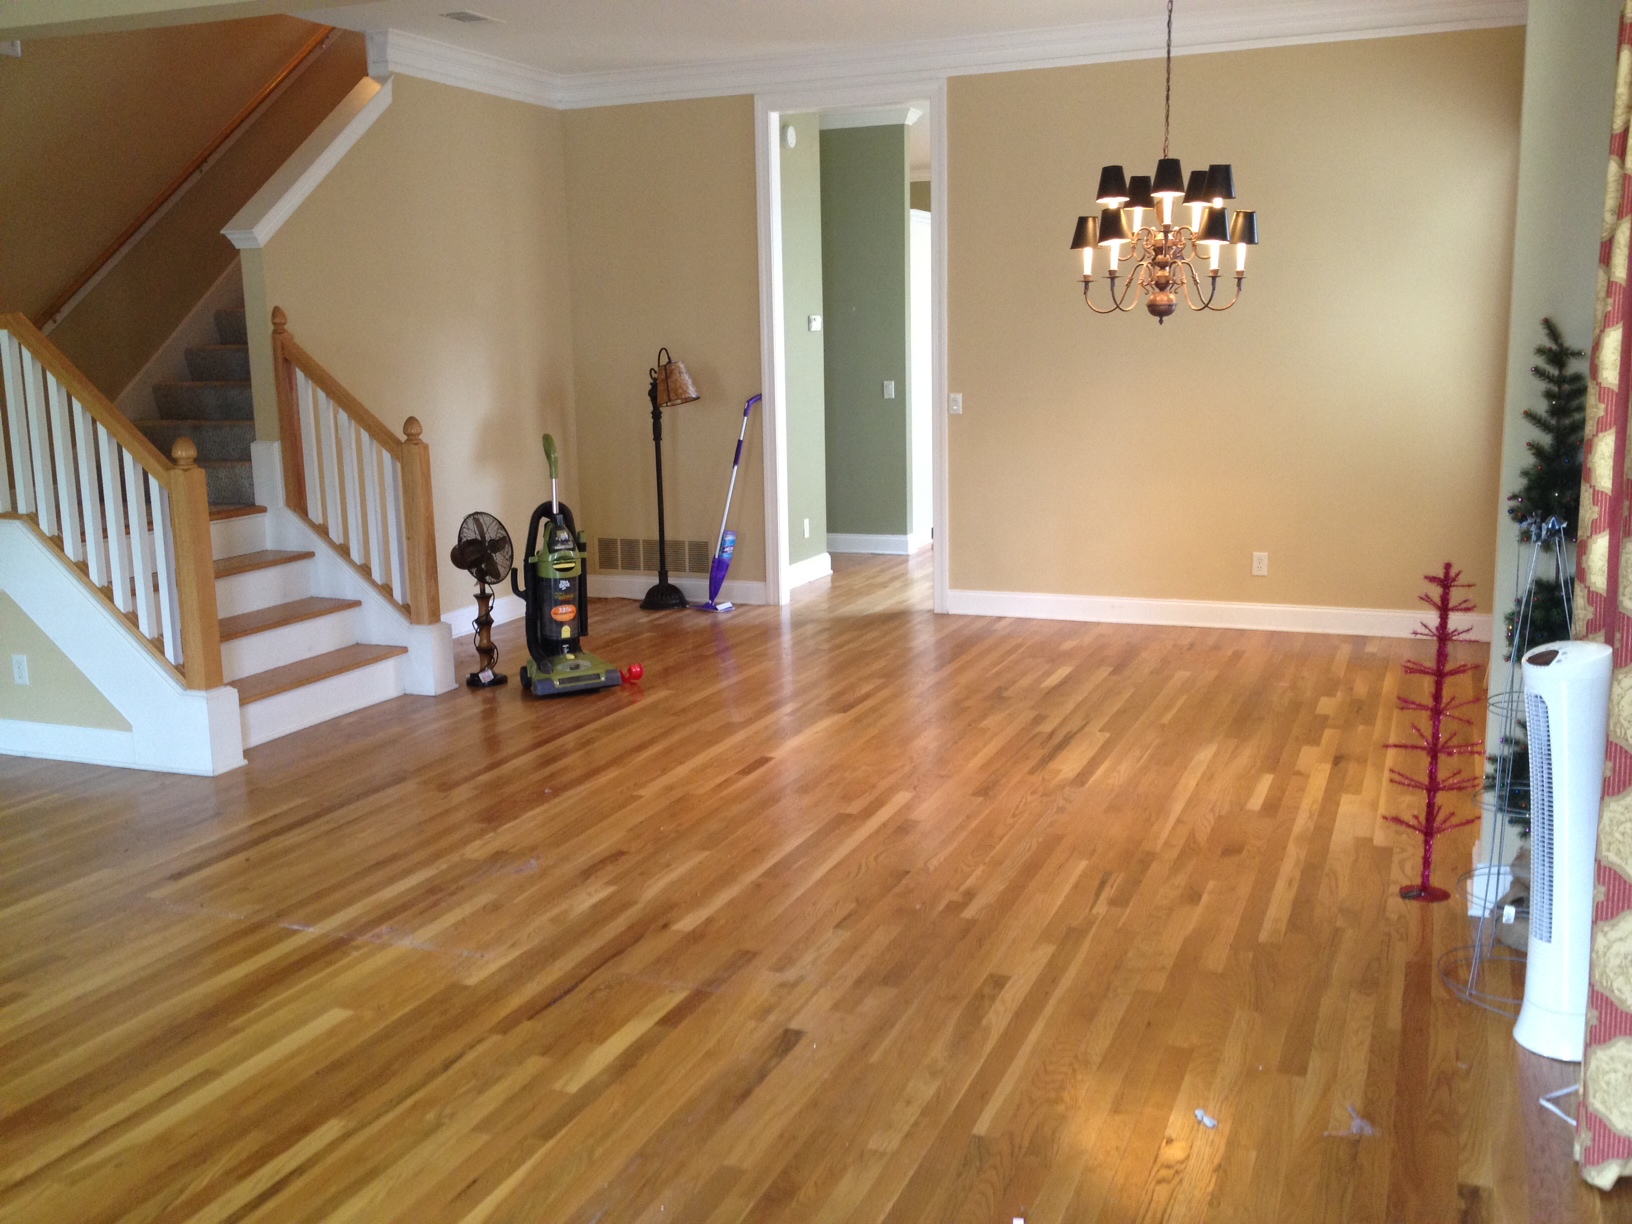
This was the last picture I took of our living room and dining room when we moved out in August.

empty house 2

And this is how those same rooms looked last Thursday.

This was how the master bathroom looked.

I was kinda sad I wasn't getting to go with him to see it myself, but after seeing the pictures maybe I'm glad I wasn't there.  Our poor house!

Since talking to the contractor, we have a pretty good idea of what all we're facing.  Here's a rundown of all the bad news.

  • The whole ceiling in the living/dining room will have to be replaced.
  • Some crown molding will need to be replaced.
  • A few of our wooden blinds were damaged and will need to be replaced.
  • A wall or two will possibly need to come down and then replaced.
  • Most of the hardwood floors will be ripped out and replaced.  They are hoping the floors underneath the kitchen cabinets are fine.
  • The wooden stairs, treads, and possibly both banisters will have to be replaced.
  • We will need a new chandelier in the dining room.
  • It's possible that the speakers from our surround sound will need to be replaced.
  • Baseboards and shoe trim will need to be replaced.
  • The carpet on the stairs will be pulled out and replaced.
  • All carpet upstairs except for the kids' room and playroom will need to be replaced.  (We'll probably pay to go ahead and do those rooms too so it'll all match.)
  • All the tile in the master bath will be jack-hammered out (it's halfway done already) and be replaced.
  • The vanity in the master bath will need to be replaced (they think the counter and sinks can be reused, but maybe we'll replace those too).
  • Time frame for repairs is estimated at six to eight weeks (from now, not from when it originally happened two weeks ago).

As you can see, that's a lot of stuff that needs to be replaced!

I am choosing to focus on the positives:

  • We are not currently living in the home, especially with a small baby.
  • We have insurance that is going to cover most of the damage.  We will have to pay our deductible of approximately $4,200 which is definitely more than pocket change, but doesn't even compare to what the overall bill is going to be.
  • Our insurance will also continue to pay us rent since we are not charging the tenant while repairs are being done. 
  • When it's all said and done, we will essentially have a brand new house.  Surely this will help our resale value.

I have never in my life been so thankful to have insurance!  We have gotten a first estimate of the total bill and it's over $30,000.  We know it's missing quite a few things too so it will be a lot more than that.  Shortly after the management company assessed the situation, they learned that our tenant had violated the terms of the lease by failing to purchase renter's insurance.  Unfortunately for him, that means any damage to his furniture and belongings will not be covered, nor will any expenses for temporary living arrangements be.  (Our insurance is for the structure, not contents.)  I feel certain that he will not make that mistake again!  He is currently not staying at the house while repairs are being made, but will return to it when construction is complete.  We will not go any months without receiving a rent check...woohoo!

That's what we've been dealing with lately.  Not sure how much longer we'll want to stay in this landlord business.  Anybody want to buy a house from us?