We bought a couch.

I don't think I've ever formally introduced our master bedroom here on the blog.  That's mostly because I've never felt like it was finished.  And it still isn't.  Far from it, actually.  So I'm still not introducing it today but you will get to see a big ol' glimpse of it.

Our master is HUGE.  We had a big master in our old house so I didn't think we'd ever find another house with one as big, but low and behold we did.  This one is even bigger.  When we had the carpets shampooed this past summer, they charged us the price for two rooms for our master.  

It kinda is two rooms, really.  We have the half where we sleep - it has our bed and nightstands and dresser.  And also my wrapping armoir.  Then the other half is where we live.  It's where we watch tv at night after the kids have gone to bed and when they're awake, it's where we spend lots of time on the floor playing.  The two areas are divided by a partial wall and a big arched opening.

Up until about two (or three?) months ago, this is how it looked since we moved in.  

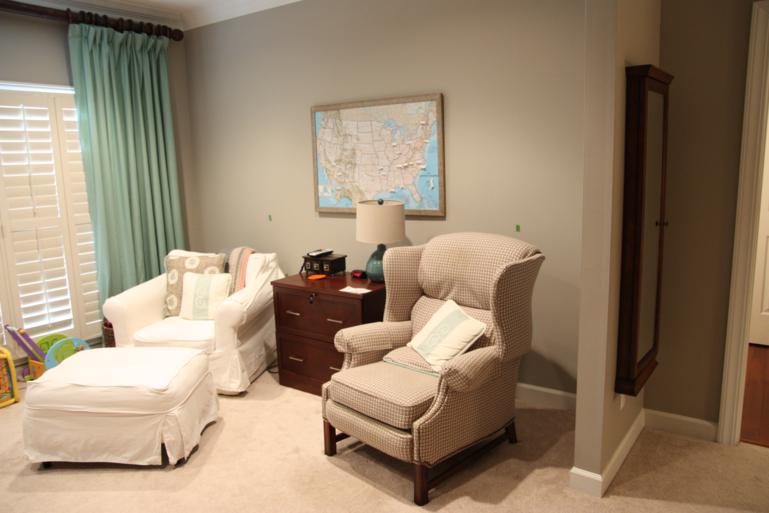
See why I've never given you a tour of this space?  Those chairs look so pitiful!  But, they are both the most comfortable chair ever.  I know, it's impossible for them both to earn that title, but they do.  They're comfortable in different ways.  The one on the left is soft and fluffy and you just sink right into it.  The one on the right reclines so far backwards that you could sleep all night in it.  And they were both bargains!  The white one was given to us (for free!) by some friends and the brownish one was purchased for a whopping 40 bucks.  I've had it recovered twice since it's former white pleather days.  (Yes, I'm aware those arm covers are hideous.)

So if they are both simultaneously the most comfortable chair ever, then why get rid of them?  Well, I'm glad you asked.  First off - check out that ill-fitting slipcover on the white chair.  Don't ever listen to any blogger that tells you an Ikea slipcover will fit on a Pottery Barn basic chair.  As you can clearly see, this is a lie.  (And what you can't see is that the slipcover is completely cut all the way up the back!)  But at just $30 for the slipcover, it was worth a try.  Lesson learned.  I have a big pile of swatches of fabric that I can purchase a Pottery Barn cover for this chair in, but the prices start in the $400 range.  I could get a whole new chair for that!  Secondly, my husband didn't like that we were always in our own separate chairs.  Call him a sap, but on movie nights, he wanted to be able to cuddle up on a couch.  Can't say I blame him - it'd be a heck of a lot easier for him to rub my feet if we were closer together! ;)

We initially shopped for a love seat to replace just one of the chairs with, but we never found what we wanted.  We eventually just bought a full-sized couch and I'm so glad we did.  It has a chaise too and that's something I've always wanted!  After having it for a few months, I'm surprised we ever survived without it.  There's plenty of room for all four (five plus Lolli) of us to pile on while watching Mickey Mouse Clubhouse on a Sunday afternoon.

No, it's not the fanciest couch in the world and that photo above would never show up on a design blogger's page.  But it's big and comfy and easy to clean and that's exactly what we need at this stage in our life.  It's got to be able to withstand a dog and two small, sticky kids.  Plus the drool from when I nap.  :)  

Those pillows are sad and pathetic looking but their days are numbered.  I'm currently shopping for new bedding and fabric to finally spruce up our bedroom like it deserves.  Maybe this will be the year to formally introduce it on the blog.

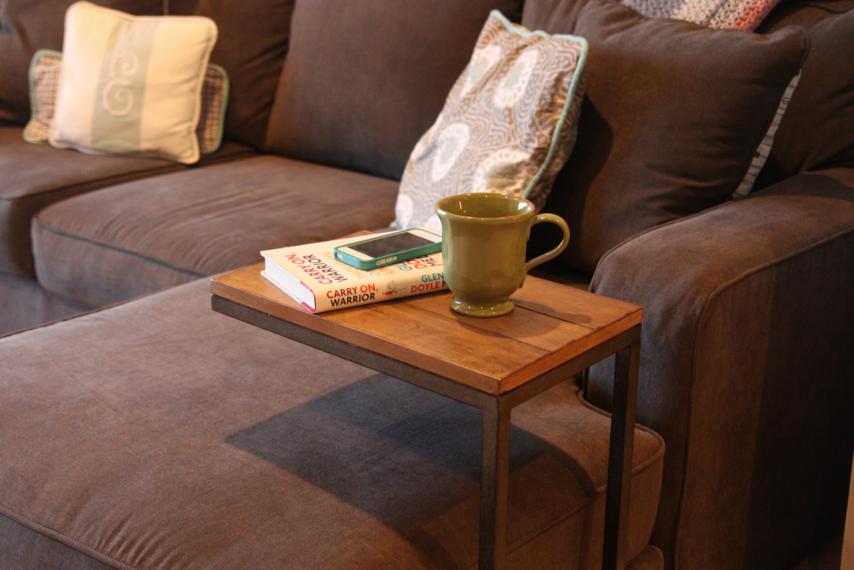
One of my favorite Christmas gifts was that cute little sofa table.  We had the couch for less than a week before I decided I had to have something.  My spot is in the corner with the chaise and I never had anywhere to put my drink or empty ice cream bowl.

It's wood and metal combined and came from Ballard Designs and is just the most darling little table ever.  I heart it.  It's the perfect size to hold my drink and phone and whatever I'm reading at the time.

Just for fun (seriously, no judgement please!) here's a full view of that side of the room.  It's like a daycare up in here.  I dream of the day when colorful toys won't line the walls of my bedroom, but if having the toys means my kids will stay little forever, then I'll keep 'em!

So that's our three-months-ago update.  I feel like this couch and I have been friends for much longer than that.  We've done some pretty serious Sunday afternoon bonding.

Anyone looking for a new chair?  I've got a couple just hanging out in our playroom.  Wanna play Let's Make A Deal?

Blinded by the Light

Warning: this home improvement update is not very exciting.  But it's worth mentioning thanks to the money we just shelled out for it.  It's kinda like a new roof - way more money than you want to spend but you know it's necessary even though no one other than the homeowners will really notice or appreciate it.  

So here 'tis: we got custom blinds.

WHOA!! I CAN'T HANDLE THAT MUCH EXCITEMENT!!

I know. Crazytown.


Our living room is a two-story room that has four windows up high on one wall.  I would show you a picture of them sans new blinds but I seem to have deleted those.  Oops.  The windows bring a lot of natural light into the room, which I absolutely love, but there are times during the day when it's just a little bit too much sunshine.

Take sitting on the couch for example.  Let's say you're on maternity leave and you've been snuggling up with your cutie pie baby for oh, 4-ish hours watching Law and Order: Special Victims Unit reruns when, like clockwork, ten minutes into the 3pm episode the sun beams are so strong you can feel your sweet pea starting to fry like bacon.  Do you know how annoying it is to have to uproot the little nest of necessities you've built around yourself so you can relocate to a chair in the shade?  Seriously, the sun rays are so intense it's amazing our couch hasn't caught on fire yet.

And then, after you've survived the hell that is the couch in the mid afternoon, you move onto the kitchen for a nice dinner at the table with your family.  But then, boom!  The 6:15 sun beams dart through the living room and straight into the kitchen to blind anyone trying to enjoy their chicken enchiladas.  No chair is safe as the sun moves around the table within the hour.

After a full summer of being blinded by the light in multiple rooms, we decided to do something about this little first world problem of ours.  We called in some professionals to see what they could do.

What they couldn't do - at least not on the first visit - was bring the right sized ladder.  Whomp, whomp.  I even sent pictures so they could see the window we needed help with and they still came up short.  (Ha! Punny.)

On their second time out, they had an extension ladder and the rep was able to climb up to do some measuring.  I think he measured for longer than the install took.

And he had quite an audience while he was up on that ladder.  Thomas couldn't keep his eyes off him!  And Lolli...well, she had to keep her eye on the stranger in the house.

Six weeks later, after maternity leave and SVU marathon days had ended, our custom plantation shutters finally came in.  Rep #2 came to install them only to find out that they'd forgotten the hanging strips for one of the four windows.  Whomp, whomp again.

A week later he was back with the missing piece - and a buddy to hold his ladder for him.  I probably should've offered to do that the first time.  Maybe that's why he was sweating bullets.  Oops.

Now we are no longer getting sunburns in our living room!  Of course, the seasons have also changed so the sun shines in in a different place now, so the true test will be next summer.  Maybe I'll have to take 14 weeks off again to make sure they're doing their job.

I took these two pictures below at night so you can see how the actual shutters look when the sun's not blaring behind them.  Right now they are pointed up so we still get natural light bouncing around those upper walls, just no more laser beams frying us to pieces.  I may have to test them out pointed down a little because I do kinda miss getting to see the sky.

So that's our most recent home improvement project for ya.  Not super exciting, but something that will hopefully add value to our home, or at least drastically reduce the amount of SPF we have to apply before hanging out in the living room. 

The end.

Patio Projects

This summer we have worked on some temporary projects in our backyard.  I say temporary because we have much bigger long term plans back there, but these smaller projects should satisfy us until we get all of our dollars saved up.  

The biggest project that we knocked out (and by "we" I totally mean "Matt") is a small paver patio that we put in just past our brick patio.  It's relatively small compared to most patios but it didn't feel small when we were manually loading up 80 pavers onto a cart at Home Depot, then into the truck bed, and then unloading them at home (again, that "we" totally means "Matt").  I wasn't able to take in-progress pictures because my job was to keep the two kids happy, so you'll have to talk to him if you want a tutorial.  We did kill the grass and weeds in this corner ahead of time, then he did some leveling out and sand spreading before laying out the pavers.  I really wanted to do a more intricate pattern but it would've required us to cut pavers and that just wasn't going to happen.  He was nice enough to arrange them several different ways until I decided on a pattern I liked.  The black edging helps hold the pavers in tight and the grass has already grown up to it so it's not so noticeable..  Then he used a sand specifically made for this kind of project to fill in the gaps - it hardened and dried after being misted with the water hose.  

IMG_7947.JPG

So what was the point of adding a patio off of a patio?  Glad you asked.  The sole purpose of this was so that we could finally move Matt's grill around to the backyard.  For almost two years, it's sat in our garage and he's had to pull it out onto the driveway every time he wants to grill - something he loves to do.  Putting it out here gives it a more permanent home and is closer to the kitchen for all his trips back and forth.  As you can see from the picture below, we couldn't put it on the already existing patio because it's covered.

IMG_7936.JPG

And now that the new (somewhat temporary) patio is done, I'm sure a new grill and grill cover are on Matt's Christmas list.  :)

The next project on the list was one that I really wanted: some proper edging for my flower garden.  The pictures below of Katie Wynn checking the tulips were taken last spring.  You can see how there was no real defining edge between the flower bed and the grass.  Well, unless you call the line of weeds and moss that grew there a defining edge...

5.JPG
7.JPG

So back to the store we went.  We debated building up a wall or making a pathway, but we reminded ourselves that this wasn't a forever project.  We grabbed enough to have two pavers the full length of the bed and arranged them with one standing up and one laying down, kinda creating an L shape.

IMG_7938.JPG
IMG_7939.JPG

I love the way it looks.  I also love that the moss and weeds are mostly gone and the grass is growing right up to the edging.  It just looks so much better!

I took all of these pictures a while back - maybe even a whole month ago?  Here is how my zinnias looked then...

zinnias
IMG_7942.JPG

...and here are updated pictures that I took last night.  We have so many blooms and they're so big!  Seriously, if anyone local needs an arrangement, bring over a vase and fill it up.  I have more than I can keep up with!

zinnias
zinnias

The final project for the patio is one that my mom did for us.  She painted us two canvases to hang on the brick wall - one about Gardens and one that has Porch Rules.  Perfect!  While she did most of the grunt work, it did take us a while to get masonry nails and actually get them hung.  Hammering into mortar is kinda nerve-racking! 

cavases

Here's a panned out view of the patio.  I wish I had thought to take an updated picture of this too because our flower pots are looking great!

IMG_7948.JPG

Here's the current view of our backyard as we see it when we're sitting on the back patio (something we really enjoy doing when it's not miserably hot and the mosquitoes aren't out to get us so, you know, like twenty nights a year).  

IMG_7953.JPG

And here's the World's Worst Photoshop Rendering of what our backyard would look like in a perfect world if and when we can ever afford to do what we'd like to to it.  We would extend the brick patio out further so that it matches the current one and we could add an outdoor table with the grill.  The tree would have to go because we'd be putting in a custom pool (those blue squiggles are waves).  And contrary to what this picture depicts, it would probably be bigger than the patio.  The green blobs represent the landscaping we'd add around the pool and since we'd have to cut down one tree, we'd plant more along the fence for shade and added privacy.  And yes, that tree on the far left is flipping you off.

future backyard

Oh, and what's not pictured in the drawing is that the existing covered patio would be screened in.  So long, pesky mosquitoes! 

We have more big plans for the rest of the exterior of our house, but it'll be a while before we can check any of them off our list.  Who knew brick and concrete could be so dang expensive!?  For now, we're just gonna enjoy our nice little paver patio and perfectly edged flower bed.  Nothing like a little sweat equity to make you appreciate it even more, right?

Grout Upgrade

Ever since we moved into this house (almost two years ago!), I have hated the grout color in Katie Wynn's (and Thomas's) bathroom.  I have always thought it looked dark and gross.  Here, take a look for yourself.

before grout
before grout

Isn't that nasty?  Not to mention that the color was inconsistent across the floor.  

After reading this tutorial from Young House Love and seeing a couple other success stories (here and here), I felt pretty confident that I could give my gross grout an inexpensive face lift.  And with Matt's parents in town for the week to help take care of Thomas, now seemed like the perfect time to knock it out.  So I sent Matt to Home Depot after work on Tuesday to pick up a $12 bottle of Polyblend Grout Renew.  I told him to pick a light grey or putty color and he ended up bringing home Oyster Gray, the same color used by John and Sherry from YHL.  

He brought it home Tuesday evening and Wednesday morning I went to work in the bathroom!  I did not scrub my floors in preparation because A) I'm too lazy and B) the grout renew is supposed to be applied to dry floors and I was ready to get it done.  No time to let floors dry!

Still in my pajamas, I grabbed the bottle and a tiny paintbrush and crouched down to get started behind the toilet.  After doing one tile I was pretty sure I would not be knocking out this project in one day.  It took forever, and I was already hurting from contorting my body to get behind the toilet.  Thankfully, my pace picked up a little as I moved out into the open floor.  

Here are some progress shots.  

painting grout
painting grout

Three and a half hours later and I was finally done!  And in desperate need of a back and shoulder massage.  I think it was worth it, though.  My paint job is far from perfect up close, but who is going to get down on their hands and knees to inspect this bathroom floor?  Hopefully only our cleaning lady.  :)

Here are some side-by-side before and after pics.  Do you think the new color looks better?  I don't necessarily think it's the perfect shade for these tiles, but I still think it's way better than before!

before
after
before
after

The bottle of Grout Renew says it's a paint and sealer in one, so I have zero plans to add another separate sealer.  That means that BOOM, this home improvement project is DONE.  Which is a good thing since I need to move on to the next project.  This bathroom is undergoing a mini makeover so now I've got to get busy finishing some art work for the walls.

Nursery Wardrobe

We have made a lot of progress on the new nursery!!  For those of you that have not toured our home in person, here are some details about our house and the room that will soon occupy our newest family member.  We purchased our house as a four-bedroom house and if you count all of our family members (Me and Matt, Katie Wynn, Wyatt, and Anna), that means we are already at max capacity when it comes to bedrooms.  So where would we put our little man?  We did lots of brainstorming on bedroom arrangements - it didn't seem fair to have him and KW share a room since they're both here full time, but it also wouldn't be good for Anna and Wyatt to share rooms as opposite sex moving into their teenage and high school years.  And we definitely weren't ready to move KW upstairs so putting A and W together to clear a bedroom wouldn't really have helped anyway.  

So, we decided to turn our office into a new nursery.  What office?  Right.  It has never been pictured on this blog because it has never been used!  I have said since the day we moved in that it would eventually become my craft room (aww, yeah!) but fixing it up and adding cabinetry was loooooow on the priority list.  So for the most part, it has held junk for the past 18 months and pretty much served no purpose.  

Here's how it looked right when we moved in...this is where we unloaded all of our "decorations" - things like picture frames, candles, vases, and all the junk we didn't know what to do with.  What a mess!

office before
office before

As for where this is in our house, it's right up front off the entry hall.  In fact, it's right across the entry hall from the dining room that I just wrote about.  Not necessarily the most ideal place to put a brand new baby, but we figured we could make it work.

You know what I have always thought was really weird about this room?  The previous owners used it as a formal sitting room that also housed a mini grand piano and it has two nice french doors with glass panels that open into it.  So kinda a formal-ish room...yet it's the ONLY room in the house that didn't have crown molding.  Isn't that bizarre?  

Ok, so obviously the biggest problem about using an office as a nursery is that it didn't have a closet.  We figured that was just as good as any place to get started!  We called Cesar, the skilled trim carpenter that did our mudroom cabinetry, and got on his schedule as soon as possible!  I think I've already shown you these drawings but this is what we gave him as our inspiration.  I had drawn out my vision on a piece of paper at work one day, and then that night Matt and I tried to draw it to scale on the wall (albeit with VERY crooked lines!).  (And yes, that's five outlets right in a row on that wall.  Who knows?)

wardrobe sketch
wardrobe sketch

I met with Cesar one afternoon and he spent about thirty minutes measuring everything out so he could price his materials and give us a price.  The price was right so we told him to come on over and make it happen!  Luckily for us, he had a spot open in his schedule the week we were at the beach on vacation.  My mom and oldest brother, Nick, took turns letting him in and stopping by the house to check on his progress.  I loved receiving pictures of the transformation that was happening while we were gone!  

End of day one...and you can see it matches up pretty closely to my drawings! :)

End of day one...and you can see it matches up pretty closely to my drawings! :)

End of day two - trim has been added and construction is done!

End of day two - trim has been added and construction is done!

From the pictures, it looks like most of the work was completed on the first day.  But, the wall unit was only half the work.  In addition to adding trim on the second day, Cesar also made all of the doors, shelves, and drawers.  If you look closely at the top left corner of the Day Two picture, you can see that Cesar also added crown molding to the rest of the room.  Fixed that weird little problem!

doors
doors

We were thrilled to get to come home to finished construction, except that it meant it was now our turn to get to work.  Despite the sinus infection I was fighting, duty called and we got busy painting!

I spent Friday morning prepping the wall unit for paint...lots of nail hole filling and caulking up seams.  By lunch time, it was ready to be primed and my rockstar Mama came over to lend a hand!  The picture below on the left shows how far we got before running out of primer.  Agh!  So frustrating to be so close to being done and have to stop to get more paint.  I made a quick trip to the store and was able to finish the coat of primer before Matt made it home from work.

primer
primer
little helper

I did not do a very good job of taking progress pics throughout the weekend.  The big kids - especially Anna - were a great help in keeping Katie Wynn occupied so that Matt and I could paint both Saturday and Sunday.  She and Lolli both were very curious about what we were doing.  Thankfully, we only had to clean up one set of white painted doggy prints across the wood floors!

It took two coats of white paint after the primer and then we still had a few touch-ups to do.

finished painting

Painting the huge wall unit was actually the EASY part of the job.  The hard part was the seven drawers, four shelves, and ten doors that had to be painted.  That part was hard because, since there were so many pieces and our indoor space was limited, we had to do them in shifts.  Plus, every side and edge had to have a coat of primer and two coats of paint.  Ugh.  We laid out the drawers and shelves and painted them as we painted the wall unit, so they weren't too bad.  Once all that was done, we were pretty excited that we only had ten doors left to go.

Of course, that's when the stomach bug from hell hit.  

I returned home from the hospital late Wednesday afternoon and Cesar was scheduled to arrive out our house early the next Saturday morning to hang all the doors, add hardware, etc.  We had no choice but to push onward and keep painting.  Matt was a superstar and was able to get the backs of all the doors primed and painted while still taking care of me.  We primed the fronts together and then by Friday afternoon, I had enough energy to get them painted while he was at work.  (That's kind of a lie as it totally wore me out, but at least they were done!)  The paint was barely dry when Cesar arrived Saturday morning!

We were pretty limited on the hardware we could select because of how he put the trim on the drawers, but we found some that we thought would work at Home Depot.  I was naive and thought he'd be able to finish everything up in about an hour on Saturday.  He and his brother were at our house working for five hours!  I'm just glad it was them hanging the doors and not me...I can't hang a door straight to save my life.  :)

The finished wardrobe!!  (Well, except for the face plate that goes on that outlet...)

wardrobe

Here's a view of the inside of the side cabinets.  Each one has two shelves at the bottom right now, but they are removable and adjustable, so who knows how they'll actually end up.  Oh, and these pictures were taken after we'd painted the walls khaki.  

closet
closet

We painted the built-ins and the walls ourselves but hired painters to paint the ceiling and the rest of the trim work.  They just finished painting yesterday afternoon so I'm pumped about getting to start putting this room together!  And I can finally hang some tiny boy clothes into those brand new closets!  I am not by any means ready for this little boy to grow up, but man-oh-man I can't wait for this to eventually become my craft room...SO much storage!!!  One day...

Here are some sneak peeks of a few things I recently purchased for the room.  The rug and mirror were both super scores at Home Goods.  If you look closely at the mirror you can see that it has slid down in it's frame - I was able to weasel an extra discount for that "flaw" even though I knew it would be a simple fix.  :)  Also in the mirror's reflection you can see a rope lamp...that came home with us too!

mirror
rug

We officially have a changing table too!  Now, the DIY-er in me would much rather have found a cool piece of furniture to refinish and use as a changing table like we did for Katie Wynn's room, but the very tired, pregnant part of me saw this changing table for the low, low price of 25 bucks at Bargain Hunt and said it'll do.  :)  The baskets on it were another Home Goods find and I've since added two more coordinating ones to the bottom.  

The chair is one that we already had.  It was a red stationary chair that sat in our little sitting nook at our old house, but has been in the attic since we moved here.  We added a swivel glider base to it, had it recovered (along with a storage cube ottoman) and just like that we have a nursery-appropriate rocker!

changing table
rocking chair

Mom has been furiously sewing away on the curtains and bedding, so hopefully we'll be able to add them to the room soon.  There are days when I think we have done so much and this room is practically done, but then I remember that we only have 6 weeks left and I haven't even started on the craft projects I want to do.  Eep!  Better get busy!