Repurposed Door

This is a quick project we did for our family friend, Leslie.  Actually, it took us about a full year to get it done for her, only because we drug our feet getting started on it.  Once we got started, we were done in a week! 

A year or so ago, Leslie got a new front door for her house.  And since her late husband had designed the stained glass window in her old door, she didn't just want to throw it out with the trash.  With the new door installed, the old door immediately made it's way to our wood shop with the intentions of somehow becoming a table.  Dad removed all the hardware and cut the door in half...and that's where we stalled.  (And I stupidly forgot to take a picture of the door before we got started.) 

The door was solid so it was incredibly heavy.  We couldn't come up with a table design that didn't add a bunch of bulk to it and make it even heavier.  That's why we kept pushing this project to the side. 

Last summer, Leslie had a new carport and screened patio built at her house.  It was her idea to just turn the door into something that could hang in the breezeway.  Done!  That was an idea we could work with.  :) 

before
before
photo 1.JPG
before

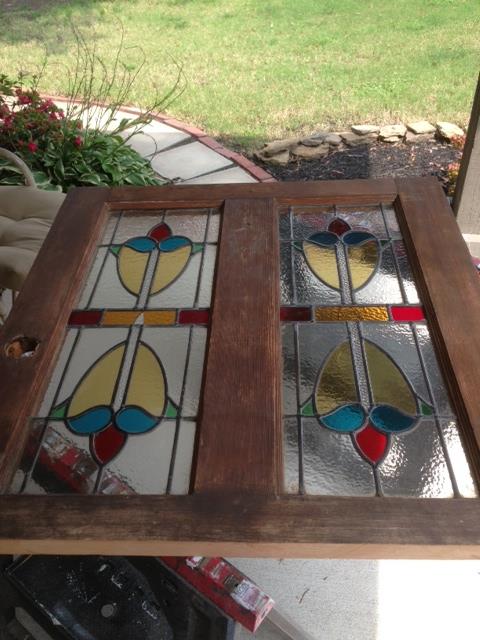
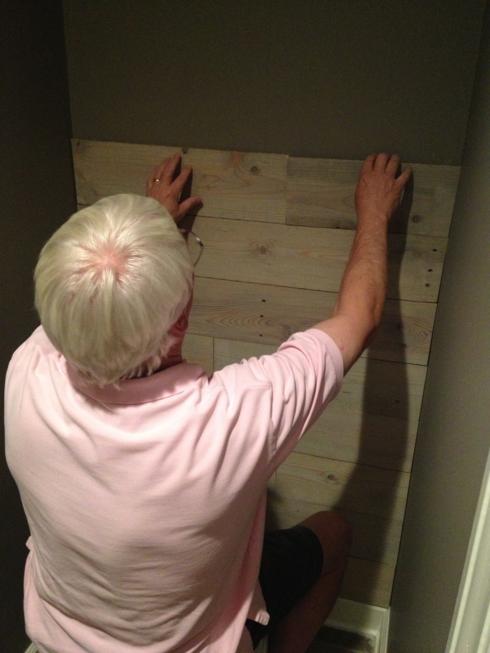
After years spent out in the elements, the wood was looking a bit...dehydrated.  The stain glass was still in really good condition, but the wood needed to be spruced up a little bit.  Also notice in the top two pictures above how the edges were not very pretty.  Our plan was to trim the half-door out in new wood to give it a more finished look.  

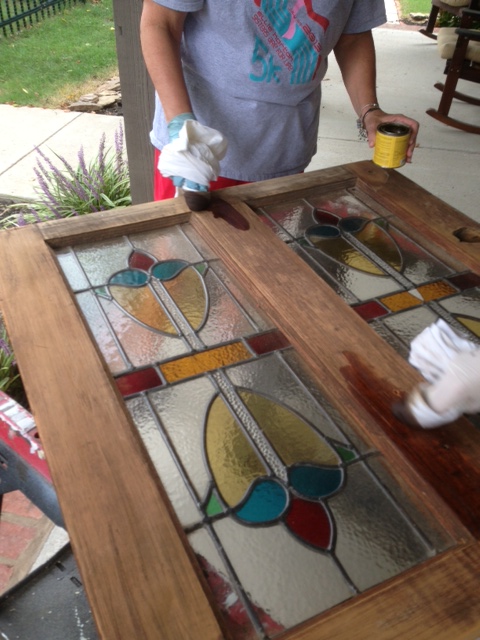
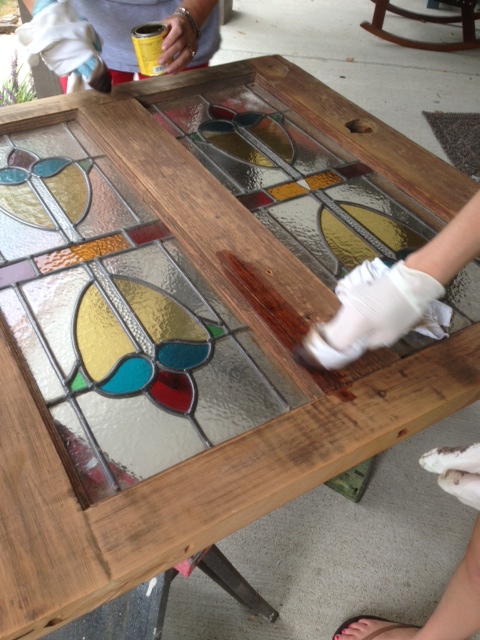
After I sanded the wood all over, Mom and I got to work giving it a new coat of stain.  It instantly brightened up the color! 

staining
staining
staining

Dad and Matt cut the trim boards down to size.  We used simple 1x3 boards and pieces of quarter-round trim to finish it off.  Since they were new white pine, we had to stain them to match the door so they would blend in.  (Sorry, no pictures...I stopped taking them at this point!) 

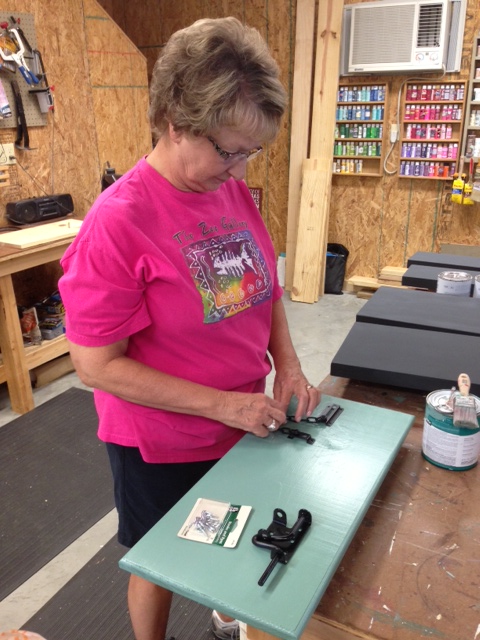
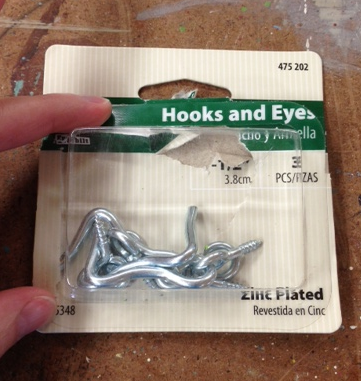
Before taking it over to Leslie's house, we put some of the original hardware back on the door and added hooks and chain to the top so it could hang.  We love the way it turned out and hope that she does too!  Doesn't it look great hanging in her carport breezeway? 

after
after

Here are a couple close-ups of the newly added trim.  I think we did a pretty good job of staining them to match.  (Stain experts we are not!)  Putting these boards around the outside really made it look more finished. 

trim
IMG_3933.JPG

Probably my very favorite part of this repurposed door is the original door knocker that we put back on.  Love that it has their last name engraved on it!

door knocker

Now I wish I had an old stained-glass door of my own so I could make one for my house too!  Don't be so quick to throw away your old stuff...never know what you could turn it into.  :) 

after
after

Pallet Board Wall

Remember back when I told you how to put a shelf on it and then said I'd be right back to tell you all about the wall I put said shelf on and then disappeared for, like, a month?   

Yeah, sorry about that.   

Guess what, though.  I didn't forget.  I'm finally back to tell you about that wall. 

It all started when I saw this picture on pinterest and the wheels in my head started turnin'.   You already know I love a good plank wall and all things distressed, so using old pallet boards on a plank wall was right up my alley.  I loved the muted colors in the wood in this picture and especially the grey undertones.  And it just so happened that we had a half bath that could use some sprucing up...

via

When I get an idea in my head that I'm really excited about, I develop a one-track mind and start moving full-steam ahead.  In less than 48 hours, I had a pile of pallets delivered to our house...for free!  Gotta love having connections.  :)  (Thanks, Kim!) 

Slight problem with the f-r-e-e pallets, though.  They were brand new.  As in, the wood wasn't worn at all.  They were also really, really rough.  So rough that I think I got a splinter just by looking at them.  So it wasn't going to be as easy as just taking them apart and slapping them up on the wall.  A little pre-work was required. 

My dad worked on pulling the pallets apart for me.  I pulled up at his house one Saturday just after he'd finished the first one.  It took him over an hour!  After watching some YouTube videos of how to correctly dismantle a pallet, we were able to hammer the other ones apart much faster.  Thank goodness or this project still may not be done!  

A couple Christmases ago, we gave my Dad a wood planer for his wood shop.  It doesn't get used very often, but this was the perfect project for it.  We were able to run all the pallet boards through it and turn them from incredibly rough to nice and smooth.  That made a HUGE difference.  I wasn't so sure we were going to be able to use the boards in their original state, so I was really glad running them through the planer worked. 

Even after smoothing them out, they were still brand new wood.  (In case you can't tell, I forgot to take "before" pictures of my pallets.)  I really wanted those grey undertones so I went shopping for some stain.  At Lowe's, I found a sunbleached stain by Rustoleum that was perfect!   My husband stepped up for the staining part.  (I'm quickly learning that I have to do a lot of sweet-talking to get projects done these days since someone always has to be on baby duty too.)  He put two coats of stain on all the boards and then we were finally ready to put them up in the bathroom!

I think it was the evening of July 3rd when we installed it.  I remember because we didn't have to work the next day (4th of July holiday) because we didn't really even start working on it until after I'd put Katie Wynn to bed for the night.  As we ate dinner, the three of us (me, Matt, Dad) talked through the plan.  We were pretty sure we were going to be able to remove the tank of the toilet but the leave the seat in place and still get the boards in behind it. 

We used liquid nails to glue the boards to the wall and then nailed them in with the nail gun too.  I think we were all really nervous when the first one went up.  It won't be pretty should we ever decide to pull these down!  It would probably require re-sheetrocking the wall so the boards are here to stay for a while! 

As the second board went up, Matt turned to me and said: 

When we got married, I didn’t really think we’d ever be standing in the bathroom together watching your Dad sit on the toilet.

Then shortly after he said that, I texted this picture to my mom.   No maintaining-three-feet-of-personal-space for this project!

IMG_4779.JPG

After the first couple of boards were done, we really got into a groove and it started going up quickly.  My job was to cut the boards to length out in the garage (while fighting off mosquitoes and June bugs!)  and decide the pattern of the boards (we alternated between one full-length board across and two boards pieced together).  Matt then applied the liquid nails and then handed the board off to my Dad who nailed them in place.  All while never waking the baby.  :)

IMG_4780.JPG
IMG_4783.JPG
IMG_4786.JPG

In the picture above on the far right, you can see that when we made it to the ceiling, we were left with a sliver of space too narrow for a full board.  We measured it out and then sent my Dad home to cut it to size on his table saw.  Waiting for him to come back was probably the longest part of the whole project and he only lives 5 minutes away!   

I guess I forgot to take a picture of just the wall by itself before putting a shelf on it.  Here's my side-by-side before and after pictures like the Pinterest inspiration above. 

IMG_4876.JPG

It's been over two months now since we installed the pallet wall and I still love, love, love it!  More pictures of the complete bathroom redo coming next.  Promise.  :) 

Latch Board

Last week I made a new toy for Katie Wynn.  In all honesty, she's probably too young for it, but this toy is going to live at my parents' house and I have a feeling all of KW's cousins will enjoy playing with it too.  It's the perfect thing for us to keep out in my Dad's woodshop so that when the adults are building or painting or refinishing, the kids have something to do. 

The toy is a latch board, like this one that John and Sherry did on Young House Love

I used a piece of scrap wood that we already had, so the only thing I had to buy for this project was a whole bunch of latches.  I probably could've scrounged around the woodshop to find old ones but when I originally planned this it was gonna be a birthday gift for someone so I bought new ones.  (And obviously I ended up buying something else for the birthday gift.)  I chose to go with latches in different finishes to mix it up a little and I got them in bigger sizes than what John and Sherry used. 

After cutting the scrap board down to size, my mom put two coats of paint (on both sides) on it for me.  Then, the hardest part of this whole DIY was figuring out the arrangement of all the latches.

1.JPG
2.JPG

I had randomly grabbed this package of hook and eye closures to use in as filler if we needed them.  I'm glad I did because we ended up using all three of them in blank spaces.

3.JPG

After getting the arrangement figured out, then it was just a matter of screwing them all in place.  Easy peasy!

Latches closed...

Latches closed...

Latches open!

Latches open!

To finish it off, I adhered some small bumpers on the back so that the wood wouldn't scratch up any floors.  I know I said this toy was for out in the shop but I couldn't resist taking it inside to see what my little girl thought of it. 

7.JPG
8.JPG
9.JPG
11.JPG

So far it's a hit!  And I think she'll only grow to love it more when she figures out how to work the harder latches.  Right now, she's perfectly content with flipping the hinges back and forth.  :)  Yay for quick and easy projects!

Put A Shelf On It

As you probably know from reading this blog, I love a good room makeover.  And I've realized that when I'm working on rooms, one of my go-to decor items is a shelf to hang on the wall.  Who doesn't love a place to display cute things? Let's go ahead and queue up some Beyonce for this post..."If you like it, then you prob'ly put a shelf on it..."

You can buy a wall shelf practically anywhere.  But why would you when they're so darn easy (and cheap!) to make?  I think the first one I did was for my friend Kim's room.  This picture isn't great but I LOVED how the distressed blue turned out on it.

Shortly after Kim's shelf was hung, my mom demanded requested we make one for above her bed.  Again, you can't really tell in the picture, but hers is a distressed black to match her black and brown furniture.

shelf.jpg

Last summer we made another shelf and painted it pale pink for Katie Wynn's nursery.  It's the perfect place for little pink shoes!

IMG_8174.jpg

And then this winter we made two matching shelves for our favorite little twins.

So last weekend when we were wrapping up our mini bathroom renovation (pics coming soon!) and I was hunting for something to hang on the wall, I thought, duh! I'll make another little shelf.  Perfect for a bathroom!

I thought I'd take pictures along the way so that you guys can give your walls some shelf lovin' too.

Here are the supplies I started with from left to right: one 1x6  (I usually use a 1x4 but wanted a wider shelf this time) one 1x4 three different moldings in varying sizes

1.jpg

The first thing I did was figure out how long I wanted the shelf to be (about shoulders' width) and cut my 1x6 to length.  I also cut two pieces out of the 1x4 the same length.  I used a miter saw but you could use a hand saw if it's all you have.

2.jpg

Next, I nailed the three boards together in a U shape, making sure the 1x6 was on front of the 1x4s.  (That probably doesn't make sense, but see pictures below.)  You could do this with just wood glue, but you'd need to clamp it and wait for it to dry before moving on.

3.jpg
4.jpg

I measured the openings on the ends and cut two more pieces of my 1x4 to fit inside.  Then I just nailed them in place.  At this point I basically had a long rectangular box with no lid on it.

5.jpg

You could totally stop here if straight lines are your thing and you just want a boxy shelf.

6.jpg

I wanted to fancy mine up though, so I got busy cutting my molding.  I started with my widest piece and cut it into three pieces that would wrap around the shelf.  I mitered my edges so I used the miter saw again, but a miter box would work too.

7.jpg

This picture is just so you know what mitered edges are.  They're cut at an angle instead of meeting at 90 degrees.

8.jpg

Once the pieces were cut to the right size (I always remind myself here that wood putty is my friend!), I tacked them with nails around the top edge of the shelf.  Wood glue would work here too, just clamp and let dry.  In this picture, the open side of the box is now in the back.  That's the side that will eventually go up against the wall.

9.jpg

I always attach my trim just a little bit above the top of the shelf to create a little lip.  This keeps items on the shelf from rolling off.

10.jpg

You could stop here too if you wanted - that's where I stopped on all the shelves pictured at the top of this post - but I wanted to fancy mine up a little bit so I kept going.  I cut my next piece of molding to fit the shelf and bumped it up right underneath the top piece.

11.jpg

And just for fun, I decided to add one more piece of trim.  I wanted something with lots of curves because the wall I planned to hang it on has lots of straight lines.  Instead of bumping my third piece of trim up against the other two, I lined it up with the bottom of the box.  You can see in the picture below that there is a small gap with no molding.

12.jpg

My apologies, but this is where my step-by-step pictures fall off a little.  I must've gotten excited about the end product and forgot to snap pics along the way.  The last step in the "construction" face is to wood putty all the holes and imperfections, let it dry, and then sand it smooth.  Wood putty can hide lots of boo boos!

Later, I painted the shelf a solid blue-green color.  I had a specific look I was going for though (I was trying to match something I already had) so leaving it with just that solid coat of paint wouldn't work.  After it dried, I barely roughed it up with some sandpaper.  Just enough for the wood to show through in a few spots, but not crazy distressed.  Then I started adding a brown glaze to it.  In the picture below, I've started adding the glaze to the left side of the shelf.  The right side is just the paint that has been sanded a little.

13.jpg

The top of the shelf before glaze was added.

14.jpg

Bottom of the shelf that has already been glazed.

15.jpg

Shoot.  I'm kicking myself for totally slacking on the pictures after this.  You'll just have to imagine it from here on out.  I glazed over the whole thing, wiping it off and adding more until I got the finish I was going for.  Once it was dried, I added a coat of water-based polyurethane.

To hang the shelf, you have to put a cleat on the wall.  It's important to make sure whatever you're using for your cleat fits inside the back of your box/shelf.  I used a 2x2 that was cut about 5 inches shorter than my shelf.  After deciding where I wanted the shelf to hang, I screwed my cleat into the wall, making sure to hit at least one stud.  Then, I placed the shelf over the cleat and screwed two short screws down on the top of the shelf attaching it to the cleat.  Make sure you use screws instead of nails so you can eventually remove it without killing your walls!

Here's the final product this time!  Ignore what's sitting on top of the shelf...I haven't figured out what I want up there yet.  But the curvy lines look good, no?

16.jpg

Details coming soon of our bathroom makeover!

DIY: Four Frames

Confession: I started this DIY project when I was still pregnant.  My baby is eight months old now so yeah, it's taken me a while to get it finished.  Oopsie. If you've been reading for a while, you may remember that when we were preparing to move into our current house, I said the only two rooms I was focusing on were the nursery and our master bedroom.  Well, the nursery was a success.  As for the master, I bought new bedding and that's about it.  The bedding colors were really hard to match and I was running out of steam.

One afternoon I decided I'd just make some frames out of scrap wood and paint them to match the bedding.  Most everything in our room is a neutral gray except for the pops of color in our pillow shams, and I wanted to bring those colors out somewhere else.

I found some scrap wood and cut it down to 16 boards of equal length (four boards for each frame, four frames total).  I angled the edges using our miter saw and then used a kreg jig to attach them on the back side of the frames.

The saw blade on our miter saw is not the best for this step, so wood putty is always my best friend.  Fill those cracks and no one will know any different.

Here's the view of the front after all four pieces had been attached and the seams wood-puttied.

Next, I dug out some scrap molding and cut it down to size.  I only had three different styles so two are just alike.  I mitered the edges the same way as above, but for these I just used wood glue to hold them together.  They are slightly smaller than the opening of the frame above.

My next step was to put a base layer of paint on each of the 8 frames (4 large frame bases, 4 frames of molding).  I had already had some paint color-matched to our pillow shams and brushed a coat on each piece.  I must've been too lazy to take a picture of this step.

That's when I hit the pause button.  For a really long time.  Like, long enough to have a baby and her grow for about 6 months...

Finally, I revisited this project so I could finish it.  My plan all along had been to stencil some designs on each frame so they wouldn't be so plain.

I started with the dark teal frame and used white paint to stencil on a leopard (cheetah?) print.  Don't judge.  I was limited in my stencil choices.

As you can see, I'm not a very good (read: patient) stenciler and had a lot of bleed through.  Not a big deal since I was also planning on doing some sanding in the next step.

Since I didn't really have any other good stencils, I taped off some stripes with painter's tape on the lighter blue frame.  I painted the stripes with white paint.

I also taped stripes on the white frame and painted on some tan stripes.

For the fourth and final frame, I used a sponge stencil and added white diamonds to the tan frame.  This one drives me nuts because I didn't get my spacing centered.  Gah!

The molding frames just stayed a solid color.  After the stenciled designs were dry, I gave all four frames a good sanding to distress them a little bit, and then glued the molding frames onto the base frames.  The molding frames being just a little bit smaller than the opening in the big frame created a little lip to hold in a picture.

I switched up the colors when I added the molding so that they'd all coordinate.

After sanding and adding a quick coat of polyurethane.

To finish them off, I added a claw picture hanger to the back of each one.

There was another pause that lasted about a month until I finally got around to hanging them up in our room.  To get my spacing right, I rolled out a long piece of brown craft paper and lined them up on it.  I used a ruler to make sure they were centered and evenly spaced.  Once they were in the right spot, I traced around them and added a dot where the nail should go.

Just as I was finishing marking the last one, my little helper came in to show me how she would do it if it were her project.  I didn't have the heart to tell her that was a pretty dumb way to figure out picture frame spacing.

I hung my brown paper on the wall and let gravity help me get it hanging straight.  That wrinkled part at the bottom was my helper's contribution.

Since I had marked my nail holes on the paper, all I had to do was tap four nails in directly through the paper.

Then I just ripped off the paper and hung the frames up!  I don't love, love them but I'm ok with them.  I do love that we finally have something up on the wall and that it adds some color.

At some point, one of my helpers (my money's on the furry one) ran off with one of my cardboard backing squares.  That's why the second one down is empty.

I suppose the very last step is to put pictures in the frames.  Nope, still haven't done that, even though they've been hanging up for about three weeks now.  I just can't decide which ones to use!

And I still owe you a tour of our room, especially since it's where we spend the majority of our time.  It's far from finished, but I guess I could do an in-progress post.  Maybe I'll work on that this week...